
 Integrate Microsoft Teams with Atatus
Microsoft Teams is a popular real-time messaging tool for team communication. With the Atatus integration, your team is notified in a Teams channel when an incident opens — and, with the bot-based methods, you can acknowledge and resolve incidents directly from the Teams message.
Choose an integration method
Atatus supports three ways to connect Microsoft Teams. Pick the one that fits your setup:
| Hosted bot | Custom bot app | Incoming webhook | |
|---|---|---|---|
| Best for | Most Atatus Cloud customers | Self-hosted (on-premise), or running the bot under your own Azure app | A quick, one-way notification into a single channel |
| Azure setup | None | You register your own Azure app | None |
| Acknowledge / resolve from Teams | Yes | Yes | No (notifications only) |
| Setup effort | Lowest | Highest | Low |
The hosted bot is recommended for Atatus Cloud. Use a custom bot app when you run Atatus on-premise, or want the bot to run under your own Microsoft Entra (Azure AD) app. The incoming webhook is the simplest option, but it only posts notifications — it cannot acknowledge or resolve incidents.
Method 1 — Hosted bot (recommended)
With the hosted bot, you connect your Microsoft tenant to the Atatus app in a couple of clicks — no Azure configuration required. A Microsoft administrator approves the app once, and Atatus can then post to your channels and receive acknowledge and resolve actions.
Connect your Microsoft tenant
- In Atatus, open Integrations, select Microsoft Teams, and go to the Configure » Tenants tab.
Click Add tenant. You are redirected to Microsoft to sign in.
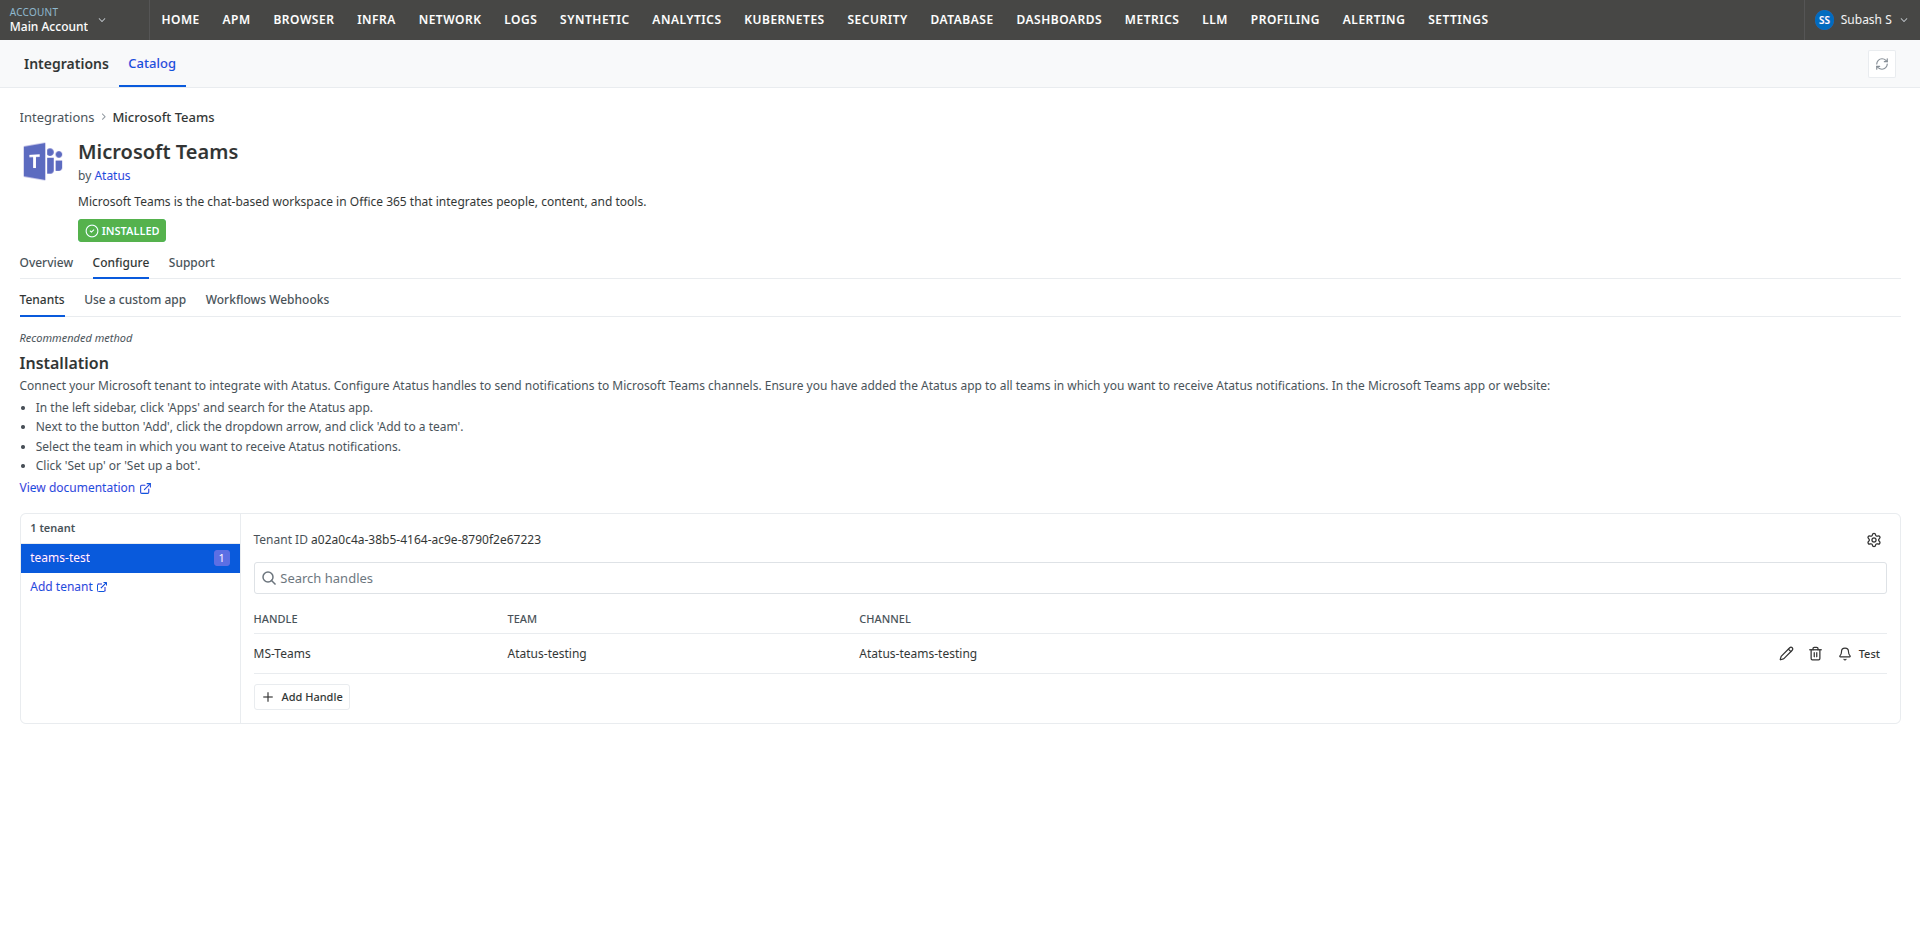
Sign in with a Microsoft Entra (Azure AD) administrator account and approve the requested permissions. Only an administrator can grant this consent for the organization.
After you approve, Microsoft returns you to Atatus and your tenant appears under Tenants.
The permissions Atatus requests are used only to list your teams and channels and to post messages. Atatus never reads your Teams conversations, chats, or files.
Add the Atatus app to a team
For Atatus to post into a channel, the Atatus app must be added to that team:
- In Microsoft Teams, open Apps, search for Atatus, and choose Add to a team.
- Select the team you want to receive notifications in, and click Set up.
Add the app to the team (not a single channel) — the bot can then post to any channel in that team.
Next, choose which channel receives alerts — see Send alerts to a channel below.
Method 2 — Custom bot app (bring your own)
Use this method if you run Atatus on-premise, or you want the Teams bot to run under your own Microsoft Entra (Azure AD) app. You register an app in your Azure account, then enter its credentials in Atatus.
Throughout these steps, replace <your-atatus-host> with the address of your Atatus deployment (for Atatus Cloud, this is your Atatus dashboard URL).
Step 1 — Register an Azure Bot
- In the Azure portal, go to Create a resource » Azure Bot.
For Type of App, choose Single Tenant.
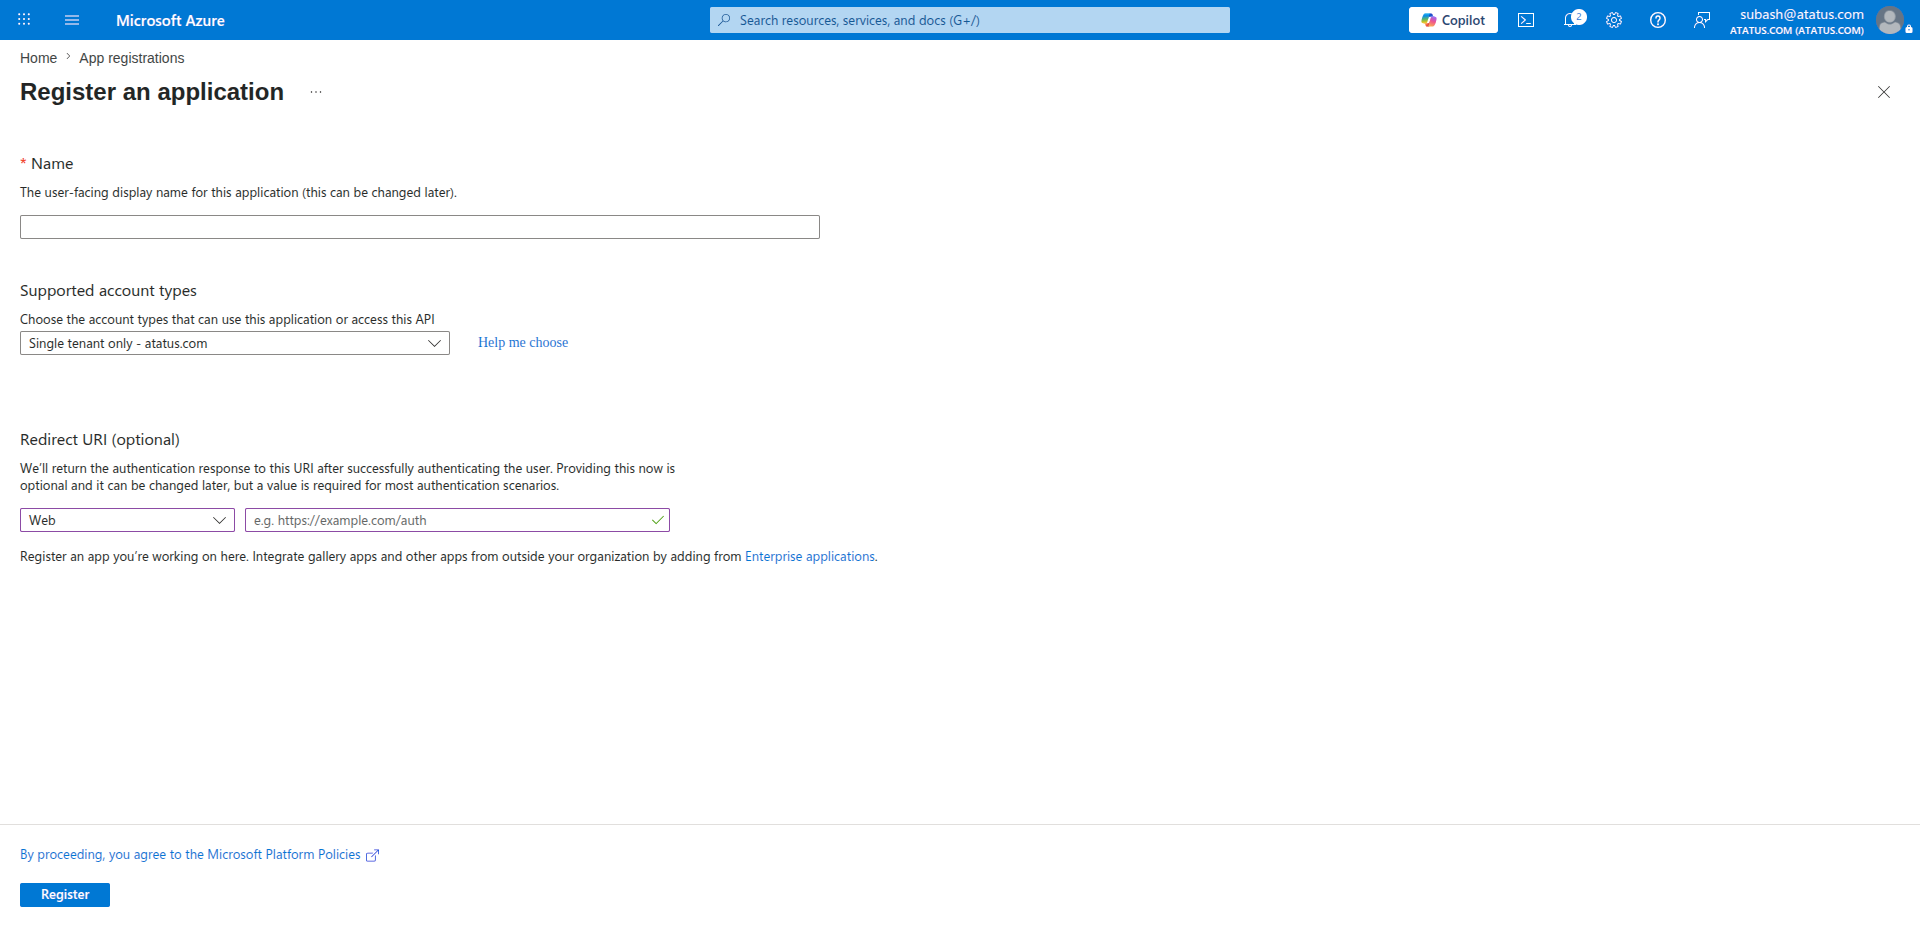
Once the resource is created, open it and note the Microsoft App ID — this is your Application (client) ID.
On the app registration, open Certificates & secrets and click New client secret.
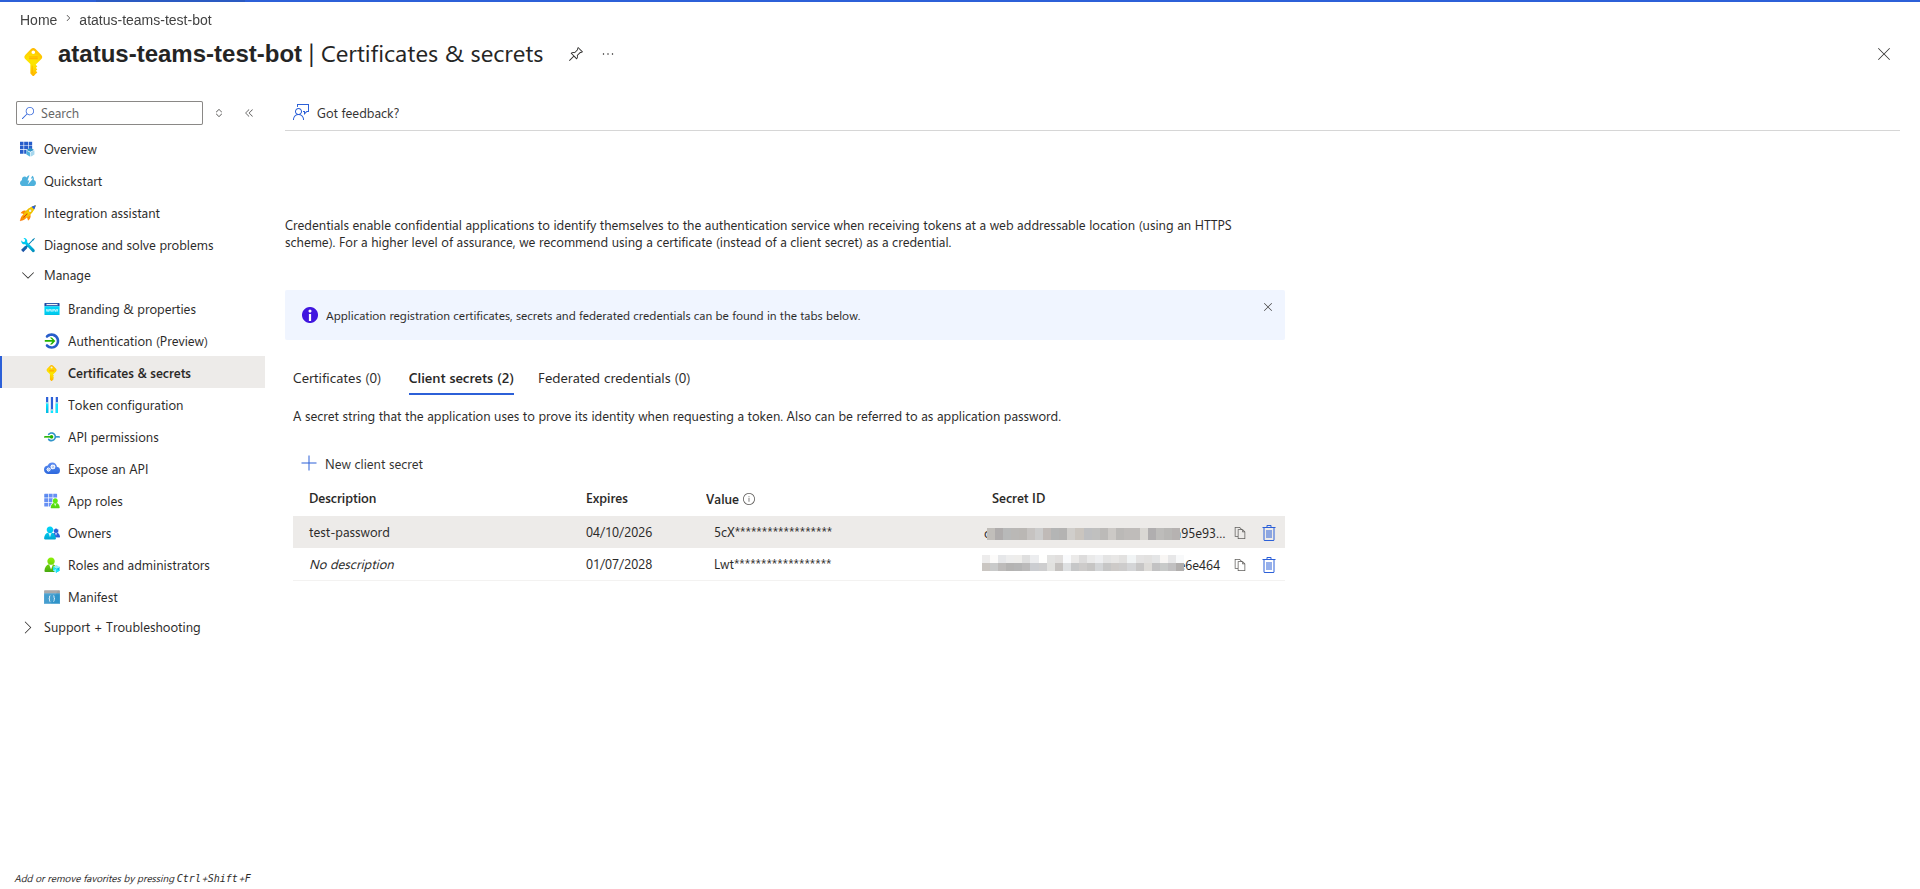
Give the secret a description and an expiry, then click Add.
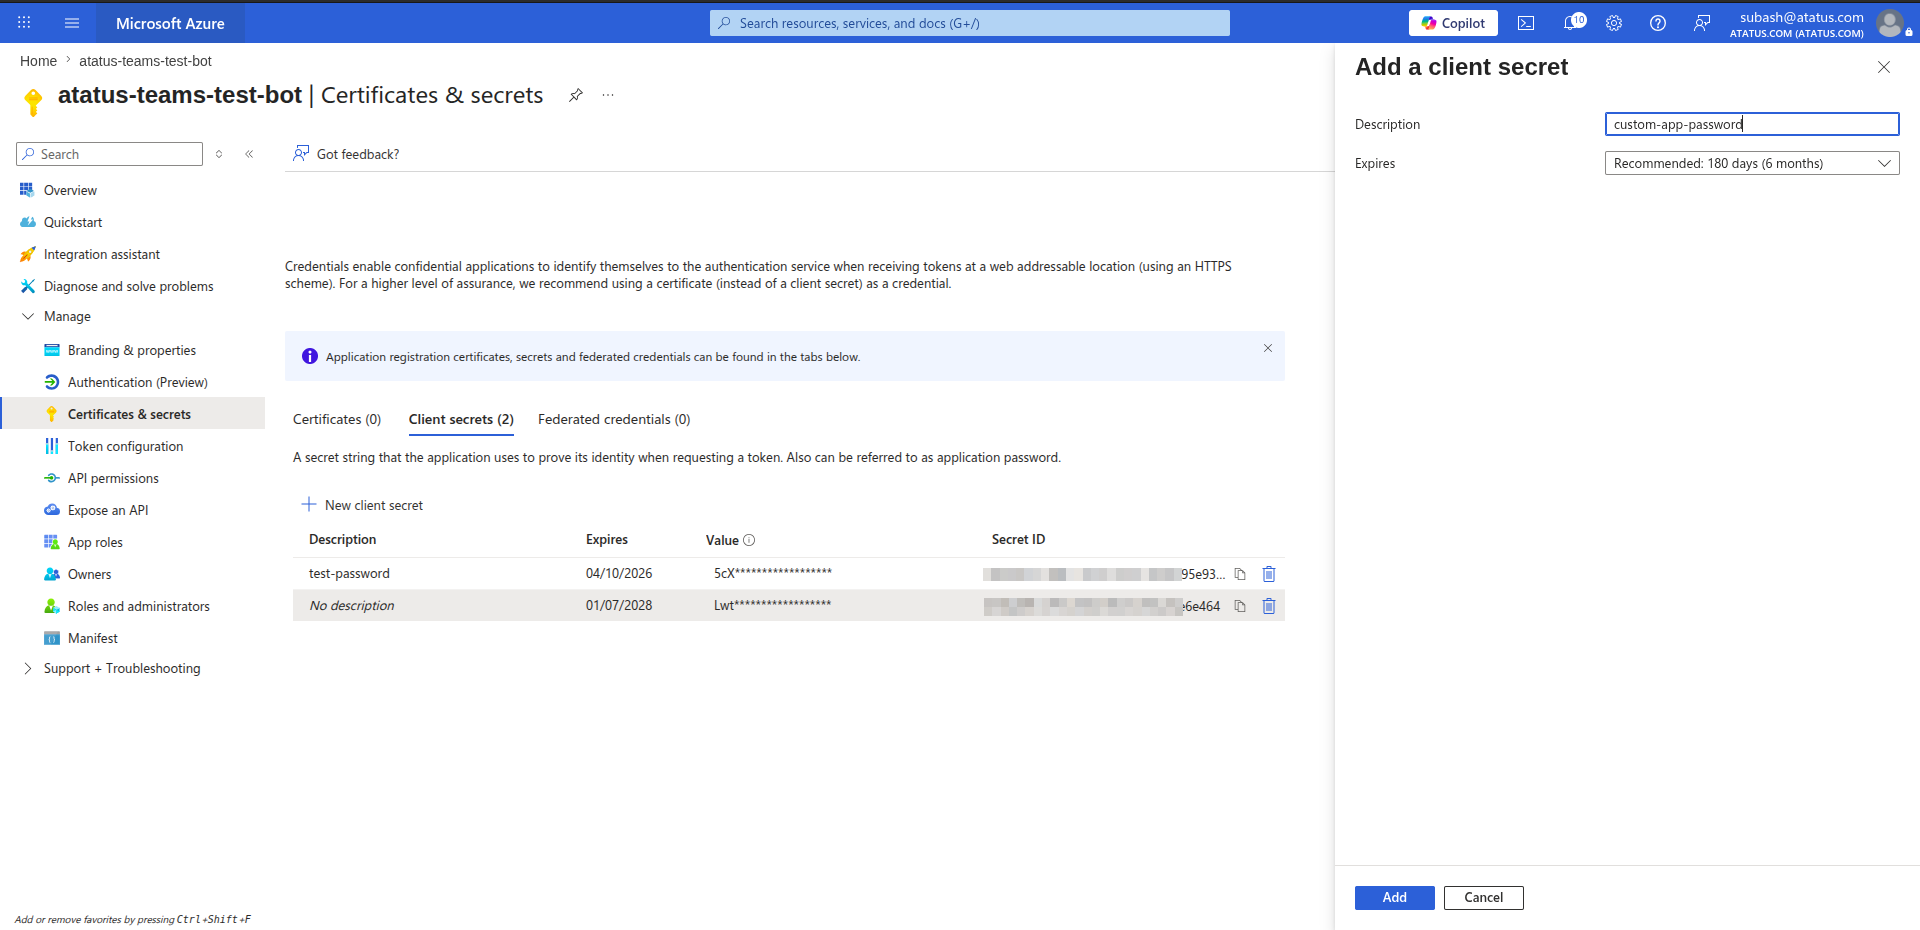
Copy the secret's Value immediately (it is shown only once) — this is your Client secret.
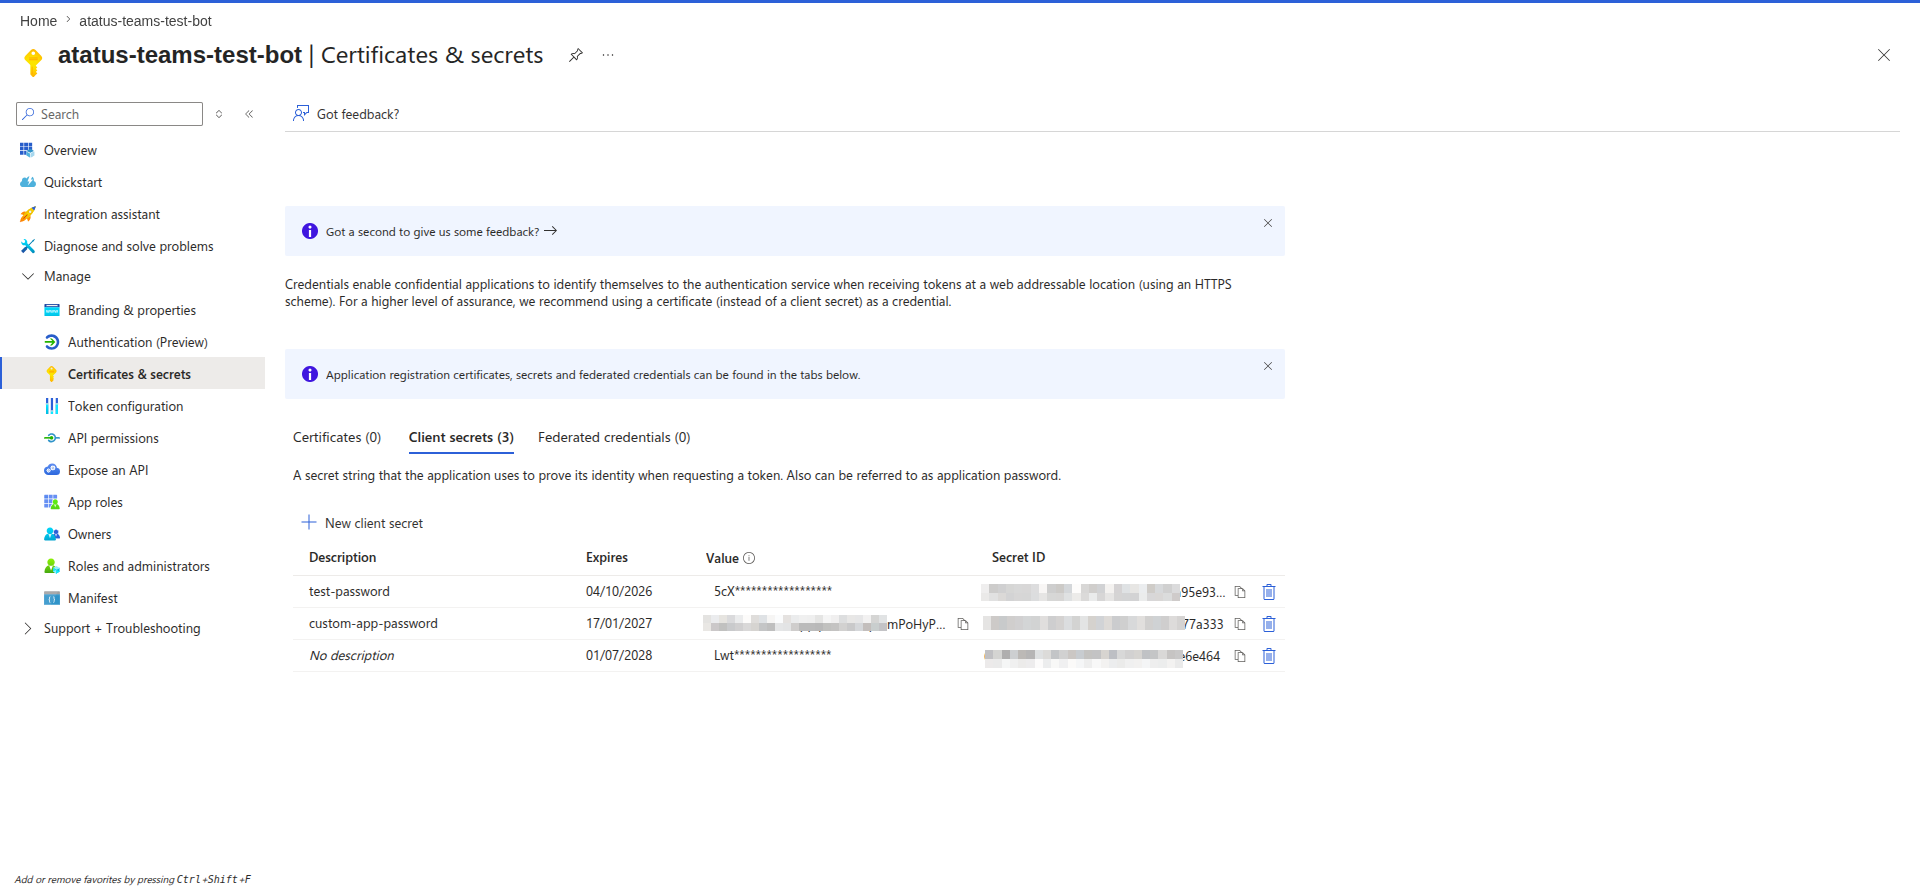
In Microsoft Entra ID » Overview, note your Directory (tenant) ID.
Copy the client secret's Value, not its Secret ID. The Value is shown only once; if you lose it, create a new secret.
Step 2 — Set the messaging endpoint and enable Teams
In your Azure Bot, open Configuration and set the Messaging endpoint to:
https://<your-atatus-host>/integrations/teams/messages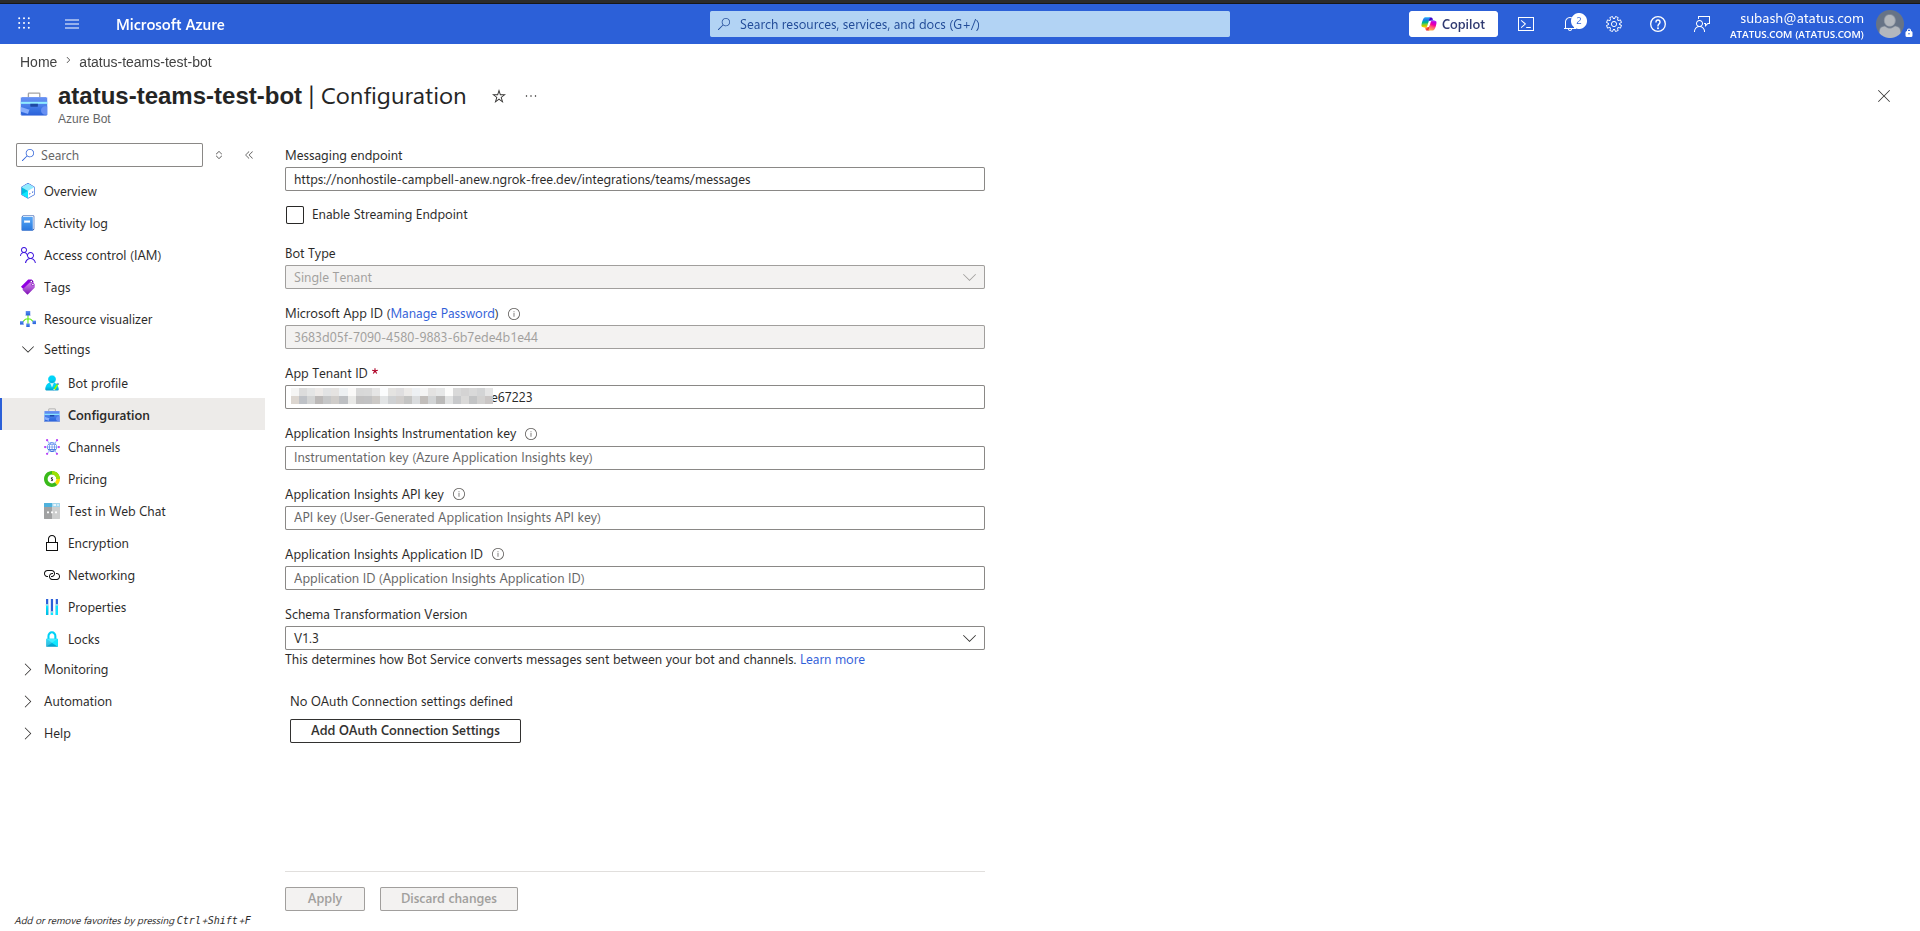
Open Channels and enable Microsoft Teams.
Step 3 — Grant Microsoft Graph permissions
So Atatus can list your teams and channels:
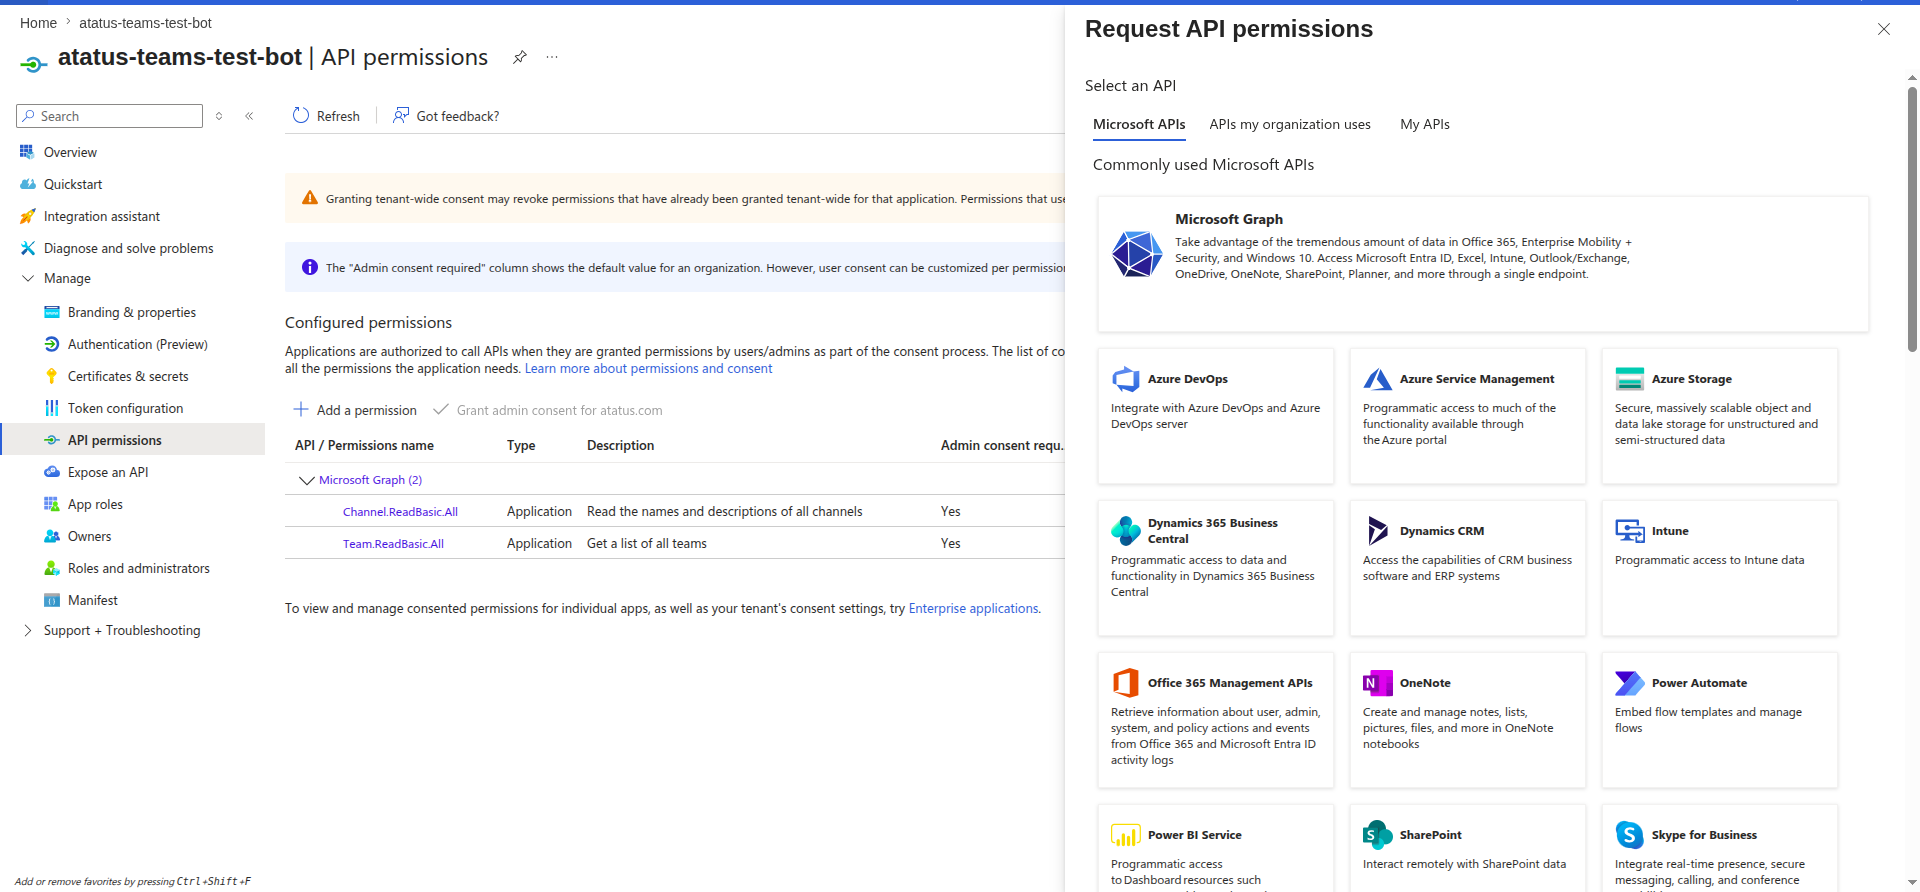
- On your app registration, go to API permissions » Add a permission » Microsoft Graph » Application permissions.
- Add
Team.ReadBasic.AllandChannel.ReadBasic.All. Click Grant admin consent for your organization.
Step 4 — Add redirect URLs
These let you sign in to link your account and grant permissions later:
On your app registration, go to Authentication, click Add a platform, and choose Web.
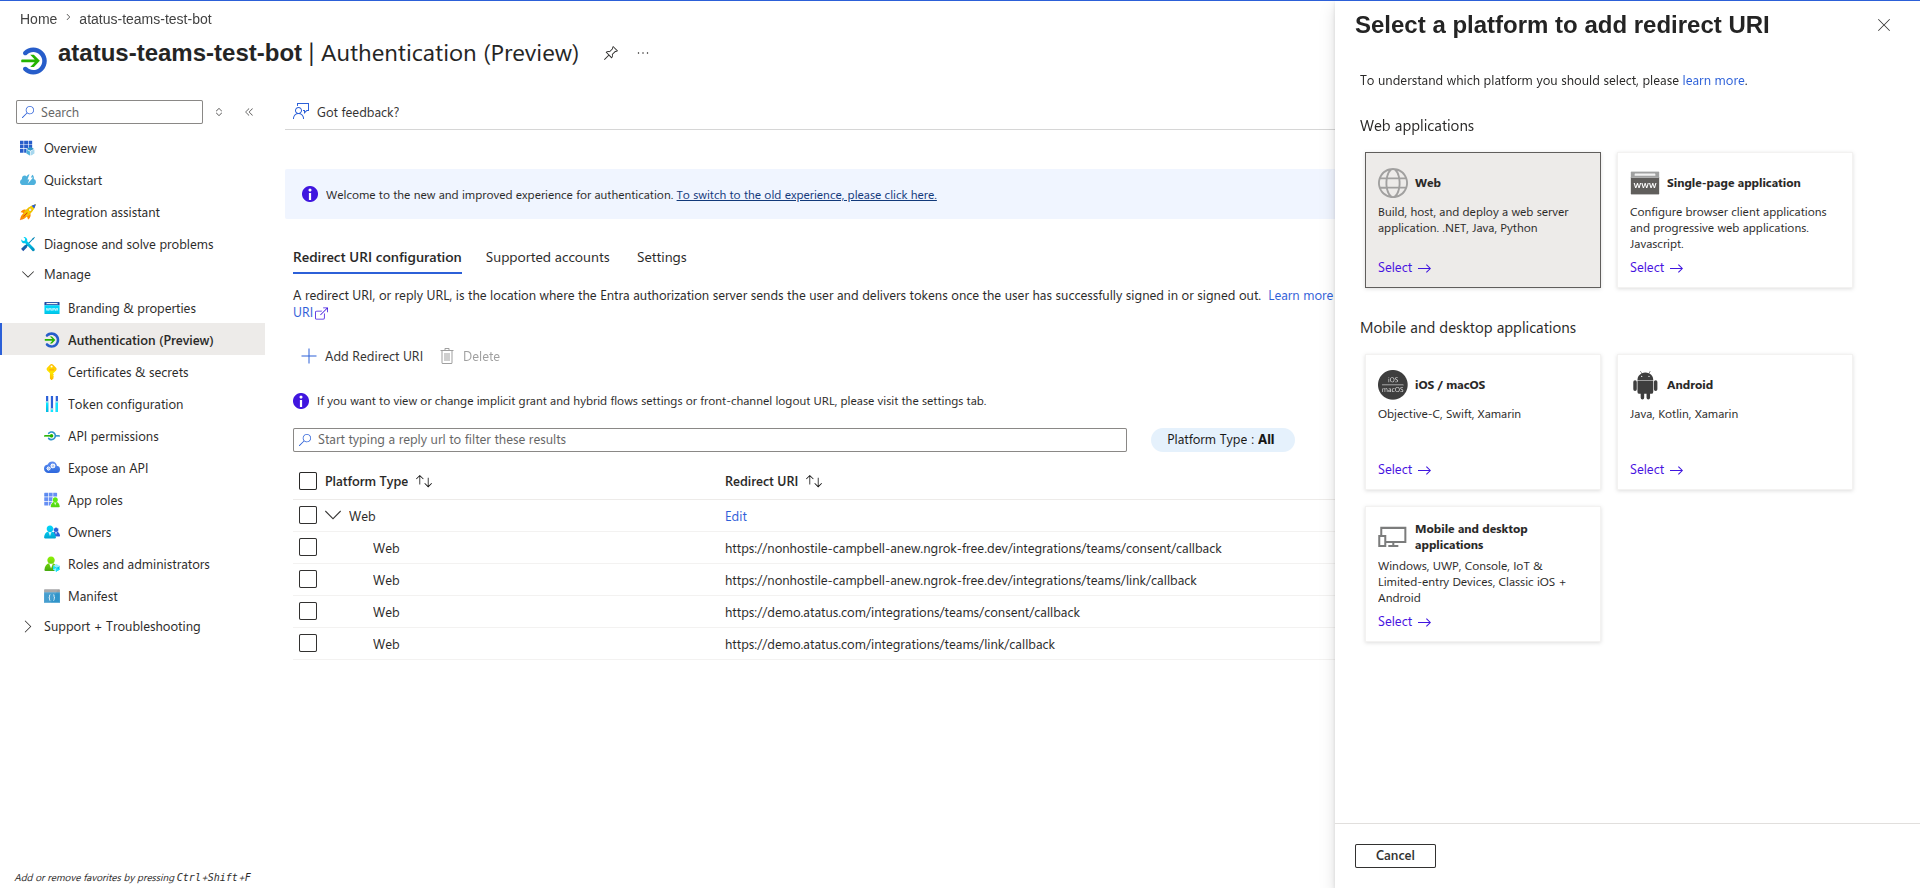
In the Redirect URI field, enter your Atatus consent callback, then click Configure:
https://<your-atatus-host>/integrations/teams/consent/callback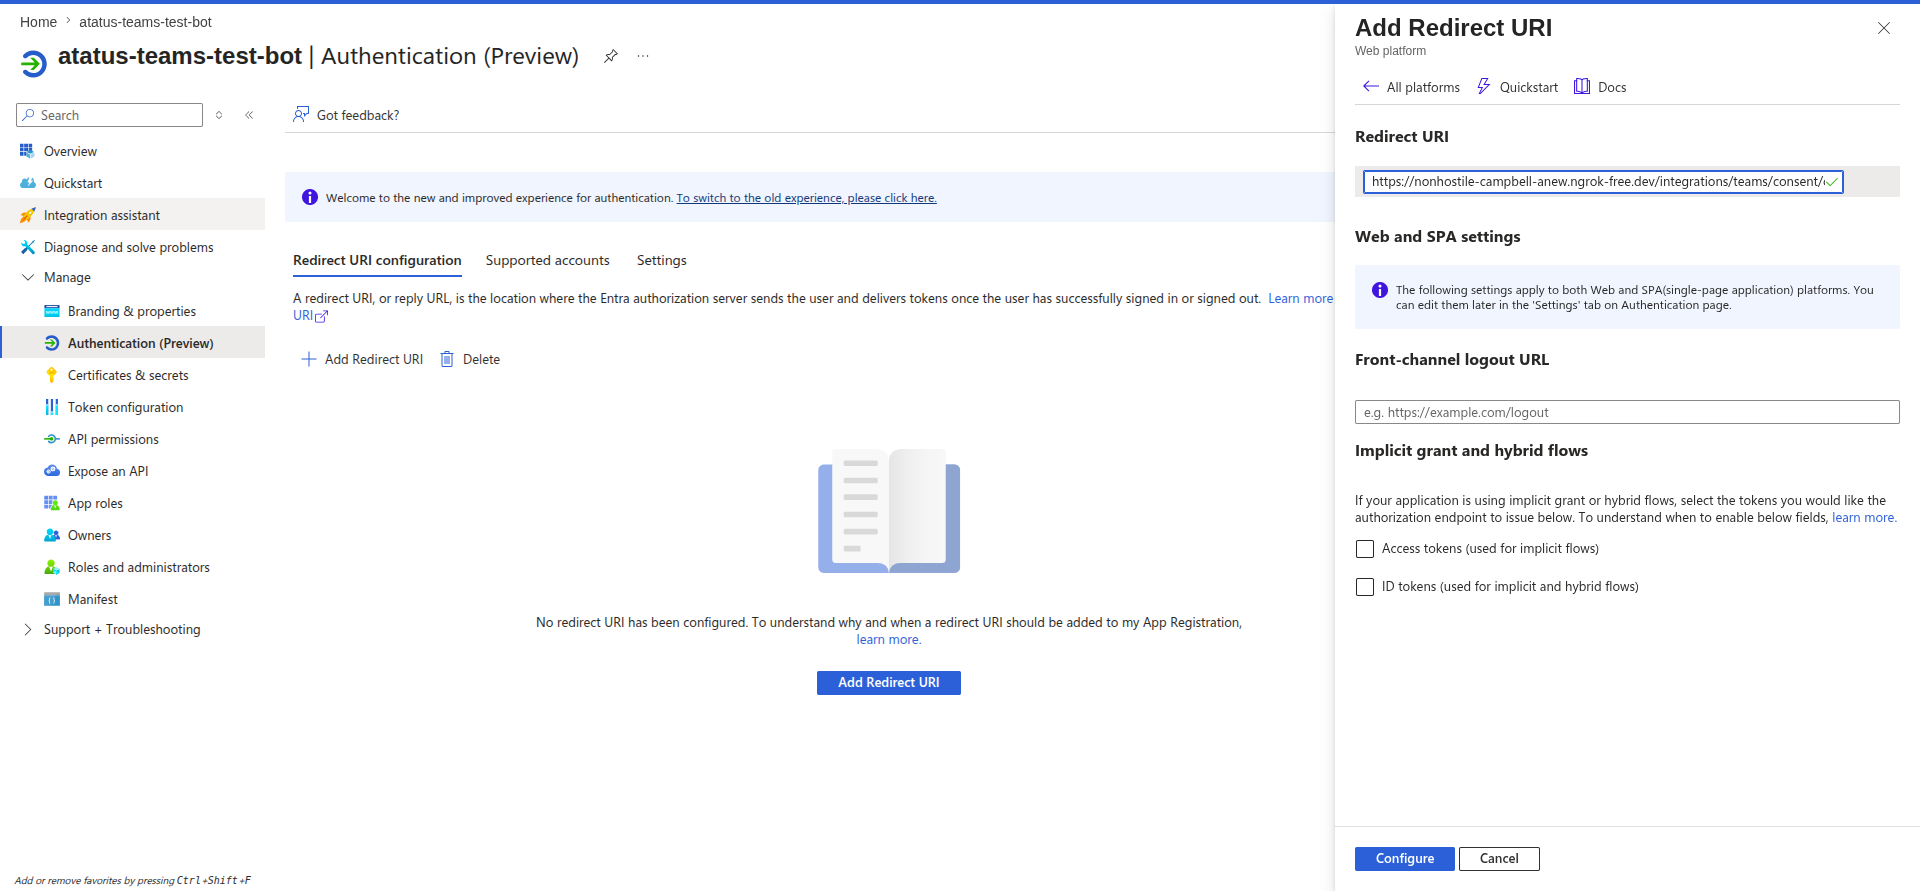
Click Add Redirect URI again, enter your link callback, then click Configure:
https://<your-atatus-host>/integrations/teams/link/callback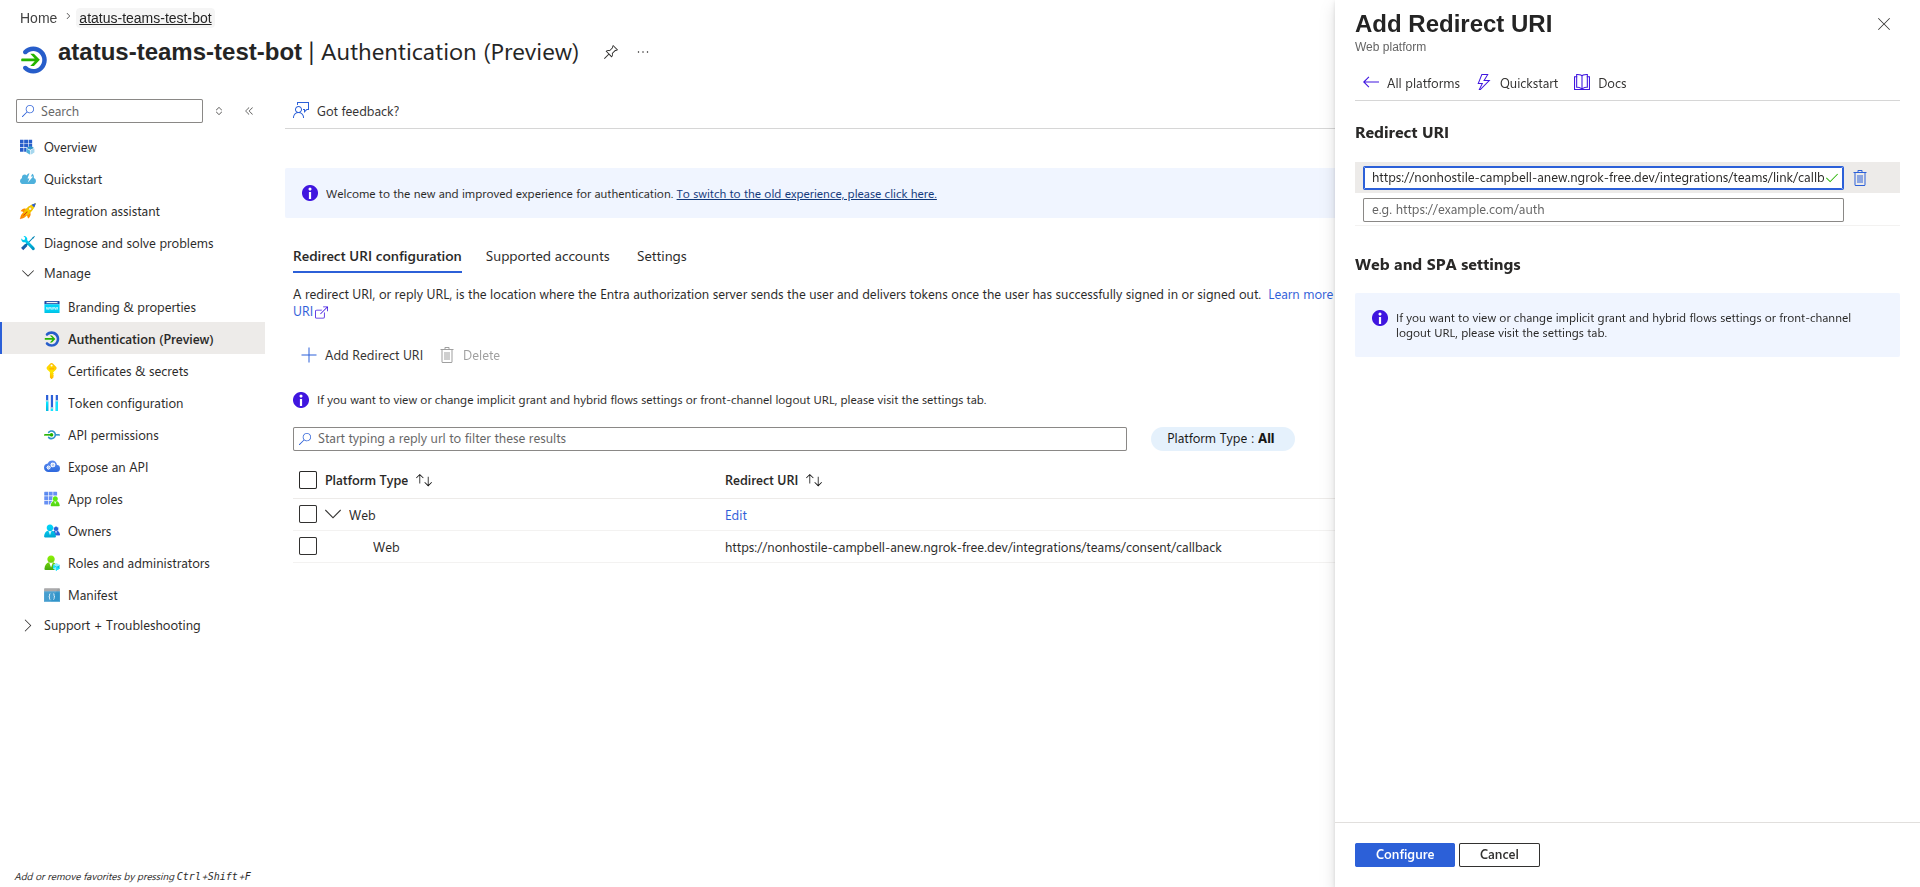
Step 5 — Package and upload your app to Teams
- Build a Teams app package — a
manifest.json(see the sample below) plus a 192×192 colour icon (color.png) and a 32×32 outline icon (outline.png), zipped together with all three files at the root of the zip. (See Microsoft's guide to creating a Teams app package.) - Upload the package: Teams admin center » Teams apps » Manage apps » Upload new app for the whole organization, or Teams » Apps » Manage your apps » Upload a custom app to sideload it (install a custom app directly, for testing).
- Add the app to the team you want to receive notifications in, and click Set up.
A minimal manifest.json — set id and botId to your Application (client) ID from Step 1, and validDomains to your Atatus host (no scheme):
{
  "$schema": "https://developer.microsoft.com/en-us/json-schemas/teams/v1.16/MicrosoftTeams.schema.json",
  "manifestVersion": "1.16",
  "version": "1.0.0",
  "id": "<your-application-client-id>",
  "packageName": "com.atatus.teams",
  "developer": {
    "name": "<your-company>",
    "websiteUrl": "https://<your-domain>",
    "privacyUrl": "https://<your-domain>/privacy",
    "termsOfUseUrl": "https://<your-domain>/terms"
  },
  "icons": {
    "color": "color.png",
    "outline": "outline.png"
  },
  "name": {
    "short": "Atatus",
    "full": "Atatus Monitoring"
  },
  "description": {
    "short": "APM alerts, incidents and SIEM signals delivered to Microsoft Teams.",
    "full": "Atatus posts application performance, uptime and security alerts into your Teams channels as Adaptive Cards, and lets you acknowledge or resolve incidents directly from the card."
  },
  "accentColor": "#0055dc",
  "bots": [
    {
      "botId": "<your-application-client-id>",
      "scopes": ["team", "groupchat", "personal"],
      "supportsFiles": false,
      "isNotificationOnly": false
    }
  ],
  "permissions": ["identity", "messageTeamMembers"],
  "validDomains": ["<your-atatus-host>"]
}
Step 6 — Enter your credentials in Atatus
In Atatus, open Integrations, select Microsoft Teams, and go to the Configure » Use a custom app tab.
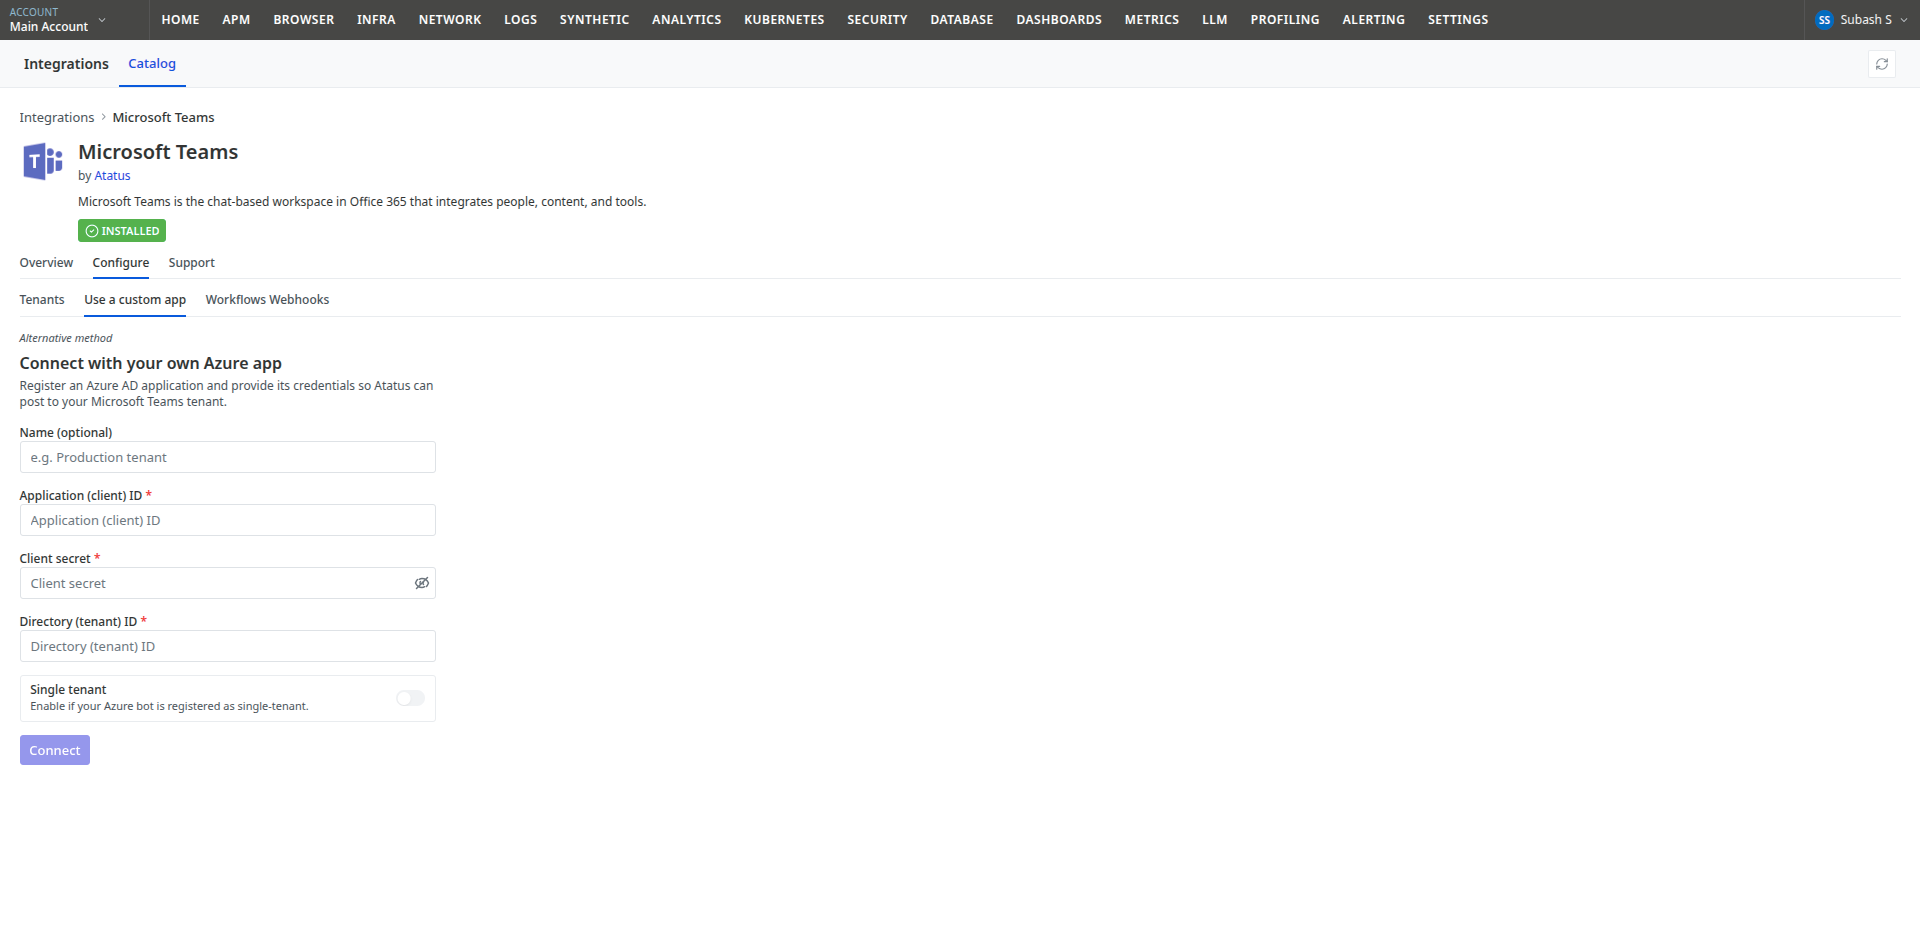
Enter your Application (client) ID, Client secret, and Directory (tenant) ID.
Enable the Single tenant toggle (you registered a Single-Tenant Azure Bot in Step 1), then click Connect.
Atatus validates the credentials and adds your tenant. If the credentials are wrong, you see an error and the tenant is not added.
Next, choose which channel receives alerts — see Send alerts to a channel below.
Rotate the client secret
Azure client secrets expire (180 days by default). When the secret expires, Atatus can no longer post to Teams. Because credentials can't be edited in place, rotating a secret means re-adding the tenant:
- In Azure, create a New client secret on your app registration (as in Step 1) and copy its Value.
- In Atatus, open Configure » Tenants, open the tenant's gear menu (⚙), and choose Delete Tenant.
- Re-add the tenant via Configure » Use a custom app with the same Application (client) ID and Directory (tenant) ID and the new Client secret, then click Connect.
- Recreate the tenant's handles — they stop working once the tenant is removed.
To avoid a gap in alerts, rotate the secret before its Azure expiry date. You can also set a longer expiry (up to 24 months) when you create the secret.
Method 3 — Incoming webhook
An incoming webhook posts alerts into a single channel. It is quick to set up, but one-way — it cannot acknowledge or resolve incidents.
Microsoft is retiring Office 365 connectors. For new setups, prefer the hosted bot or a custom bot app above, which also support acknowledging and resolving incidents from Teams.
Create the webhook in Teams
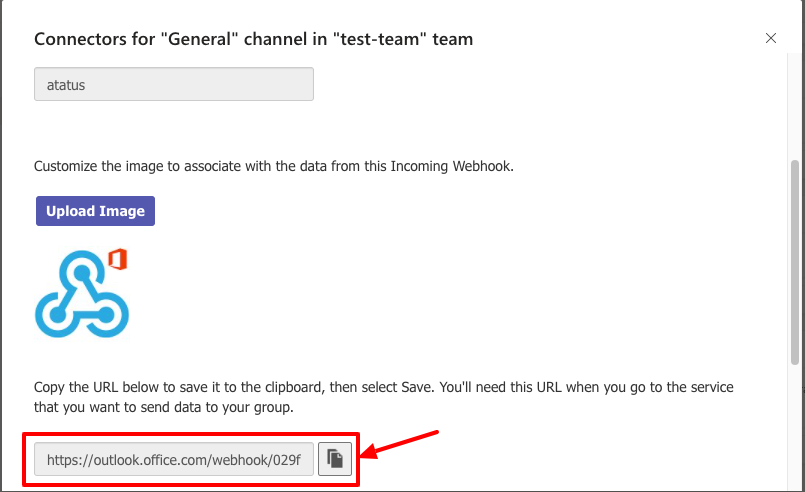
- In Microsoft Teams, go to the channel where you want alerts, and create an incoming webhook for it (via a Workflows / Power Automate template such as "Post to a channel when a webhook request is received", or a channel connector).
Copy the generated webhook URL.
Add the webhook to Atatus
- In Atatus, open Integrations, select Microsoft Teams, and go to the Configure » Workflows Webhooks tab.
Paste the webhook URL, optionally give it a name, then click Add Webhook.

Attach the webhook to your alerts: when you create or edit an alert policy, add this webhook as a notification channel.
Send alerts to a channel
For the hosted bot and custom bot app methods, you choose the exact team and channel by adding a handle:
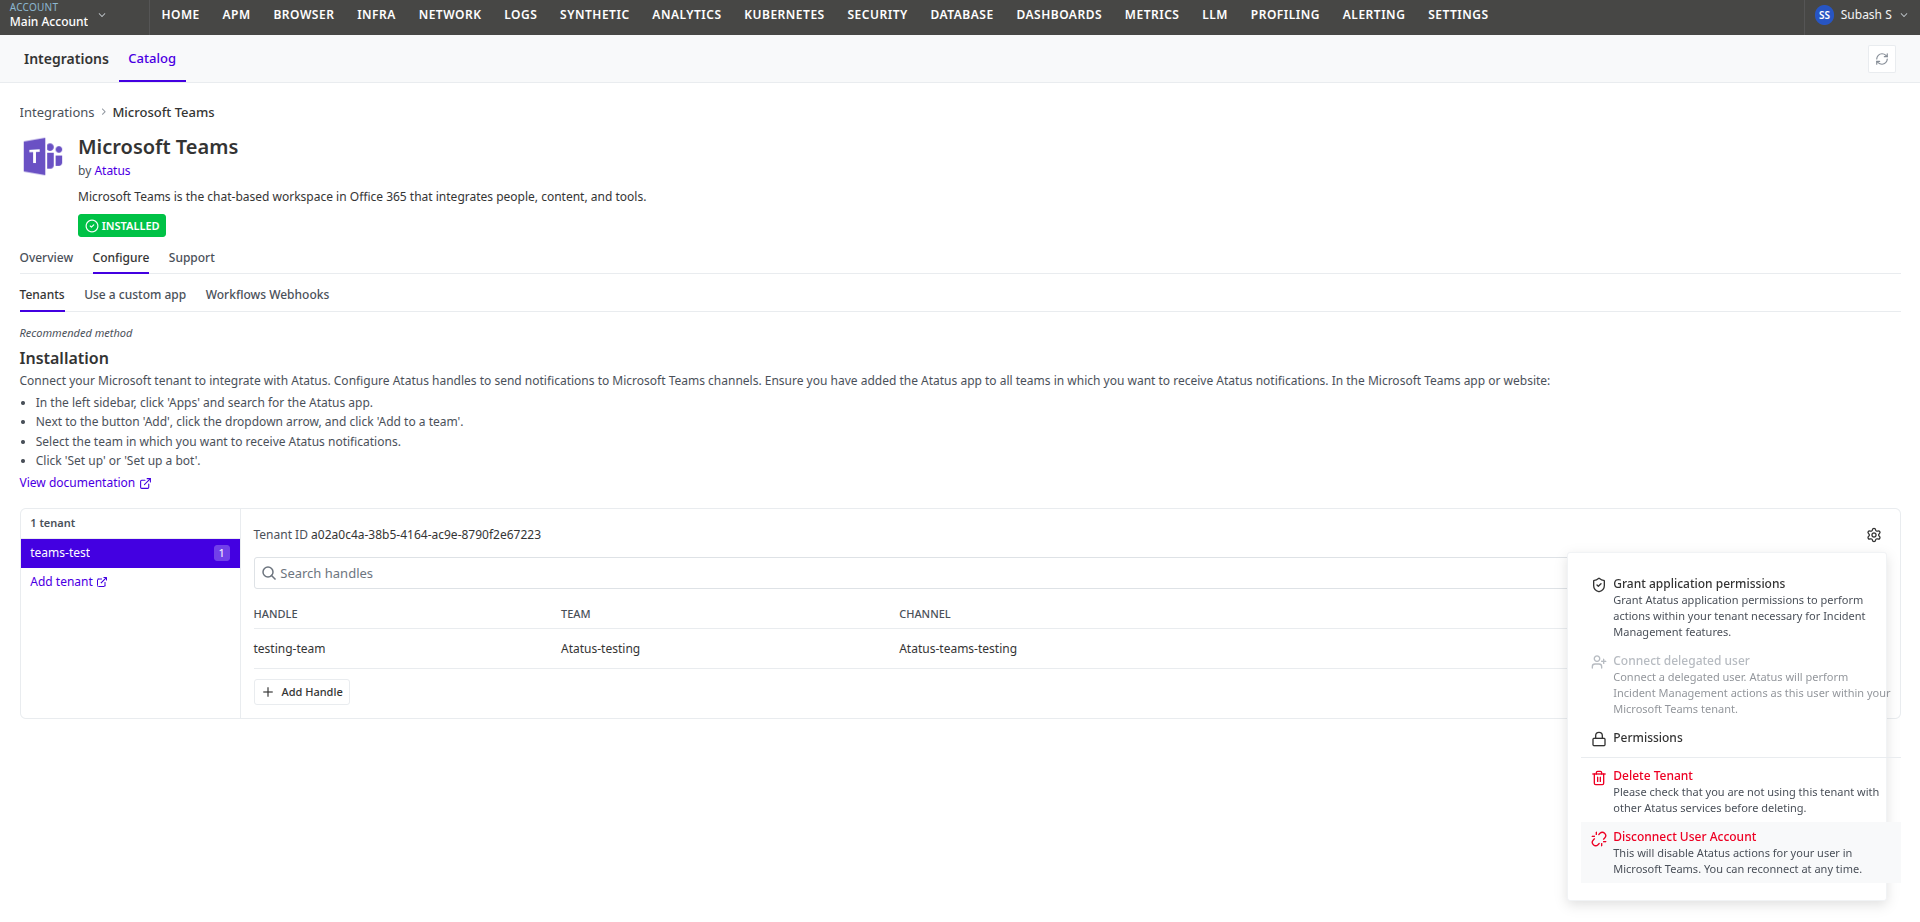
- In Atatus, open Integrations » Microsoft Teams » Configure » Tenants and select your tenant.
Click Add Handle, give the handle a name, and choose the Team and Channel you want alerts posted to, then click Add handle.
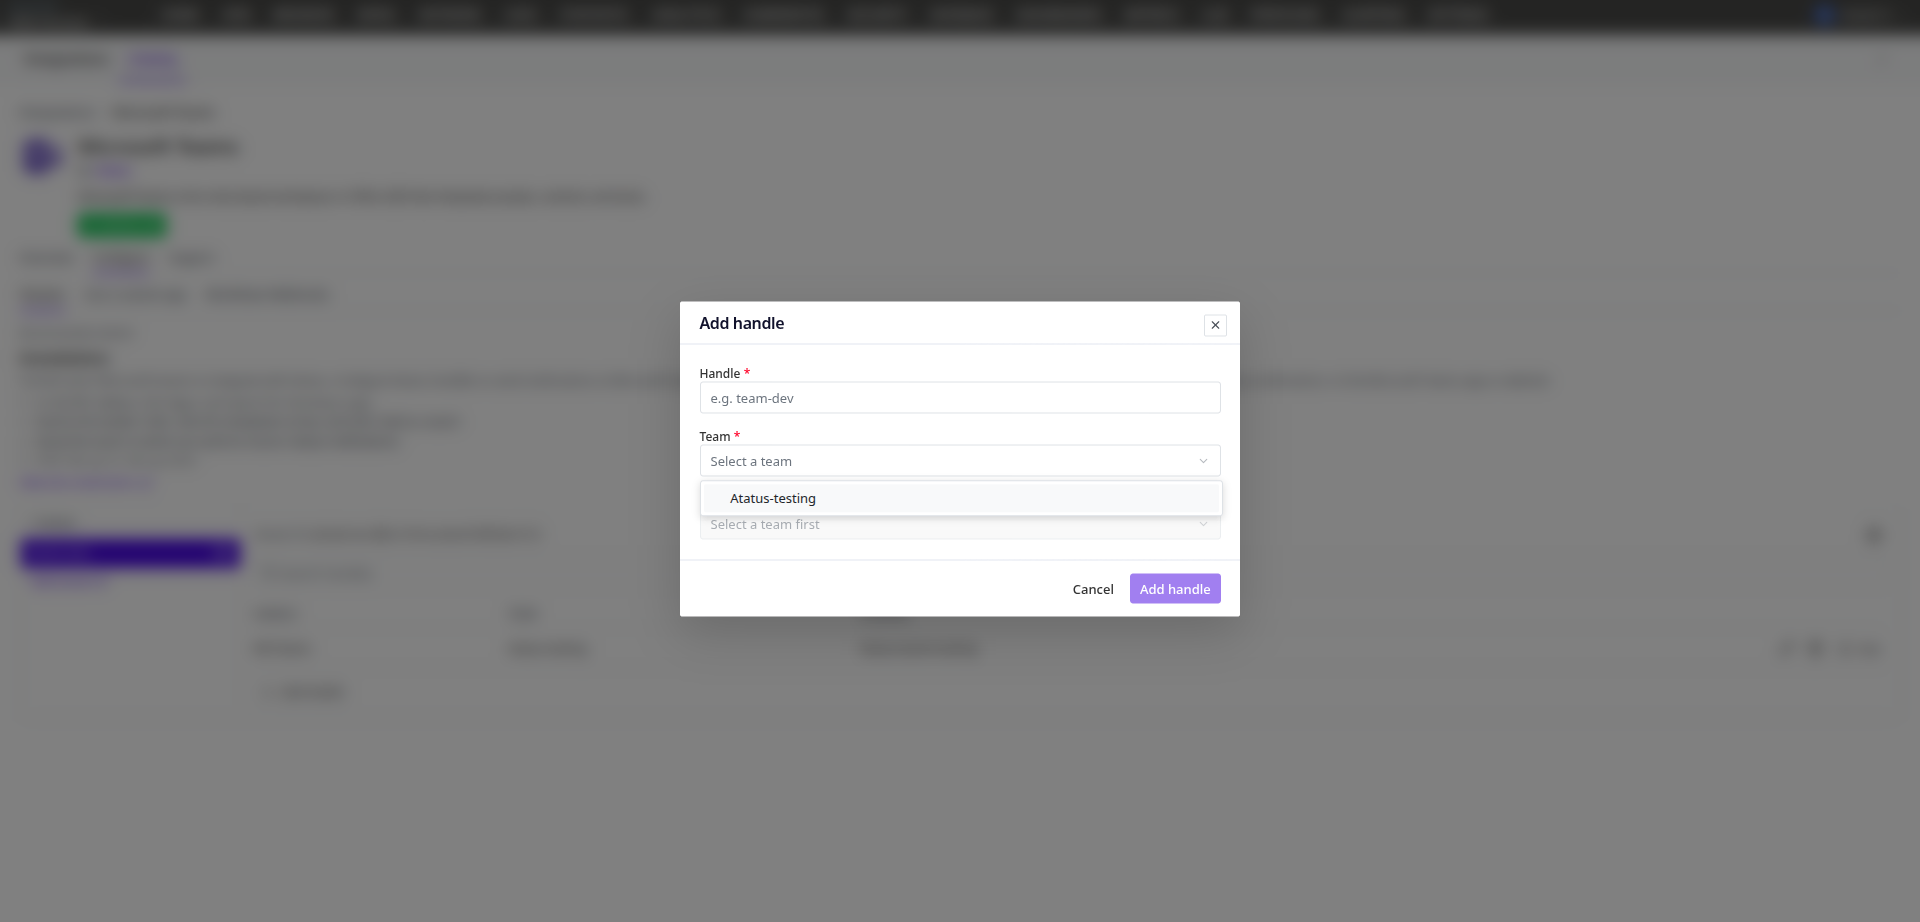
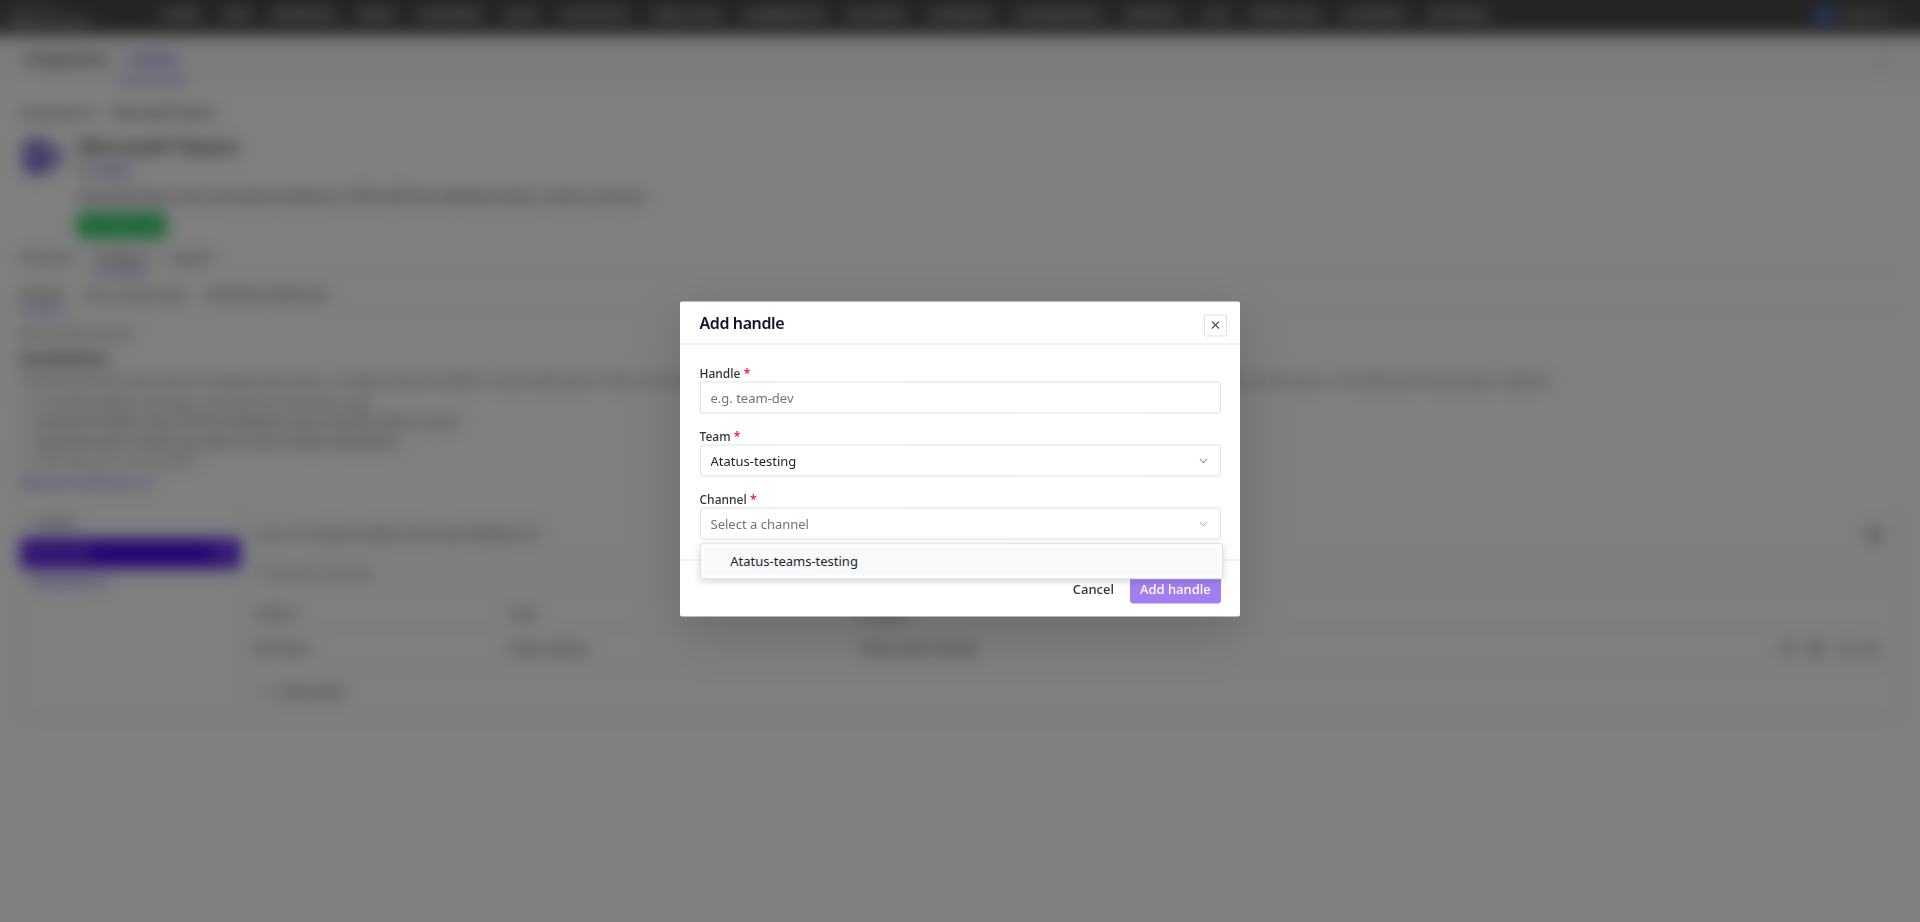
Use Test to send a sample message and confirm it arrives in the channel.
Attach the handle to your alerts: when you create or edit an alert policy, add this Microsoft Teams channel as a notification channel.
To acknowledge or resolve incidents from Teams, each user links their account once — see Link your Teams account below. (The Teams card also prompts to link on first use.)
Link your Teams account
When you acknowledge or resolve an incident from a Teams message, Atatus records the action against your Atatus user — but only if your Teams identity is linked to your Atatus account. Linking is per-user, and there are two ways to do it:
- From Teams: the first time you click Acknowledge or Resolve on a card without a linked account, Atatus shows a Link Atatus account button. Click it, sign in to Atatus, and you are linked.
From Atatus: open Integrations » Microsoft Teams » Configure » Tenants, open the tenant's gear menu (⚙), and choose Connect User Account.
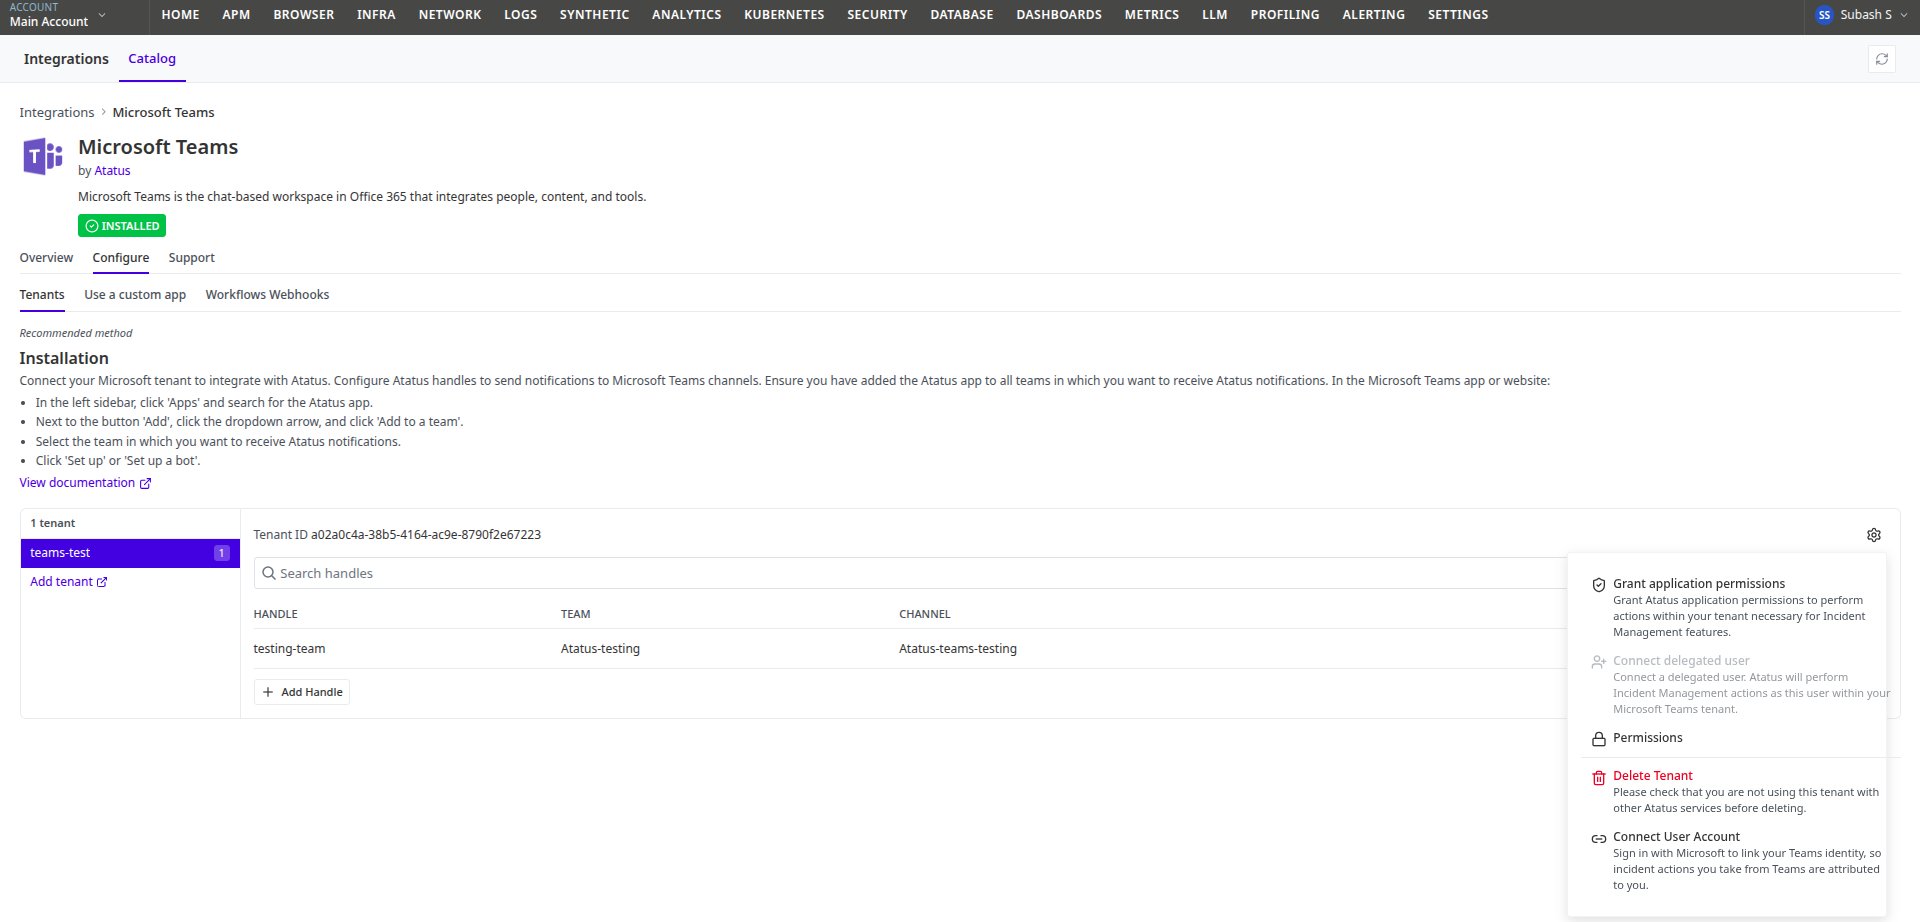
Sign in with Microsoft to complete the link.
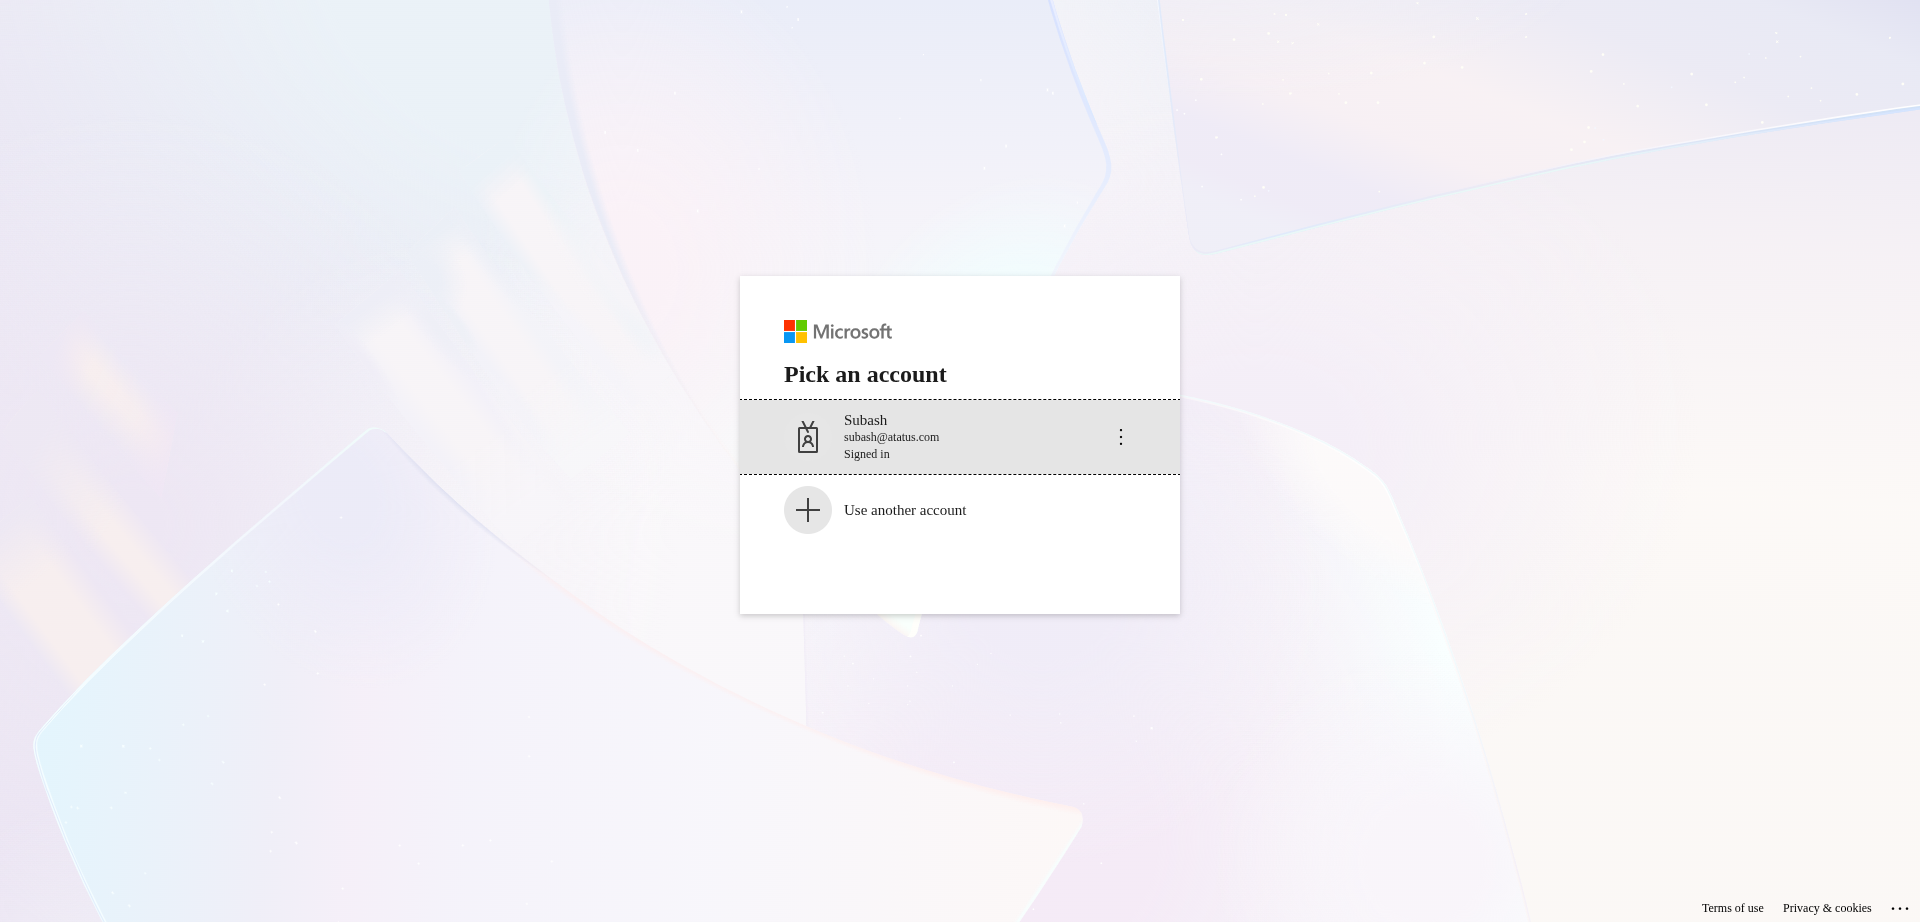
Unlink your Teams account
To stop attributing your Teams actions to your Atatus user, open the tenant's gear menu (⚙) and choose Disconnect User Account. You can reconnect at any time.
Manage incidents from Teams
With the hosted bot or a custom bot app, you can act on an alert without leaving Teams:
- When an incident opens, Atatus posts a card to the channel with Acknowledge and Resolve buttons.
- Click Acknowledge to take ownership, or Resolve to close the incident. The card updates to the new status, and the change is reflected in Atatus (and vice-versa).
The first time you act on a card, you are prompted to link your account — see Link your Teams account above. After that, your actions are attributed automatically.

Acknowledge and resolve are available only with the bot methods. Incoming webhooks are notification-only.
Grant application permissions
If listing channels or handling incident actions stops working — for example, after you add new permissions — a Microsoft administrator can re-grant the app's permissions:
- Open the tenant's gear menu (⚙) and choose Grant application permissions.
- Sign in as a Microsoft Entra (Azure AD) administrator and approve.
Granting application permissions requires a Microsoft administrator. If you are not one, ask your Microsoft administrator to complete this step.
Remove a tenant or webhook
To disconnect a tenant, open Configure » Tenants, select it, open its gear menu (⚙), and choose Delete Tenant. To remove a webhook, open Configure » Workflows Webhooks and delete it from the list.
Removing a tenant deletes the connection from Atatus only. It does not uninstall the Atatus app from Teams, and it does not revoke the app's Microsoft Entra (Azure AD) consent — do those from the Teams admin center and the Azure portal if you want a full teardown.
Troubleshooting
- Notifications don't arrive — make sure the Atatus app has been added to the team (not just a channel), and that a handle points at the right team and channel. Send a Test from the handle to confirm.
- The channel list is empty or shows no names — grant the Microsoft Graph permissions (custom app: Step 3; hosted bot: use Grant application permissions), then reopen the channel picker.
- Acknowledge or resolve from Teams asks you to link — this is expected the first time. Click Link Atatus account, or use Connect User Account in Atatus, to link your identity.
- Custom app: a sign-in or redirect error — confirm the Redirect URIs (Step 4) exactly match your Atatus host, including
https://and no trailing slash.
 +1-415-800-4104