

What You Will Need
Before you begin, verify that you have:- An Atatus account with the Owner or Admin role.
- An Auth0 dashboard account with administrator permissions to manage applications and actions.
Step 1: Get Service Provider Values from Atatus
- Log in to your Atatus dashboard.
- Navigate to Settings » Account Settings » Single Sign-on.
- Keep this tab open. Copy and record the following parameters:
- Atatus SAML ACS URL:
https://app.atatus.com/login/saml/<ACCOUNT_ID>/acs - Atatus Account Id: Your unique 24-character alphanumeric identifier.
- Atatus SAML ACS URL:
Step 2: Create an Application in Auth0
- Sign in to your Auth0 Dashboard.
- In the sidebar, select Applications » Applications.
- Click Create Application.
- Enter an application name (for example,
Atatus). - Choose Regular Web Applications as the application type.
- Click Create.
Step 3: Enable and Configure the SAML2 Web App Addon
- Within your Atatus application in Auth0, select the Addons tab.
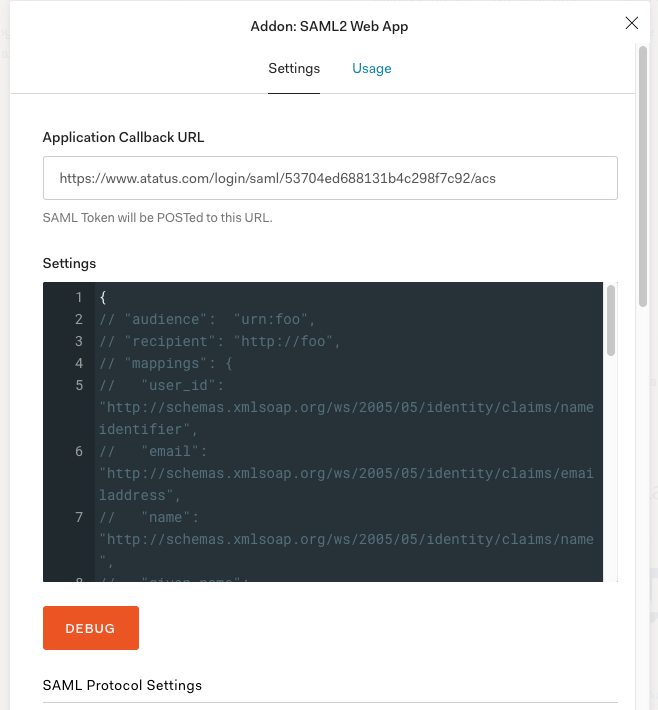
- Click the toggle to enable the SAML2 Web App addon. A configuration dialog opens.
- Under the Settings tab:
- In the Application Callback URL field, paste your Atatus SAML ACS URL.
- In the Settings JSON payload, set the audience to your Atatus Account ID:
- Scroll to the bottom and click Enable (or Save).
Step 4: Configure SAML Attribute Mapping
Auth0 uses Actions (or legacy Rules) to map user claims into the SAML assertion.- Auth0 Actions (Recommended)
- Auth0 Rules (Legacy)
- In the Auth0 sidebar, navigate to Actions » Flows » Login.
- Click the + icon next to the flow line and select Build Custom.
- Enter a name (such as
Map Atatus SAML Attributes) and click Create. - Replace the template code with the following:
- Click Deploy.
- Return to Actions » Flows » Login, drag your new action into the flow between Start and Complete, and click Apply.
Step 5: Copy Auth0 Metadata URL
- In your Atatus application in Auth0, return to the Addons » SAML2 Web App dialog.
- Select the Usage tab.
- Locate Identity Provider Metadata.
- Right-click the Download link next to Identity Provider Metadata and select Copy Link Address (or copy the Identity Provider Login URL).
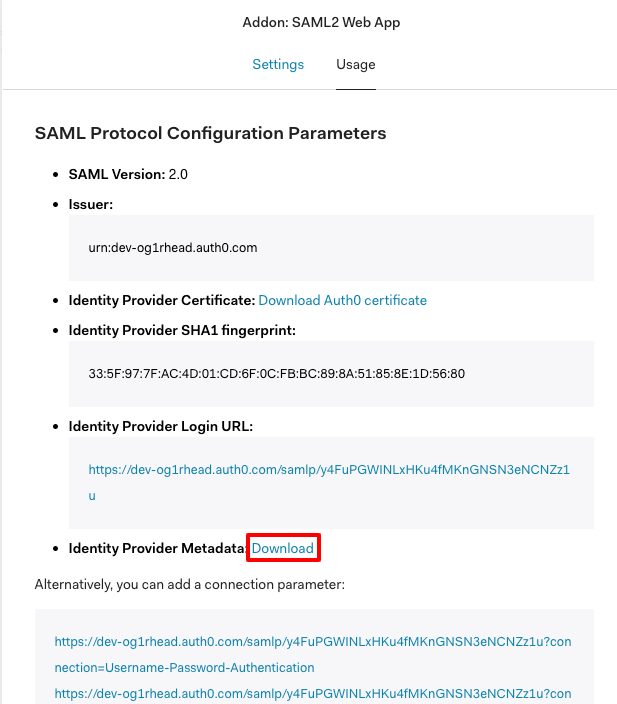 Alternatively, go to application Settings » Advanced Settings » Endpoints and copy the SAML Metadata URL.
Step 6: Configure Metadata in Atatus
- Return to the Atatus dashboard under Settings » Account Settings » Single Sign-on.
- Under SAML Metadata from your SSO provider, select SAML Metadata URL.
- Paste the Auth0 SAML Metadata URL copied in Step 5 into the text field.
- Click Save SSO.
- Confirm that the Enabled toggle switch displays active.