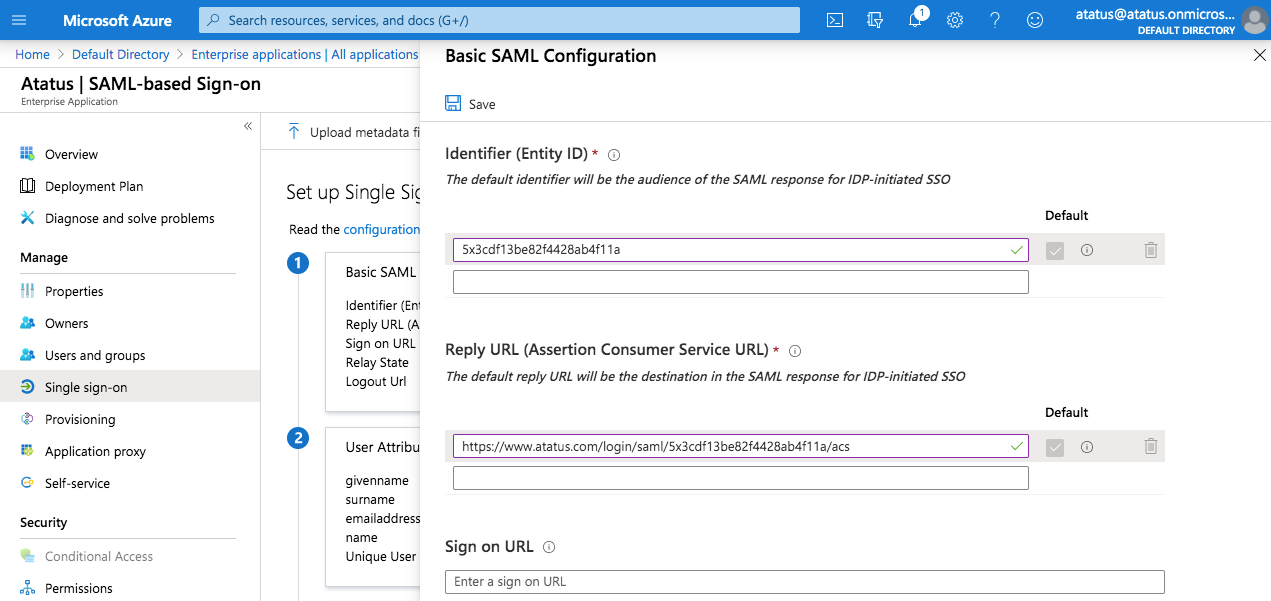
Add or edit user claims to supply the user’s name:
Name
Source Attribute
Requirement
email
user.mail (or user.userprincipalname)
Required
firstName
user.givenname
Recommended
lastName
user.surname
Recommended
Configure claim names as plain names (email, firstName, lastName). Do not wrap them with namespace URLs, as Atatus resolves attributes strictly by their exact name.
Click Save and close the panel.
Step 5: Assign Users and Groups in Microsoft Entra ID
Users cannot authenticate until they are assigned access in Microsoft Entra ID:
In the application sidebar, select Manage » Users and groups.
Click Add user/group.
Under Users, click None Selected and select the users or security groups requiring Atatus access.
Click Select, then click Assign.
Step 6: Download Metadata and Configure Atatus
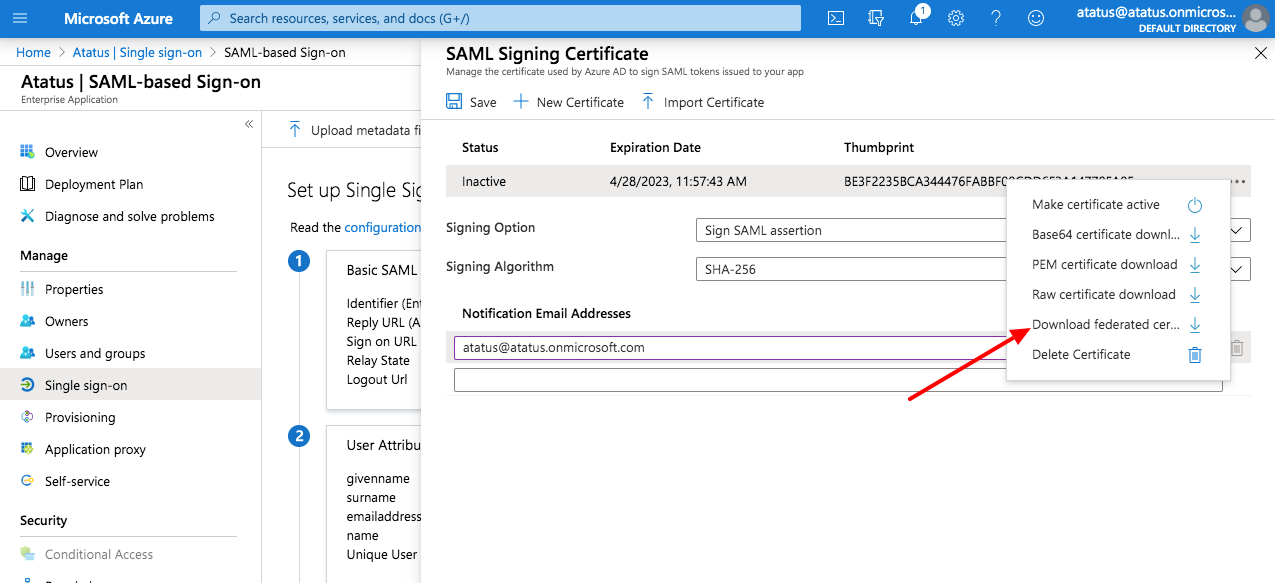
In Microsoft Entra ID, scroll down to section 3: SAML Certificates.
Locate Federation Metadata XML and click Download to save the XML file to your computer.
Important Note on Certificate Rollover:
Atatus requires that your Entra ID SAML configuration contains exactly one active signing certificate. If Microsoft Entra ID has two active signing certificates in its descriptor (such as during an uncommitted rollover), Atatus certificate validation will fail. When rotating certificates, generate the new certificate and remove or uncheck the secondary certificate before uploading your metadata file to Atatus.
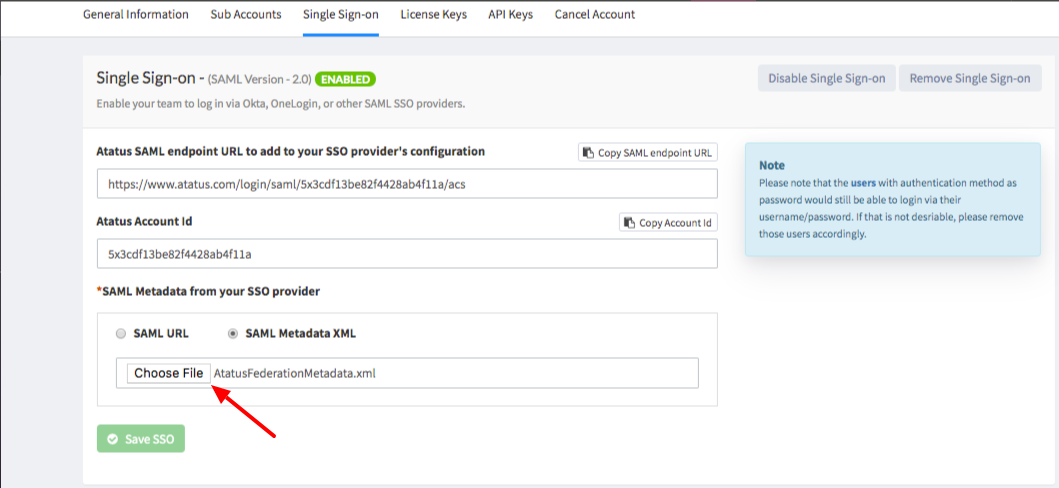
Return to the Atatus dashboard under Settings » Account Settings » Single Sign-on.
Under SAML Metadata from your SSO provider, select SAML Metadata XML.
Click Choose File (or Browse) and select the downloaded Federation Metadata XML file.
Click Save SSO.
Ensure the Enabled toggle switch displays active.
{"docsConfig":{"theme":"mint","$schema":"https://mintlify.com/docs.json","name":"Atatus Docs","description":"Atatus documentation: set up the AI observability platform for APM, logs, RUM, infrastructure, Kubernetes, database, synthetic monitoring, Cloud SIEM, AI SRE and OpenTelemetry.","colors":{"primary":"#0055DC","light":"#3A7DE1","dark":"#0055DC"},"logo":{"light":"/logo/light.svg","dark":"/logo/dark.svg","href":"https://www.atatus.com"},"favicon":"/favicon.png","api":{"playground":{"display":"simple"}},"appearance":{"default":"light"},"navbar":{"links":[{"href":"https://www.atatus.com","label":"Home"},{"href":"https://app.atatus.com","label":"Dashboard"},{"href":"https://app.atatus.com/login","label":"Login"}],"primary":{"type":"button","label":"Sign up","href":"https://app.atatus.com/signup"}},"footer":{"socials":{"x":"https://x.com/atatusapp","facebook":"https://www.facebook.com/pages/Atatus/535723933196096","linkedin":"https://www.linkedin.com/company/atatus","github":"https://github.com/atatus","instagram":"https://www.instagram.com/atatusapp","youtube":"https://www.youtube.com/@atatus-observability"},"links":[{"header":"Product","items":[{"label":"Application Monitoring","href":"https://www.atatus.com/product/apm"},{"label":"Real User Monitoring","href":"https://www.atatus.com/product/rum"},{"label":"Infrastructure Monitoring","href":"https://www.atatus.com/product/infrastructure-monitoring"},{"label":"Logs Monitoring","href":"https://www.atatus.com/product/log-management"},{"label":"AI SRE","href":"https://www.atatus.com/product/ai-sre-observability"},{"label":"Cloud SIEM","href":"https://www.atatus.com/product/siem"},{"label":"Kubernetes Monitoring","href":"https://www.atatus.com/product/kubernetes-monitoring"},{"label":"OpenTelemetry","href":"https://www.atatus.com/product/opentelemetry"},{"label":"LLM Observability","href":"https://www.atatus.com/product/llm"},{"label":"Synthetic Monitoring","href":"/synthetic-monitoring/overview"},{"label":"Network Monitoring","href":"/network-monitoring/overview"},{"label":"Database Monitoring","href":"/database-monitoring/overview"},{"label":"Serverless Monitoring","href":"/serverless-monitoring/overview"},{"label":"Profiling","href":"/profiling/overview"},{"label":"API Analytics","href":"https://www.atatus.com/api-analytics/features"},{"label":"MCP Server","href":"/mcp-server/overview"}]},{"header":"Resources","items":[{"label":"Pricing","href":"https://www.atatus.com/pricing"},{"label":"Blog","href":"https://www.atatus.com/blog"},{"label":"What's New","href":"https://www.atatus.com/whats-new"},{"label":"Developer API","href":"/api/overview"},{"label":"Integrations","href":"https://www.atatus.com/integrations"},{"label":"Guides","href":"https://www.atatus.com/guides"},{"label":"Switch to Atatus","href":"https://www.atatus.com/comparison"},{"label":"Quick Start","href":"/getting-started/quick-start"},{"label":"Supported Agents","href":"/getting-started/supported-agents"},{"label":"Release Notes","href":"/release-notes/overview"},{"label":"FAQ","href":"/faq/overview"}]},{"header":"Company","items":[{"label":"About Us","href":"https://www.atatus.com/about"},{"label":"Case Studies","href":"https://www.atatus.com/case-studies"},{"label":"Contact Us","href":"https://www.atatus.com/contact"},{"label":"Customers","href":"https://www.atatus.com/customers"},{"label":"Request Demo","href":"https://www.atatus.com/request-demo"}]},{"header":"Legal","items":[{"label":"DMCA","href":"https://www.atatus.com/dmca"},{"label":"GDPR","href":"https://www.atatus.com/gdpr-compliance"},{"label":"Privacy","href":"https://www.atatus.com/privacy"},{"label":"Terms","href":"https://www.atatus.com/terms"},{"label":"Trust Center","href":"https://www.atatus.com/trust-center"}]}]},"seo":{"indexing":"navigable"},"styling":{"latex":false},"integrations":{"telemetry":{"enabled":false}},"interaction":{"drilldown":false},"navigation":{"pages":[]}},"deployment":{"deploymentMetadataValue":{"hasAudioNarration":false,"customDomains":[],"gitSource":{"type":"github","owner":"local","repo":"local","deployBranch":"main","contentDirectory":"","isPrivate":true,"mountPath":"","label":"local","isBase":true},"buildId":"local","clientVersion":"0.0.4224"},"basePath":"","hasChatPermissions":false,"hasWebMcpPermissions":false,"toggles":[],"googleFontsInlined":false,"isLoggedInCli":false,"mintExport":{}},"customCss":[{"filePath":"style.css","content":"/* cyrillic-ext */\n@font-face {\n font-family: 'JetBrains Mono';\n font-style: normal;\n font-weight: 400;\n font-display: swap;\n src: url(/_mintlify/assets/fonts/google/s/jetbrainsmono/v24/tDbv2o-flEEny0FZhsfKu5WU4zr3E_BX0PnT8RD8yKwBNntkaToggR7BYRbKPx3cwhsk.woff2) format('woff2');\n unicode-range: U+0460-052F, U+1C80-1C8A, U+20B4, U+2DE0-2DFF, U+A640-A69F, U+FE2E-FE2F;\n}\n/* cyrillic */\n@font-face {\n font-family: 'JetBrains Mono';\n font-style: normal;\n font-weight: 400;\n font-display: swap;\n src: url(/_mintlify/assets/fonts/google/s/jetbrainsmono/v24/tDbv2o-flEEny0FZhsfKu5WU4zr3E_BX0PnT8RD8yKwBNntkaToggR7BYRbKPxTcwhsk.woff2) format('woff2');\n unicode-range: U+0301, U+0400-045F, U+0490-0491, U+04B0-04B1, U+2116;\n}\n/* greek */\n@font-face {\n font-family: 'JetBrains Mono';\n font-style: normal;\n font-weight: 400;\n font-display: swap;\n src: url(/_mintlify/assets/fonts/google/s/jetbrainsmono/v24/tDbv2o-flEEny0FZhsfKu5WU4zr3E_BX0PnT8RD8yKwBNntkaToggR7BYRbKPxPcwhsk.woff2) format('woff2');\n unicode-range: U+0370-0377, U+037A-037F, U+0384-038A, U+038C, U+038E-03A1, U+03A3-03FF;\n}\n/* vietnamese */\n@font-face {\n font-family: 'JetBrains Mono';\n font-style: normal;\n font-weight: 400;\n font-display: swap;\n src: url(/_mintlify/assets/fonts/google/s/jetbrainsmono/v24/tDbv2o-flEEny0FZhsfKu5WU4zr3E_BX0PnT8RD8yKwBNntkaToggR7BYRbKPx_cwhsk.woff2) format('woff2');\n unicode-range: U+0102-0103, U+0110-0111, U+0128-0129, U+0168-0169, U+01A0-01A1, U+01AF-01B0, U+0300-0301, U+0303-0304, U+0308-0309, U+0323, U+0329, U+1EA0-1EF9, U+20AB;\n}\n/* latin-ext */\n@font-face {\n font-family: 'JetBrains Mono';\n font-style: normal;\n font-weight: 400;\n font-display: swap;\n src: url(/_mintlify/assets/fonts/google/s/jetbrainsmono/v24/tDbv2o-flEEny0FZhsfKu5WU4zr3E_BX0PnT8RD8yKwBNntkaToggR7BYRbKPx7cwhsk.woff2) format('woff2');\n unicode-range: U+0100-02BA, U+02BD-02C5, U+02C7-02CC, U+02CE-02D7, U+02DD-02FF, U+0304, U+0308, U+0329, U+1D00-1DBF, U+1E00-1E9F, U+1EF2-1EFF, U+2020, U+20A0-20AB, U+20AD-20C4, U+2113, U+2C60-2C7F, U+A720-A7FF;\n}\n/* latin */\n@font-face {\n font-family: 'JetBrains Mono';\n font-style: normal;\n font-weight: 400;\n font-display: swap;\n src: url(/_mintlify/assets/fonts/google/s/jetbrainsmono/v24/tDbv2o-flEEny0FZhsfKu5WU4zr3E_BX0PnT8RD8yKwBNntkaToggR7BYRbKPxDcwg.woff2) format('woff2');\n unicode-range: U+0000-00FF, U+0131, U+0152-0153, U+02BB-02BC, U+02C6, U+02DA, U+02DC, U+0304, U+0308, U+0329, U+2000-206F, U+20AC, U+2122, U+2191, U+2193, U+2212, U+2215, U+FEFF, U+FFFD;\n}\n/* cyrillic-ext */\n@font-face {\n font-family: 'JetBrains Mono';\n font-style: normal;\n font-weight: 500;\n font-display: swap;\n src: url(/_mintlify/assets/fonts/google/s/jetbrainsmono/v24/tDbv2o-flEEny0FZhsfKu5WU4zr3E_BX0PnT8RD8yKwBNntkaToggR7BYRbKPx3cwhsk.woff2) format('woff2');\n unicode-range: U+0460-052F, U+1C80-1C8A, U+20B4, U+2DE0-2DFF, U+A640-A69F, U+FE2E-FE2F;\n}\n/* cyrillic */\n@font-face {\n font-family: 'JetBrains Mono';\n font-style: normal;\n font-weight: 500;\n font-display: swap;\n src: url(/_mintlify/assets/fonts/google/s/jetbrainsmono/v24/tDbv2o-flEEny0FZhsfKu5WU4zr3E_BX0PnT8RD8yKwBNntkaToggR7BYRbKPxTcwhsk.woff2) format('woff2');\n unicode-range: U+0301, U+0400-045F, U+0490-0491, U+04B0-04B1, U+2116;\n}\n/* greek */\n@font-face {\n font-family: 'JetBrains Mono';\n font-style: normal;\n font-weight: 500;\n font-display: swap;\n src: url(/_mintlify/assets/fonts/google/s/jetbrainsmono/v24/tDbv2o-flEEny0FZhsfKu5WU4zr3E_BX0PnT8RD8yKwBNntkaToggR7BYRbKPxPcwhsk.woff2) format('woff2');\n unicode-range: U+0370-0377, U+037A-037F, U+0384-038A, U+038C, U+038E-03A1, U+03A3-03FF;\n}\n/* vietnamese */\n@font-face {\n font-family: 'JetBrains Mono';\n font-style: normal;\n font-weight: 500;\n font-display: swap;\n src: url(/_mintlify/assets/fonts/google/s/jetbrainsmono/v24/tDbv2o-flEEny0FZhsfKu5WU4zr3E_BX0PnT8RD8yKwBNntkaToggR7BYRbKPx_cwhsk.woff2) format('woff2');\n unicode-range: U+0102-0103, U+0110-0111, U+0128-0129, U+0168-0169, U+01A0-01A1, U+01AF-01B0, U+0300-0301, U+0303-0304, U+0308-0309, U+0323, U+0329, U+1EA0-1EF9, U+20AB;\n}\n/* latin-ext */\n@font-face {\n font-family: 'JetBrains Mono';\n font-style: normal;\n font-weight: 500;\n font-display: swap;\n src: url(/_mintlify/assets/fonts/google/s/jetbrainsmono/v24/tDbv2o-flEEny0FZhsfKu5WU4zr3E_BX0PnT8RD8yKwBNntkaToggR7BYRbKPx7cwhsk.woff2) format('woff2');\n unicode-range: U+0100-02BA, U+02BD-02C5, U+02C7-02CC, U+02CE-02D7, U+02DD-02FF, U+0304, U+0308, U+0329, U+1D00-1DBF, U+1E00-1E9F, U+1EF2-1EFF, U+2020, U+20A0-20AB, U+20AD-20C4, U+2113, U+2C60-2C7F, U+A720-A7FF;\n}\n/* latin */\n@font-face {\n font-family: 'JetBrains Mono';\n font-style: normal;\n font-weight: 500;\n font-display: swap;\n src: url(/_mintlify/assets/fonts/google/s/jetbrainsmono/v24/tDbv2o-flEEny0FZhsfKu5WU4zr3E_BX0PnT8RD8yKwBNntkaToggR7BYRbKPxDcwg.woff2) format('woff2');\n unicode-range: U+0000-00FF, U+0131, U+0152-0153, U+02BB-02BC, U+02C6, U+02DA, U+02DC, U+0304, U+0308, U+0329, U+2000-206F, U+20AC, U+2122, U+2191, U+2193, U+2212, U+2215, U+FEFF, U+FFFD;\n}\n/* cyrillic-ext */\n@font-face {\n font-family: 'JetBrains Mono';\n font-style: normal;\n font-weight: 600;\n font-display: swap;\n src: url(/_mintlify/assets/fonts/google/s/jetbrainsmono/v24/tDbv2o-flEEny0FZhsfKu5WU4zr3E_BX0PnT8RD8yKwBNntkaToggR7BYRbKPx3cwhsk.woff2) format('woff2');\n unicode-range: U+0460-052F, U+1C80-1C8A, U+20B4, U+2DE0-2DFF, U+A640-A69F, U+FE2E-FE2F;\n}\n/* cyrillic */\n@font-face {\n font-family: 'JetBrains Mono';\n font-style: normal;\n font-weight: 600;\n font-display: swap;\n src: url(/_mintlify/assets/fonts/google/s/jetbrainsmono/v24/tDbv2o-flEEny0FZhsfKu5WU4zr3E_BX0PnT8RD8yKwBNntkaToggR7BYRbKPxTcwhsk.woff2) format('woff2');\n unicode-range: U+0301, U+0400-045F, U+0490-0491, U+04B0-04B1, U+2116;\n}\n/* greek */\n@font-face {\n font-family: 'JetBrains Mono';\n font-style: normal;\n font-weight: 600;\n font-display: swap;\n src: url(/_mintlify/assets/fonts/google/s/jetbrainsmono/v24/tDbv2o-flEEny0FZhsfKu5WU4zr3E_BX0PnT8RD8yKwBNntkaToggR7BYRbKPxPcwhsk.woff2) format('woff2');\n unicode-range: U+0370-0377, U+037A-037F, U+0384-038A, U+038C, U+038E-03A1, U+03A3-03FF;\n}\n/* vietnamese */\n@font-face {\n font-family: 'JetBrains Mono';\n font-style: normal;\n font-weight: 600;\n font-display: swap;\n src: url(/_mintlify/assets/fonts/google/s/jetbrainsmono/v24/tDbv2o-flEEny0FZhsfKu5WU4zr3E_BX0PnT8RD8yKwBNntkaToggR7BYRbKPx_cwhsk.woff2) format('woff2');\n unicode-range: U+0102-0103, U+0110-0111, U+0128-0129, U+0168-0169, U+01A0-01A1, U+01AF-01B0, U+0300-0301, U+0303-0304, U+0308-0309, U+0323, U+0329, U+1EA0-1EF9, U+20AB;\n}\n/* latin-ext */\n@font-face {\n font-family: 'JetBrains Mono';\n font-style: normal;\n font-weight: 600;\n font-display: swap;\n src: url(/_mintlify/assets/fonts/google/s/jetbrainsmono/v24/tDbv2o-flEEny0FZhsfKu5WU4zr3E_BX0PnT8RD8yKwBNntkaToggR7BYRbKPx7cwhsk.woff2) format('woff2');\n unicode-range: U+0100-02BA, U+02BD-02C5, U+02C7-02CC, U+02CE-02D7, U+02DD-02FF, U+0304, U+0308, U+0329, U+1D00-1DBF, U+1E00-1E9F, U+1EF2-1EFF, U+2020, U+20A0-20AB, U+20AD-20C4, U+2113, U+2C60-2C7F, U+A720-A7FF;\n}\n/* latin */\n@font-face {\n font-family: 'JetBrains Mono';\n font-style: normal;\n font-weight: 600;\n font-display: swap;\n src: url(/_mintlify/assets/fonts/google/s/jetbrainsmono/v24/tDbv2o-flEEny0FZhsfKu5WU4zr3E_BX0PnT8RD8yKwBNntkaToggR7BYRbKPxDcwg.woff2) format('woff2');\n unicode-range: U+0000-00FF, U+0131, U+0152-0153, U+02BB-02BC, U+02C6, U+02DA, U+02DC, U+0304, U+0308, U+0329, U+2000-206F, U+20AC, U+2122, U+2191, U+2193, U+2212, U+2215, U+FEFF, U+FFFD;\n}\n/* cyrillic-ext */\n@font-face {\n font-family: 'JetBrains Mono';\n font-style: normal;\n font-weight: 700;\n font-display: swap;\n src: url(/_mintlify/assets/fonts/google/s/jetbrainsmono/v24/tDbv2o-flEEny0FZhsfKu5WU4zr3E_BX0PnT8RD8yKwBNntkaToggR7BYRbKPx3cwhsk.woff2) format('woff2');\n unicode-range: U+0460-052F, U+1C80-1C8A, U+20B4, U+2DE0-2DFF, U+A640-A69F, U+FE2E-FE2F;\n}\n/* cyrillic */\n@font-face {\n font-family: 'JetBrains Mono';\n font-style: normal;\n font-weight: 700;\n font-display: swap;\n src: url(/_mintlify/assets/fonts/google/s/jetbrainsmono/v24/tDbv2o-flEEny0FZhsfKu5WU4zr3E_BX0PnT8RD8yKwBNntkaToggR7BYRbKPxTcwhsk.woff2) format('woff2');\n unicode-range: U+0301, U+0400-045F, U+0490-0491, U+04B0-04B1, U+2116;\n}\n/* greek */\n@font-face {\n font-family: 'JetBrains Mono';\n font-style: normal;\n font-weight: 700;\n font-display: swap;\n src: url(/_mintlify/assets/fonts/google/s/jetbrainsmono/v24/tDbv2o-flEEny0FZhsfKu5WU4zr3E_BX0PnT8RD8yKwBNntkaToggR7BYRbKPxPcwhsk.woff2) format('woff2');\n unicode-range: U+0370-0377, U+037A-037F, U+0384-038A, U+038C, U+038E-03A1, U+03A3-03FF;\n}\n/* vietnamese */\n@font-face {\n font-family: 'JetBrains Mono';\n font-style: normal;\n font-weight: 700;\n font-display: swap;\n src: url(/_mintlify/assets/fonts/google/s/jetbrainsmono/v24/tDbv2o-flEEny0FZhsfKu5WU4zr3E_BX0PnT8RD8yKwBNntkaToggR7BYRbKPx_cwhsk.woff2) format('woff2');\n unicode-range: U+0102-0103, U+0110-0111, U+0128-0129, U+0168-0169, U+01A0-01A1, U+01AF-01B0, U+0300-0301, U+0303-0304, U+0308-0309, U+0323, U+0329, U+1EA0-1EF9, U+20AB;\n}\n/* latin-ext */\n@font-face {\n font-family: 'JetBrains Mono';\n font-style: normal;\n font-weight: 700;\n font-display: swap;\n src: url(/_mintlify/assets/fonts/google/s/jetbrainsmono/v24/tDbv2o-flEEny0FZhsfKu5WU4zr3E_BX0PnT8RD8yKwBNntkaToggR7BYRbKPx7cwhsk.woff2) format('woff2');\n unicode-range: U+0100-02BA, U+02BD-02C5, U+02C7-02CC, U+02CE-02D7, U+02DD-02FF, U+0304, U+0308, U+0329, U+1D00-1DBF, U+1E00-1E9F, U+1EF2-1EFF, U+2020, U+20A0-20AB, U+20AD-20C4, U+2113, U+2C60-2C7F, U+A720-A7FF;\n}\n/* latin */\n@font-face {\n font-family: 'JetBrains Mono';\n font-style: normal;\n font-weight: 700;\n font-display: swap;\n src: url(/_mintlify/assets/fonts/google/s/jetbrainsmono/v24/tDbv2o-flEEny0FZhsfKu5WU4zr3E_BX0PnT8RD8yKwBNntkaToggR7BYRbKPxDcwg.woff2) format('woff2');\n unicode-range: U+0000-00FF, U+0131, U+0152-0153, U+02BB-02BC, U+02C6, U+02DA, U+02DC, U+0304, U+0308, U+0329, U+2000-206F, U+20AC, U+2122, U+2191, U+2193, U+2212, U+2215, U+FEFF, U+FFFD;\n}\ncode,kbd,samp,pre,.font-mono{font-family:'JetBrains Mono', ui-monospace, SFMono-Regular, Menlo, Monaco, Consolas, monospace}@media (min-width: 1024px){#sidebar{border-right:1px solid #e3e3e3}.dark #sidebar{border-right-color:rgb(255 255 255 / 0.1)}#navbar.is-not-custom.is-not-center~div:has(>#sidebar),#navbar .max-w-8xl{max-width:none}#content-area{max-width:72rem}#navbar~div:has(>#sidebar)>:not(#sidebar):not(:has(#content-side-layout)),div:has(>#content-side-layout)>:not(#content-side-layout){margin-bottom:var(--footer-h, 0px)}#footer{margin-top:calc(-1 * var(--footer-h, 0px));margin-left:var(--footer-l, auto);margin-right:var(--footer-r, auto);width:var(--footer-w, auto)}}#footer{align-items:flex-start}#footer>div:first-child{padding-top:2.5rem;padding-bottom:1.5rem;max-width:none}#footer>div:first-child>.h-px{margin-top:-1.5rem}#footer>div:first-child>.h-px+div{margin-top:-1.5rem}@media (min-width: 1024px){#footer>div:first-child{padding-left:1.5rem}}.rv-hidden{display:none!important}#footer a,#footer a *{overflow:visible!important;text-overflow:clip!important;white-space:normal!important}.rv-compliance{margin-top:-1rem;margin-bottom:-1rem}.rv-compliance-top{display:flex;flex-wrap:wrap;justify-content:space-between;align-items:flex-start}.rv-compliance-copy{max-width:32rem;margin-bottom:1rem}.rv-compliance-head{margin:0 0 0.25rem;font-size:13px;font-weight:600;color:#000}.rv-compliance-text{margin:0;font-size:14px;line-height:1.5;color:#6b7280}.dark .rv-compliance-text{color:rgb(156 163 175)}.rv-badges{display:flex;flex-wrap:wrap;justify-content:flex-end}.rv-badge{display:inline-flex;align-items:center;cursor:pointer;margin:0 0.75rem 0.75rem 0;padding:0.5rem 0.875rem 0.5rem 0.5rem;border:1px solid #e3e3e3;border-radius:8px;font-size:13px;font-weight:600;white-space:nowrap}.rv-badge-icon{width:36px;height:36px;margin-right:0.625rem;object-fit:contain}.dark .rv-badge{border-color:rgb(255 255 255 / 0.1)}#footer div.flex.items-center.justify-between:has(>.rv-socials)>:first-child{flex:1 1 auto}.rv-socials{display:flex;flex-wrap:wrap;justify-content:flex-end;margin-right:1.5rem;font-size:13px}.rv-social{margin-left:1rem;color:#6b7280;transition:color 0.2s}.rv-social:hover{color:#0055dc}.sidebar-group-header:has(+ul.sidebar-group>li[data-title=\"Get Started\"]){display:none}div.mt-6:has(>.sidebar-group-header+ul.sidebar-group>li[data-title=\"Get Started\"]){margin-top:1px}ul.sidebar-group:has(>li[data-title=\"Get Started\"])>li>button{font-weight:600;color:rgb(17 24 39)}.dark ul.sidebar-group:has(>li[data-title=\"Get Started\"])>li>button{color:rgb(229 231 235)}@media (min-width: 1960px){#content-area{margin-inline:auto}}@media (min-width: 1280px){div:has(>#content-side-layout):not(:has(#table-of-contents)):not(:has(#content-side-layout .code-group))>#content-side-layout{display:none}div:has(>#content-side-layout):not(:has(#table-of-contents)):not(:has(#content-side-layout .code-group))>#content-area{width:100%;max-width:none;margin-inline:-3rem 0}div:has(>#content-side-layout):not(:has(#table-of-contents)):not(:has(#content-side-layout .code-group))>#content-area #content>:is(p,span[data-as=\"p\"],ul,ol,blockquote){max-width:60rem}div:has(>#content-side-layout):has(#table-of-contents)>#content-area{max-width:none;flex:1 1 0%;margin-inline:-3rem -3rem}}#navbar{background:#fff;border-bottom:1px solid #e3e3e3}.dark #navbar{background:rgb(10 13 13);border-bottom-color:rgb(255 255 255 / 0.1)}#navbar a[href^=\"https://www.atatus.com\"],#navbar a[href^=\"https://docs.atatus.com\"]{font-family:inherit;font-size:14px;font-weight:400;letter-spacing:normal;text-transform:none;color:#3b415e;transition:color 0.2s}.dark #navbar a[href^=\"https://www.atatus.com\"],.dark #navbar a[href^=\"https://docs.atatus.com\"]{color:rgb(229 231 235)}#navbar a[href^=\"https://www.atatus.com\"]:hover,#navbar a[href^=\"https://docs.atatus.com\"]:hover{color:#0055dc}#topbar-cta-button a,#topbar-cta-button button{background:#0055dc;border:2px solid #0055dc;border-radius:5px;font-family:inherit;font-size:14px;font-weight:400;letter-spacing:normal;text-transform:none;transition:all 0.2s}#topbar-cta-button a,#topbar-cta-button a *,#topbar-cta-button button,#topbar-cta-button button *{color:#fff}#topbar-cta-button:hover{filter:brightness(0.9)}#navbar .ar-wrap{position:relative;flex:none;margin-right:10px}#navbar .ar-btn{display:flex;align-items:center;gap:6px;height:36px;padding:0 10px;border-radius:12px;font-family:inherit;font-size:13px;font-weight:500;color:#3b415e;box-shadow:0 0 0 1px rgb(156 163 175 / 0.3);transition:color 0.2s, box-shadow 0.2s}.dark #navbar .ar-btn{color:rgb(229 231 235);box-shadow:0 0 0 1px rgb(75 85 99 / 0.5)}#navbar .ar-btn:hover,#navbar .ar-open .ar-btn{color:#0055dc;box-shadow:0 0 0 1px #0055dc}#navbar .ar-menu{position:absolute;top:calc(100% + 8px);left:0;min-width:170px;padding:10px 12px;background:#fff;border-radius:5px;box-shadow:0 2px 5px 0 rgba(17, 29, 57, 0.1), 0 4px 20px 0 rgba(17, 29, 57, 0.12);opacity:0;pointer-events:none;transition:opacity 0.2s ease;z-index:50}.dark #navbar .ar-menu{background:rgb(24 27 27)}#navbar .ar-open .ar-menu{opacity:1;pointer-events:all}#navbar .ar-title{display:block;margin-bottom:4px;font-size:12px;font-weight:600;letter-spacing:1.5px;text-transform:uppercase;color:#0055dc}#navbar .ar-opt{display:block;width:100%;padding:0 6px;text-align:left;font-size:13px;line-height:32px;border-radius:4px;color:#3b415e}.dark #navbar .ar-opt{color:rgb(229 231 235)}#navbar .ar-opt:hover{background:rgb(0 85 220 / 0.08)}#navbar .ar-opt.ar-on{color:#0055dc;font-weight:600}.onprem-only{display:none}html[data-region=\"onprem\"] .onprem-only{display:block}html:not([data-region=\"onprem\"]) [data-ar-op]{display:none}#navbar .ar-sub{display:none;margin-top:6px;padding-top:8px;border-top:1px solid rgb(156 163 175 / 0.3);font-size:12px}#navbar .ar-sub.ar-show{display:block}#navbar .ar-url{display:block;margin-bottom:4px;max-width:220px;overflow:hidden;text-overflow:ellipsis;white-space:nowrap;color:#6b7280}#navbar .ar-edit{font-size:12px;font-weight:600;color:#0055dc}.ar-modal{display:none;position:fixed;inset:0;z-index:100;align-items:center;justify-content:center;background:rgb(10 13 13 / 0.55)}.ar-modal.ar-modal-open{display:flex}.ar-modal-box{width:min(440px, calc(100vw - 32px));padding:24px;background:#fff;color:#3b415e;border-radius:12px;box-shadow:0 4px 24px rgba(17, 29, 57, 0.25);font-family:inherit}.dark .ar-modal-box{background:rgb(24 27 27);color:rgb(229 231 235)}.ar-modal-box h2{margin:0 0 8px;font-size:18px;font-weight:600}.ar-modal-box p{margin:0 0 14px;font-size:14px;line-height:1.5}.ar-input{width:100%;height:40px;padding:0 12px;font-size:14px;color:inherit;background:transparent;border-radius:8px;box-shadow:0 0 0 1px rgb(156 163 175 / 0.5);outline:none}.ar-input:focus{box-shadow:0 0 0 2px #0055dc}.ar-modal-box .ar-err{min-height:18px;margin:6px 0 10px;font-size:12px;color:#d92d20}.ar-actions{display:flex;justify-content:flex-end;gap:10px}.ar-actions button{height:36px;padding:0 16px;font-size:13px;font-weight:600;border-radius:8px}.ar-actions .ar-cancel{box-shadow:0 0 0 1px rgb(156 163 175 / 0.5)}.ar-actions .ar-save{color:#fff;background:#0055dc}.ar-input[aria-invalid=\"true\"]{box-shadow:0 0 0 2px #d92d20}@media (prefers-reduced-motion: no-preference){html.rv-motion .rv-r:not(.rv-in){opacity:0}html.rv-motion .rv-r.rv-in{animation:rv-rise 0.8s cubic-bezier(0.16, 1, 0.3, 1) var(--rv-d, 0ms) backwards}@keyframes rv-rise{from{opacity:0;transform:translateY(14px)}}}#pagination{display:grid;grid-template-columns:1fr 1fr;gap:1rem;padding:0}#pagination a{display:grid;align-items:center;row-gap:2px;padding:8px 12px;border:1px solid #e3e3e3;border-radius:8px;transition:border-color 0.2s, background-color 0.2s}.dark #pagination a{border-color:rgb(255 255 255 / 0.1)}#pagination a:hover{border-color:#0055dc;background:rgb(0 85 220 / 0.04)}#pagination a::after{font-size:12px;font-weight:400;color:#6b7280}#pagination [data-component-part=\"pagination-title\"]{grid-row:1;grid-column:1 / -1;font-size:13px}#pagination .pagination-prev{grid-column:1;grid-template-columns:auto 1fr;column-gap:8px}#pagination .pagination-prev svg{grid-row:2;grid-column:1}#pagination .pagination-prev::after{content:\"Previous\";grid-row:2;grid-column:2}#pagination .pagination-next{grid-column:2;grid-template-columns:1fr auto;column-gap:8px;margin-left:0;text-align:right}#pagination .pagination-next svg{grid-row:2;grid-column:2}#pagination .pagination-next::after{content:\"Next\";grid-row:2;grid-column:1;justify-self:end}#pagination a:only-child{justify-self:start;min-width:220px;padding:8px 14px}#pagination .pagination-next:only-child{grid-column:2;justify-self:end}@media (max-width: 639px){#pagination{grid-template-columns:1fr}#pagination .pagination-next{grid-column:1}}.rv-copyright{margin-right:1rem}#footer a[href*=\"mintlify.com\"]{display:none}[data-component-part=\"card-icon\"]:has(img[src^=\"/images/devicon/\"]),[data-component-part=\"card-icon\"]:has(img[src^=\"/images/osicon/\"]){width:3.5rem;height:3.5rem}[data-component-part=\"card-icon\"] img[src^=\"/images/devicon/\"],[data-component-part=\"card-icon\"] img[src^=\"/images/osicon/\"]{width:3.5rem;height:3.5rem;object-fit:contain}[role=\"tabpanel\"] [data-component-part=\"card-icon\"]:has(img[src^=\"/images/logo/\"]),[role=\"tabpanel\"] [data-component-part=\"card-icon\"] img[src^=\"/images/logo/\"]{width:3.5rem;height:3.5rem;object-fit:contain}.qs-cols{column-count:3;column-gap:2rem}.qs-group{break-inside:avoid;margin-bottom:1.5rem}.qs-group>h4:first-child{margin-top:0}@media (max-width: 1023px){.qs-cols{column-count:2}}@media (max-width: 639px){.qs-cols{column-count:1}}.home-cards .card-group{display:flex;flex-wrap:wrap;justify-content:center}.home-cards .card-group>*{flex:0 0 100%}@media (min-width: 640px){.home-cards .card-group>*{flex:0 0 calc((100% - (var(--cols) - 1) * 1rem) / var(--cols))}}"}]}
{"page":{"pagePath":"product-guide/security-privacy/single-sign-on/azure","slug":"/product-guide/security-privacy/single-sign-on/azure","pageMetadata":{"title":"Microsoft Entra ID (Azure AD) Single Sign-On","sidebarTitle":"Microsoft Entra ID","description":"Configure SAML 2.0 Single Sign-On for Atatus using Microsoft Entra ID (formerly Azure Active Directory).","href":"/product-guide/security-privacy/single-sign-on/azure"},"description":{"compiledSource":"\"use strict\";\nconst {jsx: _jsx} = arguments[0];\nconst {useMDXComponents: _provideComponents} = arguments[0];\nfunction _createMdxContent(props) {\n const _components = {\n p: \"p\",\n ..._provideComponents(),\n ...props.components\n };\n return _jsx(_components.p, {\n children: \"Configure SAML 2.0 Single Sign-On for Atatus using Microsoft Entra ID (formerly Azure Active Directory).\"\n });\n}\nfunction MDXContent(props = {}) {\n const {wrapper: MDXLayout} = {\n ..._provideComponents(),\n ...props.components\n };\n return MDXLayout ? _jsx(MDXLayout, {\n ...props,\n children: _jsx(_createMdxContent, {\n ...props\n })\n }) : _createMdxContent(props);\n}\nreturn {\n default: MDXContent\n};\n","frontmatter":{},"scope":{}},"pageType":"default","mdx":{"mdxSource":{"compiledSource":"\"use strict\";const{Fragment:_Fragment,jsx:_jsx,jsxs:_jsxs}=arguments[0];const{useMDXComponents:_provideComponents}=arguments[0];function _createMdxContent(props){const _components={a:`a`,code:`code`,img:`img`,li:`li`,ol:`ol`,p:`p`,strong:`strong`,tbody:`tbody`,td:`td`,th:`th`,thead:`thead`,tr:`tr`,ul:`ul`,..._provideComponents(),...props.components},{Heading,Table,Warning}=_components;if(!Heading)_missingMdxReference(`Heading`,true);if(!Table)_missingMdxReference(`Table`,true);if(!Warning)_missingMdxReference(`Warning`,true);return _jsxs(_Fragment,{children:[_jsx(_components.p,{children:`This guide walks you through configuring SAML 2.0 Single Sign-On (SSO) between Microsoft Entra ID (formerly Azure Active Directory) and Atatus.`}),`\n`,_jsx(Heading,{level:`2`,id:`what-you-will-need`,children:`What You Will Need`}),`\n`,_jsx(_components.p,{children:`Before you begin, verify that you have:`}),`\n`,_jsxs(_components.ul,{children:[`\n`,_jsxs(_components.li,{children:[`An Atatus account with the `,_jsx(_components.strong,{children:`Owner`}),` or `,_jsx(_components.strong,{children:`Admin`}),` role.`]}),`\n`,_jsxs(_components.li,{children:[`A Microsoft Entra ID tenant with permissions to manage Enterprise Applications (`,_jsx(_components.strong,{children:`Cloud Application Administrator`}),` or `,_jsx(_components.strong,{children:`Application Administrator`}),`).`]}),`\n`]}),`\n`,_jsx(Heading,{level:`2`,id:`step-1-get-service-provider-values-from-atatus`,children:`Step 1: Get Service Provider Values from Atatus`}),`\n`,_jsxs(_components.ol,{children:[`\n`,_jsxs(_components.li,{children:[`Log in to your `,_jsx(_components.a,{href:`https://app.atatus.com`,children:`Atatus dashboard`}),`.`]}),`\n`,_jsxs(_components.li,{children:[`Navigate to `,_jsx(_components.strong,{children:`Settings » Account Settings » Single Sign-on`}),`.`]}),`\n`,_jsxs(_components.li,{children:[`Keep this tab open. Copy and record the following parameters:`,`\n`,_jsxs(_components.ul,{children:[`\n`,_jsxs(_components.li,{children:[_jsx(_components.strong,{children:`Atatus SAML ACS URL`}),`: `,_jsx(_components.code,{children:`https://app.atatus.com/login/saml/\u003cACCOUNT_ID>/acs`})]}),`\n`,_jsxs(_components.li,{children:[_jsx(_components.strong,{children:`Atatus Account Id`}),`: Your unique 24-character alphanumeric identifier.`]}),`\n`]}),`\n`]}),`\n`]}),`\n`,_jsx(Heading,{level:`2`,id:`step-2-create-an-enterprise-application-in-microsoft-entra-id`,children:`Step 2: Create an Enterprise Application in Microsoft Entra ID`}),`\n`,_jsxs(_components.ol,{children:[`\n`,_jsxs(_components.li,{children:[`Sign in to the `,_jsx(_components.a,{href:`https://entra.microsoft.com/`,children:`Microsoft Entra admin center`}),`.`]}),`\n`,_jsxs(_components.li,{children:[`In the left navigation, select `,_jsx(_components.strong,{children:`Identity » Applications » Enterprise applications`}),`.`]}),`\n`,_jsxs(_components.li,{children:[`Click `,_jsx(_components.strong,{children:`New application`}),`.`]}),`\n`]}),`\n`,_jsx(_components.p,{children:_jsx(_components.img,{src:`/images/guide/security-privacy/azure-create-new-app.png`,alt:`Microsoft Entra New Application`})}),`\n`,_jsxs(_components.ol,{start:`4`,children:[`\n`,_jsxs(_components.li,{children:[`Click `,_jsx(_components.strong,{children:`Create your own application`}),`.`]}),`\n`,_jsxs(_components.li,{children:[`Enter a name for your application (for example, `,_jsx(_components.code,{children:`Atatus`}),`).`]}),`\n`,_jsxs(_components.li,{children:[`Under `,_jsx(_components.strong,{children:`What are you looking to do with your application?`}),`, select `,_jsx(_components.strong,{children:`Integrate any other application you don’t find in the gallery (Non-gallery)`}),`.`]}),`\n`,_jsxs(_components.li,{children:[`Click `,_jsx(_components.strong,{children:`Create`}),`.`]}),`\n`]}),`\n`,_jsx(Heading,{level:`2`,id:`step-3-configure-saml-in-microsoft-entra-id`,children:`Step 3: Configure SAML in Microsoft Entra ID`}),`\n`,_jsxs(_components.ol,{children:[`\n`,_jsxs(_components.li,{children:[`In your newly created application, select `,_jsx(_components.strong,{children:`Single sign-on`}),` from the left navigation.`]}),`\n`,_jsxs(_components.li,{children:[`Select `,_jsx(_components.strong,{children:`SAML`}),` as the single sign-on method.`]}),`\n`,_jsxs(_components.li,{children:[`In the `,_jsx(_components.strong,{children:`Basic SAML Configuration`}),` box, click the `,_jsx(_components.strong,{children:`Edit`}),` icon (pencil).`]}),`\n`]}),`\n`,_jsx(_components.p,{children:_jsx(_components.img,{src:`/images/guide/security-privacy/azure-sso-provider-details.png`,alt:`Basic SAML Configuration`})}),`\n`,_jsxs(_components.ol,{start:`4`,children:[`\n`,_jsxs(_components.li,{children:[`Enter the Atatus Service Provider values:`,`\n`,_jsxs(_components.ul,{children:[`\n`,_jsxs(_components.li,{children:[_jsx(_components.strong,{children:`Identifier (Entity ID)`}),`: Paste your `,_jsx(_components.strong,{children:`Atatus Account Id`}),`.`]}),`\n`,_jsxs(_components.li,{children:[_jsx(_components.strong,{children:`Reply URL (Assertion Consumer Service URL)`}),`: Paste your `,_jsx(_components.strong,{children:`Atatus SAML ACS URL`}),`.`]}),`\n`]}),`\n`]}),`\n`,_jsxs(_components.li,{children:[`Click `,_jsx(_components.strong,{children:`Save`}),` and close the panel.`]}),`\n`]}),`\n`,_jsx(Heading,{level:`2`,id:`step-4-configure-saml-attribute-mapping`,children:`Step 4: Configure SAML Attribute Mapping`}),`\n`,_jsxs(_components.ol,{children:[`\n`,_jsxs(_components.li,{children:[`In the `,_jsx(_components.strong,{children:`Attributes \u0026 Claims`}),` box, click the `,_jsx(_components.strong,{children:`Edit`}),` icon.`]}),`\n`,_jsxs(_components.li,{children:[`Verify that `,_jsx(_components.strong,{children:`Unique User Identifier (Name ID)`}),` is configured with:`,`\n`,_jsxs(_components.ul,{children:[`\n`,_jsxs(_components.li,{children:[_jsx(_components.strong,{children:`Name identifier format`}),`: `,_jsx(_components.code,{children:`Email address`})]}),`\n`,_jsxs(_components.li,{children:[_jsx(_components.strong,{children:`Source attribute`}),`: `,_jsx(_components.code,{children:`user.userprincipalname`}),` (or `,_jsx(_components.code,{children:`user.mail`}),`)`]}),`\n`]}),`\n`]}),`\n`,_jsx(_components.li,{children:`Add or edit user claims to supply the user’s name:`}),`\n`]}),`\n`,_jsxs(Table,{children:[_jsx(_components.thead,{children:_jsxs(_components.tr,{children:[_jsx(_components.th,{style:{textAlign:`left`},children:`Name`}),_jsx(_components.th,{style:{textAlign:`left`},children:`Source Attribute`}),_jsx(_components.th,{style:{textAlign:`left`},children:`Requirement`})]})}),_jsxs(_components.tbody,{children:[_jsxs(_components.tr,{children:[_jsx(_components.td,{style:{textAlign:`left`},children:_jsx(_components.code,{children:`email`})}),_jsxs(_components.td,{style:{textAlign:`left`},children:[_jsx(_components.code,{children:`user.mail`}),` (or `,_jsx(_components.code,{children:`user.userprincipalname`}),`)`]}),_jsx(_components.td,{style:{textAlign:`left`},children:_jsx(_components.strong,{children:`Required`})})]}),_jsxs(_components.tr,{children:[_jsx(_components.td,{style:{textAlign:`left`},children:_jsx(_components.code,{children:`firstName`})}),_jsx(_components.td,{style:{textAlign:`left`},children:_jsx(_components.code,{children:`user.givenname`})}),_jsx(_components.td,{style:{textAlign:`left`},children:`Recommended`})]}),_jsxs(_components.tr,{children:[_jsx(_components.td,{style:{textAlign:`left`},children:_jsx(_components.code,{children:`lastName`})}),_jsx(_components.td,{style:{textAlign:`left`},children:_jsx(_components.code,{children:`user.surname`})}),_jsx(_components.td,{style:{textAlign:`left`},children:`Recommended`})]})]})]}),`\n`,_jsx(Warning,{children:_jsxs(_components.p,{children:[`Configure claim names as plain names (`,_jsx(_components.code,{children:`email`}),`, `,_jsx(_components.code,{children:`firstName`}),`, `,_jsx(_components.code,{children:`lastName`}),`). Do not wrap them with namespace URLs, as Atatus resolves attributes strictly by their exact name.`]})}),`\n`,_jsxs(_components.ol,{start:`4`,children:[`\n`,_jsxs(_components.li,{children:[`Click `,_jsx(_components.strong,{children:`Save`}),` and close the panel.`]}),`\n`]}),`\n`,_jsx(Heading,{level:`2`,id:`step-5-assign-users-and-groups-in-microsoft-entra-id`,children:`Step 5: Assign Users and Groups in Microsoft Entra ID`}),`\n`,_jsx(_components.p,{children:`Users cannot authenticate until they are assigned access in Microsoft Entra ID:`}),`\n`,_jsxs(_components.ol,{children:[`\n`,_jsxs(_components.li,{children:[`In the application sidebar, select `,_jsx(_components.strong,{children:`Manage » Users and groups`}),`.`]}),`\n`,_jsxs(_components.li,{children:[`Click `,_jsx(_components.strong,{children:`Add user/group`}),`.`]}),`\n`,_jsxs(_components.li,{children:[`Under `,_jsx(_components.strong,{children:`Users`}),`, click `,_jsx(_components.strong,{children:`None Selected`}),` and select the users or security groups requiring Atatus access.`]}),`\n`,_jsxs(_components.li,{children:[`Click `,_jsx(_components.strong,{children:`Select`}),`, then click `,_jsx(_components.strong,{children:`Assign`}),`.`]}),`\n`]}),`\n`,_jsx(Heading,{level:`2`,id:`step-6-download-metadata-and-configure-atatus`,children:`Step 6: Download Metadata and Configure Atatus`}),`\n`,_jsxs(_components.ol,{children:[`\n`,_jsxs(_components.li,{children:[`In Microsoft Entra ID, scroll down to section 3: `,_jsx(_components.strong,{children:`SAML Certificates`}),`.`]}),`\n`,_jsxs(_components.li,{children:[`Locate `,_jsx(_components.strong,{children:`Federation Metadata XML`}),` and click `,_jsx(_components.strong,{children:`Download`}),` to save the XML file to your computer.`]}),`\n`]}),`\n`,_jsx(_components.p,{children:_jsx(_components.img,{src:`/images/guide/security-privacy/azure-download-metadata.png`,alt:`Download Federation Metadata XML`})}),`\n`,_jsx(Warning,{children:_jsxs(_components.p,{children:[_jsx(_components.strong,{children:`Important Note on Certificate Rollover`}),`:\nAtatus requires that your Entra ID SAML configuration contains exactly `,_jsx(_components.strong,{children:`one`}),` active signing certificate. If Microsoft Entra ID has two active signing certificates in its descriptor (such as during an uncommitted rollover), Atatus certificate validation will fail. When rotating certificates, generate the new certificate and remove or uncheck the secondary certificate before uploading your metadata file to Atatus.`]})}),`\n`,_jsxs(_components.ol,{start:`3`,children:[`\n`,_jsxs(_components.li,{children:[`Return to the Atatus dashboard under `,_jsx(_components.strong,{children:`Settings » Account Settings » Single Sign-on`}),`.`]}),`\n`,_jsxs(_components.li,{children:[`Under `,_jsx(_components.strong,{children:`SAML Metadata from your SSO provider`}),`, select `,_jsx(_components.strong,{children:`SAML Metadata XML`}),`.`]}),`\n`,_jsxs(_components.li,{children:[`Click `,_jsx(_components.strong,{children:`Choose File`}),` (or Browse) and select the downloaded `,_jsx(_components.strong,{children:`Federation Metadata XML`}),` file.`]}),`\n`]}),`\n`,_jsx(_components.p,{children:_jsx(_components.img,{src:`/images/guide/security-privacy/atatus-sso-upload-xml.png`,alt:`Upload Metadata XML in Atatus`})}),`\n`,_jsxs(_components.ol,{start:`6`,children:[`\n`,_jsxs(_components.li,{children:[`Click `,_jsx(_components.strong,{children:`Save SSO`}),`.`]}),`\n`,_jsxs(_components.li,{children:[`Ensure the `,_jsx(_components.strong,{children:`Enabled`}),` toggle switch displays active.`]}),`\n`]})]})}function MDXContent(props={}){const{wrapper:MDXLayout}={..._provideComponents(),...props.components};return MDXLayout?_jsx(MDXLayout,{...props,children:_jsx(_createMdxContent,{...props})}):_createMdxContent(props)}return{default:MDXContent};function _missingMdxReference(id,component){throw new Error(`Expected `+(component?`component`:`object`)+\" `\"+id+\"` to be defined: you likely forgot to import, pass, or provide it.\")}","frontmatter":{},"scope":{"config":{},"pageMetadata":{"title":"Microsoft Entra ID (Azure AD) Single Sign-On","sidebarTitle":"Microsoft Entra ID","description":"Configure SAML 2.0 Single Sign-On for Atatus using Microsoft Entra ID (formerly Azure Active Directory).","href":"/product-guide/security-privacy/single-sign-on/azure"}}},"mdxSourceWithNoJs":null},"mdxExtracts":{"tableOfContents":[{"title":"What You Will Need","slug":"what-you-will-need","depth":2,"children":[]},{"title":"Step 1: Get Service Provider Values from Atatus","slug":"step-1-get-service-provider-values-from-atatus","depth":2,"children":[]},{"title":"Step 2: Create an Enterprise Application in Microsoft Entra ID","slug":"step-2-create-an-enterprise-application-in-microsoft-entra-id","depth":2,"children":[]},{"title":"Step 3: Configure SAML in Microsoft Entra ID","slug":"step-3-configure-saml-in-microsoft-entra-id","depth":2,"children":[]},{"title":"Step 4: Configure SAML Attribute Mapping","slug":"step-4-configure-saml-attribute-mapping","depth":2,"children":[]},{"title":"Step 5: Assign Users and Groups in Microsoft Entra ID","slug":"step-5-assign-users-and-groups-in-microsoft-entra-id","depth":2,"children":[]},{"title":"Step 6: Download Metadata and Configure Atatus","slug":"step-6-download-metadata-and-configure-atatus","depth":2,"children":[]}],"codeExamples":{}},"jsLinks":["/_mintlify/custom/localhost/c2489d4aee377e25/footer-compliance.js","/_mintlify/custom/localhost/2e3e3c15c249b948/footer-copyright.js","/_mintlify/custom/localhost/42a5f3d1b8fd87a3/footer-offset.js","/_mintlify/custom/localhost/faaf692e80512594/kelu-widget.js","/_mintlify/custom/localhost/df3640d7ab8f7e92/regions.js","/_mintlify/custom/localhost/04d865768f445464/reveal.js"],"subdomain":"localhost","siteName":"Atatus Docs","title":"Microsoft Entra ID (Azure AD) Single Sign-On - Atatus Docs","navMaps":{"firstHrefInVersion":{},"firstHrefInLanguage":{}},"originalFileLocation":"product-guide/security-privacy/single-sign-on/azure.mdx"},"headHtml":"\u003cscript data-mint-head>(function(){var d=document.documentElement,p=null;if(!p){try{p=localStorage.getItem(\"isDarkMode\")}catch(e){}if(p==='true')p='dark';else if(p==='false')p='light';if(p!=='light'\u0026\u0026p!=='dark'\u0026\u0026p!=='system')p=\"light\"}var r=p==='system'?(matchMedia(\"(prefers-color-scheme: dark)\").matches?'dark':'light'):p;d.classList.remove(r==='dark'?'light':'dark');d.classList.add(r);d.setAttribute(\"data-theme-preference\",p)})();\u003c/script>\u003cmeta data-mint-head name=\"description\" content=\"Configure SAML 2.0 Single Sign-On for Atatus using Microsoft Entra ID (formerly Azure Active Directory).\">\u003cmeta data-mint-head name=\"application-name\" content=\"Atatus Docs\">\u003cmeta data-mint-head name=\"generator\" content=\"Mintlify\">\u003clink data-mint-head rel=\"apple-touch-icon\" type=\"image/png\" sizes=\"180x180\" href=\"/favicons/apple-touch-icon.png\">\u003clink data-mint-head rel=\"icon\" type=\"image/png\" sizes=\"32x32\" href=\"/favicons/favicon-32x32.png\">\u003clink data-mint-head rel=\"icon\" type=\"image/png\" sizes=\"16x16\" href=\"/favicons/favicon-16x16.png\">\u003clink data-mint-head rel=\"shortcut icon\" type=\"image/x-icon\" href=\"/favicons/favicon.ico\">\u003cmeta data-mint-head property=\"og:title\" content=\"Microsoft Entra ID (Azure AD) Single Sign-On - Atatus Docs\">\u003cmeta data-mint-head property=\"og:description\" content=\"Configure SAML 2.0 Single Sign-On for Atatus using Microsoft Entra ID (formerly Azure Active Directory).\">\u003cmeta data-mint-head property=\"og:site_name\" content=\"Atatus Docs\">\u003cmeta data-mint-head property=\"og:url\" content=\"https://docs.atatus.com/product-guide/security-privacy/single-sign-on/azure\">\u003cmeta data-mint-head property=\"og:type\" content=\"website\">\u003cmeta data-mint-head name=\"twitter:card\" content=\"summary_large_image\">\u003cmeta data-mint-head name=\"twitter:title\" content=\"Microsoft Entra ID (Azure AD) Single Sign-On - Atatus Docs\">\u003cmeta data-mint-head name=\"twitter:description\" content=\"Configure SAML 2.0 Single Sign-On for Atatus using Microsoft Entra ID (formerly Azure Active Directory).\">\u003cmeta data-mint-head name=\"msapplication-config\" content=\"/favicons/browserconfig.xml\">\u003cmeta data-mint-head name=\"apple-mobile-web-app-title\" content=\"Atatus Docs\">\u003cmeta data-mint-head name=\"msapplication-TileColor\" content=\"#0055DC\">\u003clink data-mint-head rel=\"canonical\" href=\"https://docs.atatus.com/product-guide/security-privacy/single-sign-on/azure\">\u003clink data-mint-head rel=\"alternate\" type=\"application/xml\" href=\"/sitemap.xml\">\u003clink data-mint-head rel=\"alternate\" type=\"text/markdown\" href=\"/product-guide/security-privacy/single-sign-on/azure.md\">\u003cscript data-mint-head type=\"application/ld+json\">{\"@context\":\"https://schema.org\",\"@type\":\"WebSite\",\"name\":\"Atatus Docs\",\"publisher\":{\"@type\":\"Organization\",\"name\":\"Atatus Docs\"},\"provider\":{\"@type\":\"Organization\",\"name\":\"Mintlify\",\"url\":\"https://mintlify.com\"}}\u003c/script>","agentPointerHref":"/product-guide/security-privacy/single-sign-on/azure.md","siteName":"Atatus Docs","nav":{"tabs":[{"tab":"Documentation","pages":[{"title":"Atatus Docs","sidebarTitle":"Docs Home","href":""},{"group":"Atatus Docs","pages":[{"group":"Get Started","pages":[{"title":"Quick Start Guide","sidebarTitle":"Quick Start","href":"/getting-started/quick-start"},{"title":"Supported Agents","href":"/getting-started/supported-agents"}]},{"group":"Application Monitoring","pages":[{"title":"Application Performance Monitoring (APM) Overview","sidebarTitle":"Overview","href":"/application-monitoring/overview"},{"group":"PHP","pages":[{"title":"PHP APM Overview - Monitor your PHP Apps","sidebarTitle":"Overview","href":"/application-monitoring/php-agent/overview"},{"group":"Installation","pages":[{"title":"PHP Agent Installation Overview for Application Monitoring","sidebarTitle":"Overview","href":"/application-monitoring/php-agent/installation/overview"},{"title":"PHP Agent Installation - Ubuntu and Debian","sidebarTitle":"Debian","href":"/application-monitoring/php-agent/installation/debian"},{"title":"PHP Agent Installation - RedHat, CentOS","sidebarTitle":"RedHat","href":"/application-monitoring/php-agent/installation/redhat"},{"title":"PHP Agent Installation - Alpine, Void Linux","sidebarTitle":"Musl","href":"/application-monitoring/php-agent/installation/musl"},{"title":"PHP Agent Installation - Mac","sidebarTitle":"Mac","href":"/application-monitoring/php-agent/installation/mac"},{"title":"Tar Archive","href":"/application-monitoring/php-agent/installation/tar-archive"},{"title":"Tar Archive PHP Agent for arm64","sidebarTitle":"Tar Archive for arm64","href":"/application-monitoring/php-agent/installation/tar-archive-arm"}]},{"group":"Other Installations","pages":[{"title":"PHP APM Agent Installations in various platforms","sidebarTitle":"Overview","href":"/application-monitoring/php-agent/other-installations/overview"},{"title":"Atatus PHP Agent in Heroku PHP apps","sidebarTitle":"Heroku","href":"/application-monitoring/php-agent/other-installations/heroku"},{"title":"Install Atatus PHP Agent in Docker","sidebarTitle":"Docker","href":"/application-monitoring/php-agent/other-installations/docker"},{"title":"Atatus PHP Agent in Bitnami Wordpress - APM","sidebarTitle":"Bitnami","href":"/application-monitoring/php-agent/other-installations/bitnami"},{"title":"Atatus PHP Agent in AWS Elastic Beanstalk","sidebarTitle":"AWS Elastic Beanstalk","href":"/application-monitoring/php-agent/other-installations/beanstalk"},{"title":"Atatus PHP Agent in Laravel Vapor - APM","sidebarTitle":"Laravel Vapor","href":"/application-monitoring/php-agent/other-installations/laravel-vapor"},{"title":"Laravel Middleware for Atatus PHP Analytics","sidebarTitle":"Laravel Analytics Middleware","href":"/application-monitoring/php-agent/other-installations/laravel-analytics-middleware"},{"title":"Laravel Octane Middleware for APM","sidebarTitle":"Laravel Octane","href":"/application-monitoring/php-agent/other-installations/laravel-octane"}]},{"group":"Supported Frameworks","pages":[{"title":"PHP agent supported frameworks","sidebarTitle":"Overview","href":"/application-monitoring/php-agent/supported-frameworks"},{"title":"CodeIgniter PHP App Monitoring","sidebarTitle":"CodeIgniter","href":"/application-monitoring/php-agent/codeigniter"},{"title":"Lumen PHP App Monitoring","sidebarTitle":"Lumen","href":"/application-monitoring/php-agent/lumen"},{"title":"Phalcon Integration","sidebarTitle":"Phalcon","href":"/application-monitoring/php-agent/phalcon"}]},{"title":"Customizing PHP Agent","sidebarTitle":"Customizing Agent","href":"/application-monitoring/php-agent/customizing-agent"},{"group":"PHP Agent API","pages":[{"title":"PHP Agent API to customize PHP App monitoring.","sidebarTitle":"Overview","href":"/application-monitoring/php-agent/agent-api/overview"},{"title":"Adding custom data with PHP traces","sidebarTitle":"Add custom data","href":"/application-monitoring/php-agent/agent-api/php-add-custom-data"},{"title":"Add custom layer in PHP APM","sidebarTitle":"Add custom layer","href":"/application-monitoring/php-agent/agent-api/php-add-custom-layer"},{"title":"Begin transaction in PHP APM","sidebarTitle":"Begin transaction","href":"/application-monitoring/php-agent/agent-api/php-begin-transaction"},{"title":"End transaction in PHP APM","sidebarTitle":"End transaction","href":"/application-monitoring/php-agent/agent-api/php-end-transaction"},{"title":"Ignore transaction in PHP APM","sidebarTitle":"Ignore transaction","href":"/application-monitoring/php-agent/agent-api/php-ignore-transaction"},{"title":"Notify PHP exception and error in PHP APM","sidebarTitle":"Notify exception and error","href":"/application-monitoring/php-agent/agent-api/php-notify-exception-and-error"},{"title":"Set background transaction in PHP APM","sidebarTitle":"Set background transaction","href":"/application-monitoring/php-agent/agent-api/php-set-background-transaction"},{"title":"Set Company in PHP analytics","sidebarTitle":"Set company","href":"/application-monitoring/php-agent/agent-api/php-set-company"},{"title":"Set request body in PHP Analytics","sidebarTitle":"Set request body","href":"/application-monitoring/php-agent/agent-api/php-set-request-body"},{"title":"Set response body in PHP Analytics","sidebarTitle":"Set response body","href":"/application-monitoring/php-agent/agent-api/php-set-response-body"},{"title":"Set status code in PHP APM","sidebarTitle":"Set status code","href":"/application-monitoring/php-agent/agent-api/php-set-status-code"},{"title":"Set transaction name in PHP APM","sidebarTitle":"Set transaction name","href":"/application-monitoring/php-agent/agent-api/php-set-transaction-name"},{"title":"Set user in PHP APM \u0026 Analytics","sidebarTitle":"Set user","href":"/application-monitoring/php-agent/agent-api/php-set-user"},{"title":"Set application version","sidebarTitle":"Set app version","href":"/application-monitoring/php-agent/agent-api/php-set-app-version"}]},{"group":"Uninstallation","pages":[{"title":"PHP APM Agent Uninstallation Overview","sidebarTitle":"Overview","href":"/application-monitoring/php-agent/uninstallation/overview"},{"title":"Uninstall the PHP agent - Ubuntu and Debian","sidebarTitle":"Debian","href":"/application-monitoring/php-agent/uninstallation/uninstall-debian"},{"title":"Uninstall the PHP APM agent - RedHat, CentOS","sidebarTitle":"RedHat","href":"/application-monitoring/php-agent/uninstallation/uninstall-redhat"},{"title":"Uninstall the PHP agent - Alpine, Void Linux","sidebarTitle":"Musl","href":"/application-monitoring/php-agent/uninstallation/uninstall-musl"},{"title":"Uninstall the PHP agent - Mac","sidebarTitle":"Mac","href":"/application-monitoring/php-agent/uninstallation/uninstall-mac"},{"title":"Uninstall the PHP APM agent - Tar Archive","sidebarTitle":"Tar Archive","href":"/application-monitoring/php-agent/uninstallation/uninstall-tar-archive"},{"title":"Uninstall Atatus PHP Agent in Heroku PHP apps","sidebarTitle":"Heroku","href":"/application-monitoring/php-agent/uninstallation/heroku"}]},{"group":"Troubleshooting","pages":[{"title":"PHP Troubleshooting","sidebarTitle":"Overview","href":"/application-monitoring/php-agent/troubleshooting/overview"},{"title":"Unable to see data in PHP APM","href":"/application-monitoring/php-agent/troubleshooting/unable-to-see-data-in-php-apm"},{"title":"Manually starting Atatus PHP Collector","href":"/application-monitoring/php-agent/troubleshooting/manually-starting-atatus-php-collector"},{"title":"No transaction names in CodeIgniter framework","href":"/application-monitoring/php-agent/troubleshooting/no-transaction-names-in-codeIgniter-framework"},{"title":"Atatus PHP Agent not working in CentOS","href":"/application-monitoring/php-agent/troubleshooting/php-agent-not-working-in-centos"},{"title":"Atatus PHP Agent not working in CloudLinux","href":"/application-monitoring/php-agent/troubleshooting/php-agent-not-working-in-cloudlinux"}]},{"group":"FAQ","pages":[{"title":"PHP FAQ","sidebarTitle":"Overview","href":"/application-monitoring/php-agent/faq/overview"},{"title":"How to install specific PHP agent version?","sidebarTitle":"How to install specific agent version?","href":"/application-monitoring/php-agent/faq/how-install-specific-agent-version"},{"title":"How to enable API Analytics in Atatus PHP agent?","sidebarTitle":"How to Enable analytics in Atatus PHP agent?","href":"/application-monitoring/php-agent/faq/how-to-enable-atatus-php-analytics"},{"title":"How to install Atatus APM agent in PHP 5.4?","href":"/application-monitoring/php-agent/faq/how-to-install-apm-agent-in-php54"},{"title":"Install PHP agent in specific PHP version","href":"/application-monitoring/php-agent/faq/install-php-agent-in-specific-php-version"},{"title":"Multiple PHP Apps in a Single Server","href":"/application-monitoring/php-agent/faq/php-multiple-apps-in-a-single-server"},{"title":"Set URI as Transaction Name in WordPress","href":"/application-monitoring/php-agent/faq/set-uri-as-transaction-name-in-wordpress"}]}]},{"group":"Node.js","pages":[{"title":"Node.js APM Overview","sidebarTitle":"Overview","href":"/application-monitoring/nodejs-agent/overview"},{"title":"Node.js Agent Installation Setup","sidebarTitle":"Installation","href":"/application-monitoring/nodejs-agent/installation/nodejs-apm-installation-setup"},{"group":"Other Installations","pages":[{"title":"Atatus Node.js Agent Installations in various platforms","sidebarTitle":"Overview","href":"/application-monitoring/nodejs-agent/other-installations/overview"},{"title":"Monitor your Node.js apps in Heroku","sidebarTitle":"Heroku","href":"/application-monitoring/nodejs-agent/other-installations/heroku"},{"title":"NestJS APM Integration","sidebarTitle":"NestJS","href":"/application-monitoring/nodejs-agent/other-installations/nestjs"},{"title":"Monitor your Next.js apps in Atatus","sidebarTitle":"Next.js","href":"/application-monitoring/nodejs-agent/other-installations/nextjs"},{"title":"Monitor your Nuxt.js apps in Atatus","sidebarTitle":"Nuxt.js","href":"/application-monitoring/nodejs-agent/other-installations/nuxtjs"},{"title":"Monitor your Prisma ORM in Node.js application","sidebarTitle":"Prisma","href":"/application-monitoring/nodejs-agent/other-installations/prisma"}]},{"title":"Node.js agent supported frameworks","sidebarTitle":"Supported Frameworks","href":"/application-monitoring/nodejs-agent/supported-frameworks"},{"title":"Customizing Node.js APM Agent","sidebarTitle":"Customizing Agent","href":"/application-monitoring/nodejs-agent/customizing-agent"},{"title":"Node.js Log Correlation","sidebarTitle":"Log Correlation","href":"/application-monitoring/nodejs-agent/log-correlation"},{"title":"Instrumenting async \u0026 background work in Node.js","sidebarTitle":"Async \u0026 Background Work","href":"/application-monitoring/nodejs-agent/async-and-background-work"},{"group":"Node.js Agent API","pages":[{"title":"Node.js Agent API","sidebarTitle":"Overview","href":"/application-monitoring/nodejs-agent/agent-api/overview"},{"title":"Set transaction and span outcome in Node.js APM agent","sidebarTitle":"Set outcome","href":"/application-monitoring/nodejs-agent/agent-api/nodejs-apm-set-outcome"},{"title":"Capture Node.js exceptions and errors","sidebarTitle":"Capture exceptions","href":"/application-monitoring/nodejs-agent/agent-api/nodejs-apm-notify-exception-and-error"},{"title":"Capture Node.js Console Errors","sidebarTitle":"Capture console errors","href":"/application-monitoring/nodejs-agent/agent-api/nodejs-apm-capture-console-errors"},{"title":"Set user in Node.js APM agent","sidebarTitle":"Set user","href":"/application-monitoring/nodejs-agent/agent-api/nodejs-apm-set-user"},{"title":"Set custom data in Node.js APM agent","sidebarTitle":"Set custom data","href":"/application-monitoring/nodejs-agent/agent-api/nodejs-apm-set-custom-data"},{"title":"Set Company in Node.js Analytics","sidebarTitle":"Set company","href":"/application-monitoring/nodejs-agent/agent-api/nodejs-apm-set-company"},{"title":"Set response body in Node.js Analytics","sidebarTitle":"Set response body","href":"/application-monitoring/nodejs-agent/agent-api/nodejs-apm-set-response-body"},{"title":"Set tags in Node.js APM agent","sidebarTitle":"Set tags","href":"/application-monitoring/nodejs-agent/agent-api/nodejs-apm-set-tags"},{"title":"Set transaction name in Node.js APM agent","sidebarTitle":"Set transaction name","href":"/application-monitoring/nodejs-agent/agent-api/nodejs-apm-set-transaction-name"},{"title":"Start custom transaction in Node.js APM agent","sidebarTitle":"Start transaction","href":"/application-monitoring/nodejs-agent/agent-api/nodejs-apm-start-transaction"},{"title":"Start background transaction in Node.js APM agent","sidebarTitle":"Start background transaction","href":"/application-monitoring/nodejs-agent/agent-api/nodejs-apm-start-background-transaction"},{"title":"Start Message Transaction in Node.js APM Agent","sidebarTitle":"Start message transaction","href":"/application-monitoring/nodejs-agent/agent-api/nodejs-apm-start-message-transaction"},{"title":"End transaction in Node.js APM agent","sidebarTitle":"End transaction","href":"/application-monitoring/nodejs-agent/agent-api/nodejs-apm-end-transaction"},{"title":"Capture span in Node.js agent","sidebarTitle":"Capture span","href":"/application-monitoring/nodejs-agent/agent-api/nodejs-apm-start-span"},{"title":"Skip/Ignore certain requests in Node.js transactions","sidebarTitle":"Set skip","href":"/application-monitoring/nodejs-agent/agent-api/nodejs-apm-skip"},{"title":"Skip/Ignore certain requests in Node.js analytics","sidebarTitle":"Set analytics skip","href":"/application-monitoring/nodejs-agent/agent-api/nodejs-apm-analytics-skip"},{"title":"Mask confidential data in Node.js analytics","sidebarTitle":"Set analytics mask","href":"/application-monitoring/nodejs-agent/agent-api/nodejs-apm-analytics-mask"},{"title":"Set Log Body Content Types in Analytics","sidebarTitle":"Set log body content types","href":"/application-monitoring/nodejs-agent/agent-api/nodejs-apm-set-log-body-content-type"}]},{"title":"Uninstall the Node.js agent","sidebarTitle":"Uninstallation","href":"/application-monitoring/nodejs-agent/uninstallation/uninstall-agent"},{"group":"Troubleshooting","pages":[{"title":"Node.js Troubleshooting","sidebarTitle":"Overview","href":"/application-monitoring/nodejs-agent/troubleshooting/overview"},{"title":"Unable to see data in Node.js APM","href":"/application-monitoring/nodejs-agent/troubleshooting/unable-to-see-data-in-node.js-APM"},{"title":"Capturing Unhandled Server Errors in Next.js","sidebarTitle":"Unhandled server errors in Next.js","href":"/application-monitoring/nodejs-agent/troubleshooting/nextjs-unhandled-server-errors"}]},{"group":"FAQ","pages":[{"title":"Node.js FAQ","sidebarTitle":"Overview","href":"/application-monitoring/nodejs-agent/faq/overview"},{"title":"How can Atatus be added to my Node.js app?","href":"/application-monitoring/nodejs-agent/faq/how-can-atatus-be-added-to-my-nodejs-app"},{"title":"How can HTTP status codes in APM error tracking be excluded?","href":"/application-monitoring/nodejs-agent/faq/how-can-http-status-codes-in-apm-error-tracking-be-excluded"},{"title":"How can specific transactions be excluded?","href":"/application-monitoring/nodejs-agent/faq/how-can-specific-transactions-be-excluded"},{"title":"How to enable API Analytics in Atatus Node.js agent?","sidebarTitle":"How to Enable analytics in Atatus Node.js agent?","href":"/application-monitoring/nodejs-agent/faq/how-to-enable-atatus-nodejs-analytics"},{"title":"How to integrate Node APM with Node.js cluster?","href":"/application-monitoring/nodejs-agent/faq/how-to-integrate-node-apm-with-node-js-cluster"},{"title":"How to Link Cross-Server APIs with Redis in Node.js?","href":"/application-monitoring/nodejs-agent/faq/how-to-link-cross-server-api-redis"},{"title":"How to measure AWS Lambda functions?","href":"/application-monitoring/nodejs-agent/faq/how-to-measure-aws-lamda-functions"},{"title":"How to measure background jobs?","href":"/application-monitoring/nodejs-agent/faq/how-to-measure-web-sockets-calls-or-background-jobs"},{"title":"How to migrate Node.js agent v0.x to Node.js agent v1.x?","href":"/application-monitoring/nodejs-agent/faq/how-to-migrate-to-new-nodejs-agent"},{"title":"How to set my own hostname in Node.js APM?","href":"/application-monitoring/nodejs-agent/faq/how-to-set-my-own-hostname-in-node.js-apm"},{"title":"How to set unique request Id in Atatus Node.js agent?","sidebarTitle":"How to set unique request Id in Atatus agent?","href":"/application-monitoring/nodejs-agent/faq/how-to-set-unique-request-id"},{"title":"How to track Meteor server errors?","href":"/application-monitoring/nodejs-agent/faq/how-to-track-meteor-server-errors"}]}]},{"group":"Java","pages":[{"title":"Java APM Solution Overview","sidebarTitle":"Overview","href":"/application-monitoring/java-agent/overview"},{"group":"Installation","pages":[{"title":"Java Agent Installation Overview","sidebarTitle":"Overview","href":"/application-monitoring/java-agent/installation/overview"},{"title":"Java APM agent - Spring and Spring Boot applications","sidebarTitle":"Spring Boot","href":"/application-monitoring/java-agent/installation/spring-boot"},{"title":"Java APM agent in Apache Tomcat","sidebarTitle":"Apache Tomcat","href":"/application-monitoring/java-agent/installation/apache-tomcat"},{"title":"Java APM agent in GlassFish","sidebarTitle":"GlassFish","href":"/application-monitoring/java-agent/installation/glassfish"},{"title":"Java APM agent in JBoss","sidebarTitle":"JBoss","href":"/application-monitoring/java-agent/installation/jboss"},{"title":"Java APM agent in Jetty servers","sidebarTitle":"Jetty","href":"/application-monitoring/java-agent/installation/jetty"},{"title":"Java APM agent in Oracle WebLogic servers","sidebarTitle":"Oracle Weblogic","href":"/application-monitoring/java-agent/installation/oracle-weblogic"},{"title":"Java APM agent in WebSphere Liberty applications","sidebarTitle":"Websphere Liberty","href":"/application-monitoring/java-agent/installation/websphere-liberty"},{"title":"Java APM agent in Wildfly Applications","sidebarTitle":"Wildfly","href":"/application-monitoring/java-agent/installation/wildfly"},{"title":"Java APM agent in Java applications","sidebarTitle":"Other JVMs","href":"/application-monitoring/java-agent/installation/other-jvm"},{"title":"Java APM agent in Akka Framework","sidebarTitle":"Akka","href":"/application-monitoring/java-agent/installation/akka"}]},{"group":"Other Installations","pages":[{"title":"Atatus Java Agent Installations in various platforms","sidebarTitle":"Overview","href":"/application-monitoring/java-agent/other-installations/overview"},{"title":"Monitor your Java apps in Heroku","sidebarTitle":"Heroku","href":"/application-monitoring/java-agent/other-installations/heroku"},{"title":"Java Agent in AWS Elastic Beanstalk","sidebarTitle":"AWS Elastic Beanstalk","href":"/application-monitoring/java-agent/other-installations/beanstalk"}]},{"title":"Java agent supported servers/frameworks","sidebarTitle":"Supported Frameworks","href":"/application-monitoring/java-agent/supported-frameworks"},{"group":"Java Agent API","pages":[{"title":"Java Agent API - Application Performance Monitoring","sidebarTitle":"Overview","href":"/application-monitoring/java-agent/agent-api/overview"},{"title":"Set transaction and span outcome in Java APM agent","sidebarTitle":"Set outcome","href":"/application-monitoring/java-agent/agent-api/java-set-outcome"},{"title":"Capture Java Exceptions with Atatus APM Agent API","sidebarTitle":"Capture exception","href":"/application-monitoring/java-agent/agent-api/java-capture-exception"},{"title":"Adding custom data","sidebarTitle":"Set custom data","href":"/application-monitoring/java-agent/agent-api/java-custom-data"},{"title":"Set user in Java APM agent","sidebarTitle":"Set User","href":"/application-monitoring/java-agent/agent-api/java-set-user"},{"title":"Set transaction name in Java","sidebarTitle":"Set transaction name","href":"/application-monitoring/java-agent/agent-api/java-set-transaction-name"},{"title":"Set type - Java Application Performance Monitoring","sidebarTitle":"Set transaction type","href":"/application-monitoring/java-agent/agent-api/java-set-background-transaction"},{"title":"Start custom transaction in Java","sidebarTitle":"Start transaction","href":"/application-monitoring/java-agent/agent-api/java-start-transaction"},{"title":"End transaction in Java","sidebarTitle":"End transaction","href":"/application-monitoring/java-agent/agent-api/java-end-transaction"},{"title":"Annotation API","href":"/application-monitoring/java-agent/agent-api/annotation-api"},{"title":"Trace Methods","href":"/application-monitoring/java-agent/agent-api/trace-methods"}]},{"title":"Customizing Java APM Agent","sidebarTitle":"Customizing Agent","href":"/application-monitoring/java-agent/customizing-agent"},{"title":"Uninstall the Java APM agent","sidebarTitle":"Uninstallation","href":"/application-monitoring/java-agent/uninstall-agent"},{"title":"Java Log Correlation","sidebarTitle":"Log Correlation","href":"/application-monitoring/java-agent/log-correlation"},{"group":"Troubleshooting","pages":[{"title":"Java Troubleshooting","sidebarTitle":"Overview","href":"/application-monitoring/java-agent/troubleshooting/overview"},{"title":"Unable to see data in Java APM","href":"/application-monitoring/java-agent/troubleshooting/unable-to-see-data-in-java-apm"},{"title":"Async Profiler Library Loading Error (/tmp error)","href":"/application-monitoring/java-agent/troubleshooting/async-profiler-library-loading-error"}]},{"group":"FAQ","pages":[{"title":"Java FAQ","sidebarTitle":"Overview","href":"/application-monitoring/java-agent/faq/overview"},{"title":"How to Enable analytics in Atatus Java agent?","href":"/application-monitoring/java-agent/faq/how-to-enable-atatus-java-analytics"}]}]},{"group":"Ruby","pages":[{"title":"Ruby APM Overview","sidebarTitle":"Overview","href":"/application-monitoring/ruby-agent/overview"},{"group":"Installation","pages":[{"title":"Install Atatus Ruby APM agent in Rails server","sidebarTitle":"Rails","href":"/application-monitoring/ruby-agent/installation/rails"},{"title":"Install Atatus Ruby APM agent in Sinatra server","sidebarTitle":"Sinatra","href":"/application-monitoring/ruby-agent/installation/sinatra"},{"title":"Install Atatus Ruby APM agent in Grape","sidebarTitle":"Grape","href":"/application-monitoring/ruby-agent/installation/grape"}]},{"group":"Other Installations","pages":[{"title":"Install Atatus Ruby Agent in Heroku","sidebarTitle":"Heroku","href":"/application-monitoring/ruby-agent/installation/heroku"}]},{"title":"Ruby agent supported frameworks","sidebarTitle":"Supported Frameworks","href":"/application-monitoring/ruby-agent/supported-frameworks"},{"group":"Ruby agent API","pages":[{"title":"Ruby Agent API","sidebarTitle":"Overview","href":"/application-monitoring/ruby-agent/agent-api/overview"},{"title":"Set transaction and span outcome in Ruby APM agent","sidebarTitle":"Set outcome","href":"/application-monitoring/ruby-agent/agent-api/ruby-set-outcome"},{"title":"Custom instrumentation of method in Ruby APM","sidebarTitle":"Custom instrumentation of method","href":"/application-monitoring/ruby-agent/agent-api/ruby-span-instrumentation"},{"title":"Send exceptions and errors in Ruby APM","sidebarTitle":"Notify exception","href":"/application-monitoring/ruby-agent/agent-api/ruby-notify-exception"},{"title":"Set Company in Ruby Analytics","sidebarTitle":"Set company","href":"/application-monitoring/ruby-agent/agent-api/ruby-set-company"},{"title":"Set custom data in Ruby APM","sidebarTitle":"Set custom data","href":"/application-monitoring/ruby-agent/agent-api/ruby-set-custom-data"},{"title":"Set response body in Ruby Analytics","sidebarTitle":"Set response body","href":"/application-monitoring/ruby-agent/agent-api/ruby-set-response-body"},{"title":"Set current user in Ruby APM","sidebarTitle":"Set user","href":"/application-monitoring/ruby-agent/agent-api/ruby-set-user"},{"title":"Start custom transaction in Ruby APM","sidebarTitle":"Start transaction","href":"/application-monitoring/ruby-agent/agent-api/ruby-start-transaction"},{"title":"End transaction in Ruby APM","sidebarTitle":"End transaction","href":"/application-monitoring/ruby-agent/agent-api/ruby-end-transaction"}]},{"title":"Customizing Ruby Agent","sidebarTitle":"Customizing Agent","href":"/application-monitoring/ruby-agent/customizing-agent"},{"title":"Uninstall the Ruby agent","sidebarTitle":"Uninstallation","href":"/application-monitoring/ruby-agent/uninstall-agent"},{"title":"Ruby Log Correlation","sidebarTitle":"Log Correlation","href":"/application-monitoring/ruby-agent/log-correlation"},{"group":"Troubleshooting","pages":[{"title":"Ruby Troubleshooting","sidebarTitle":"Overview","href":"/application-monitoring/ruby-agent/troubleshooting/overview"},{"title":"No exceptions found in Rails","href":"/application-monitoring/ruby-agent/troubleshooting/no-exceptions-found-in-rails"}]},{"group":"FAQ","pages":[{"title":"Ruby FAQ","sidebarTitle":"Overview","href":"/application-monitoring/ruby-agent/faq/overview"},{"title":"How to enable API Analytics in Atatus Ruby agent?","sidebarTitle":"How to Enable analytics in Atatus Ruby agent?","href":"/application-monitoring/ruby-agent/faq/how-to-enable-atatus-ruby-analytics"}]}]},{"group":"Python","pages":[{"title":"Python Agent Overview- Installation and Framework Support","sidebarTitle":"Overview","href":"/application-monitoring/python-agent/overview"},{"group":"Installation","pages":[{"title":"Install Atatus Python APM agent in Django server","sidebarTitle":"Django","href":"/application-monitoring/python-agent/installation/django"},{"title":"Install Atatus Python APM agent in Flask server","sidebarTitle":"Flask","href":"/application-monitoring/python-agent/installation/flask"},{"title":"Install Atatus Python APM agent in FastAPI server","sidebarTitle":"FastAPI","href":"/application-monitoring/python-agent/installation/fastapi"}]},{"group":"Other Installations","pages":[{"title":"Install Atatus Python APM agent in Odoo","sidebarTitle":"Odoo","href":"/application-monitoring/python-agent/installation/odoo"},{"title":"Install Atatus Python Agent in Heroku","sidebarTitle":"Heroku","href":"/application-monitoring/python-agent/installation/heroku"},{"title":"Python Custom Code Instrumentation with Atatus","sidebarTitle":"Custom code","href":"/application-monitoring/python-agent/installation/custom-code"}]},{"title":"Supported Python Frameworks | Python APM","sidebarTitle":"Supported Frameworks","href":"/application-monitoring/python-agent/supported-frameworks"},{"title":"Customizing Python Agent","sidebarTitle":"Customizing Agent","href":"/application-monitoring/python-agent/customizing-agent"},{"group":"Python Agent API","pages":[{"title":"Python Agent API","sidebarTitle":"Overview","href":"/application-monitoring/python-agent/agent-api/overview"},{"title":"Set transaction and span outcome in Python APM agent","sidebarTitle":"Set outcome","href":"/application-monitoring/python-agent/agent-api/python-set-outcome"},{"title":"Begin transaction in Python APM","sidebarTitle":"Begin transaction","href":"/application-monitoring/python-agent/agent-api/python-begin-transaction"},{"title":"End transaction in Python APM","sidebarTitle":"End transaction","href":"/application-monitoring/python-agent/agent-api/python-end-transaction"},{"title":"Capture span in Python APM","sidebarTitle":"Capture span","href":"/application-monitoring/python-agent/agent-api/python-capture-span"},{"title":"Notify python exceptions in Python APM","sidebarTitle":"Notify exception","href":"/application-monitoring/python-agent/agent-api/python-notify-exception"},{"title":"Set Company in Python Analytics","sidebarTitle":"Set company","href":"/application-monitoring/python-agent/agent-api/python-set-company"},{"title":"Set custom data","href":"/application-monitoring/python-agent/agent-api/python-set-custom-data"},{"title":"Set response body in Python Analytics","sidebarTitle":"Set response body","href":"/application-monitoring/python-agent/agent-api/python-set-response-body"},{"title":"Set transaction name in Python APM","sidebarTitle":"Set transaction name","href":"/application-monitoring/python-agent/agent-api/python-set-transaction-name"},{"title":"Set user in Python APM agent","sidebarTitle":"Set user","href":"/application-monitoring/python-agent/agent-api/python-set-user"}]},{"title":"Uninstall the Python agent","sidebarTitle":"Uninstallation","href":"/application-monitoring/python-agent/uninstall-agent"},{"title":"Python Logs and Correlation","sidebarTitle":"Log Correlation","href":"/application-monitoring/python-agent/log-correlation"},{"group":"Troubleshooting","pages":[{"title":"Python Troubleshooting","sidebarTitle":"Overview","href":"/application-monitoring/python-agent/troubleshooting/overview"},{"title":"Unable to see data in Python APM","href":"/application-monitoring/python-agent/troubleshooting/unable-to-see-data-in-python-apm"},{"title":"No python framework performance monitoring","href":"/application-monitoring/python-agent/troubleshooting/no-python-framework-performance-monitoring"}]},{"group":"FAQ","pages":[{"title":"Python FAQ","sidebarTitle":"Overview","href":"/application-monitoring/python-agent/faq/overview"},{"title":"How to Enable analytics in Atatus Python agent?","href":"/application-monitoring/python-agent/faq/how-to-enable-atatus-python-analytics"}]}]},{"group":"Go","pages":[{"title":"Go APM Overview - Monitor your Go Apps","sidebarTitle":"Overview","href":"/application-monitoring/go-agent/overview"},{"group":"Installation","pages":[{"title":"Go Agent Installation Overview","sidebarTitle":"Overview","href":"/application-monitoring/go-agent/installation/overview"},{"group":"Frameworks","pages":[{"title":"Web Framework Instrumentation with Atatus Go Agent","sidebarTitle":"Overview","href":"/application-monitoring/go-agent/installation/frameworks/overview"},{"title":"Monitor net/http in Go Applications with Atatus Go Agent","sidebarTitle":"Http","href":"/application-monitoring/go-agent/installation/frameworks/http"},{"title":"Monitor Fast HTTP in Go Applications with Atatus Go Agent","sidebarTitle":"Fast HTTP","href":"/application-monitoring/go-agent/installation/frameworks/fasthttp"},{"title":"Monitor HTTPRouter in Go Applications with Atatus Go Agent","sidebarTitle":"HttpRouter","href":"/application-monitoring/go-agent/installation/frameworks/httprouter"},{"group":"Echo","pages":[{"title":"Monitor Echo v3 in Go Applications with Atatus Go Agent","sidebarTitle":"Echo v3","href":"/application-monitoring/go-agent/installation/frameworks/echo-v3"},{"title":"Monitor Echo v4 in Go Applications with Atatus Go Agent","sidebarTitle":"Echo v4","href":"/application-monitoring/go-agent/installation/frameworks/echo-v4"}]},{"title":"Monitor Gin in Go Applications with Atatus Go Agent","sidebarTitle":"Gin","href":"/application-monitoring/go-agent/installation/frameworks/gin"},{"title":"Monitor Fiber in Go Applications with Atatus Go Agent","sidebarTitle":"Fiber","href":"/application-monitoring/go-agent/installation/frameworks/fiber"},{"title":"Monitor Beego in Go Applications with Atatus Go Agent","sidebarTitle":"Beego","href":"/application-monitoring/go-agent/installation/frameworks/beego"},{"title":"Monitor Gorilla Mux in Go Applications with Atatus Go Agent","sidebarTitle":"gorilla/mux","href":"/application-monitoring/go-agent/installation/frameworks/gorillamux"},{"title":"Monitor go-restful in Go Applications with Atatus Go Agent","sidebarTitle":"go-restful","href":"/application-monitoring/go-agent/installation/frameworks/go-restful"},{"title":"Monitor Chi in Go Applications with Atatus Go Agent","sidebarTitle":"chi","href":"/application-monitoring/go-agent/installation/frameworks/chi"},{"title":"Monitor Negroni in Go Applications with Atatus Go Agent","sidebarTitle":"Negroni","href":"/application-monitoring/go-agent/installation/frameworks/negroni"}]},{"group":"Databases","pages":[{"title":"Database Instrumentation with Atatus Go Agent","sidebarTitle":"Overview","href":"/application-monitoring/go-agent/installation/databases/overview"},{"title":"Monitor SQL Databases in Go Apps with Atatus Go Agent Integration","sidebarTitle":"database/sql","href":"/application-monitoring/go-agent/installation/databases/sql"},{"group":"GORM","pages":[{"title":"Monitor GORM v1 in Go Apps with Atatus Go Agent Integration","sidebarTitle":"Gorm v1","href":"/application-monitoring/go-agent/installation/databases/gormv1"},{"title":"Monitor GORM v2 in Go Apps with Atatus Go Agent Integration","sidebarTitle":"Gorm v2","href":"/application-monitoring/go-agent/installation/databases/gormv2"}]},{"title":"Monitor PostgreSQL in Go Apps with Atatus Go Agent and go-pg Integration","sidebarTitle":"go-pg/pg","href":"/application-monitoring/go-agent/installation/databases/gopg"},{"title":"Monitor Cassandra in Go Apps with Atatus Go Agent Integration","sidebarTitle":"Cassandra (gocql)","href":"/application-monitoring/go-agent/installation/databases/cassandra"},{"group":"Redis","pages":[{"title":"Monitor Redis in Go Apps with Atatus Go Agent and Redigo Integration","sidebarTitle":"gomodule/redigo","href":"/application-monitoring/go-agent/installation/databases/redigo"},{"title":"Monitor Redis in Go Apps with Atatus Go Agent and GoRedis Integration","sidebarTitle":"go-redis/redis","href":"/application-monitoring/go-agent/installation/databases/goredis"},{"title":"Monitor Redis in Go Apps with Atatus Go Agent and GoRedis v8 Integration","sidebarTitle":"go-redisv8/redis","href":"/application-monitoring/go-agent/installation/databases/goredisv8"}]},{"title":"Monitor Elasticsearch in Go Apps with Atatus Go Agent Integration","sidebarTitle":"Elasticsearch","href":"/application-monitoring/go-agent/installation/databases/elasticsearch"},{"title":"Monitor MongoDB in Go Apps with Atatus Go Agent Integration","sidebarTitle":"MongoDB","href":"/application-monitoring/go-agent/installation/databases/mongodb"},{"title":"Monitor DynamoDB in Go Apps with Atatus Go Agent Integration","sidebarTitle":"DynamoDB","href":"/application-monitoring/go-agent/installation/databases/dynamodb"}]},{"group":"RPCFrameworks","pages":[{"title":"RPC Framework Instrumentation with Atatus Go Agent","sidebarTitle":"Overview","href":"/application-monitoring/go-agent/installation/rpc-frameworks/overview"},{"title":"Monitor gRPC Applications in Go using Atatus","sidebarTitle":"gRPC","href":"/application-monitoring/go-agent/installation/rpc-frameworks/grpc"}]},{"group":"Object Storage","pages":[{"title":"Object Storage Instrumentation with Atatus Go Agent","sidebarTitle":"Overview","href":"/application-monitoring/go-agent/installation/object-storage/overview"},{"title":"Monitor Amazon S3 Operations with Atatus Go Agent","sidebarTitle":"Amazon S3","href":"/application-monitoring/go-agent/installation/object-storage/amazon-s3"},{"title":"Monitor Azure Storage Services with Atatus Go Agent","sidebarTitle":"Azure Storage","href":"/application-monitoring/go-agent/installation/object-storage/azure-storage"}]},{"group":"Messaging Systems","pages":[{"title":"Messaging Systems Instrumentation with Atatus Go Agent","sidebarTitle":"Overview","href":"/application-monitoring/go-agent/installation/messaging-systems/overview"},{"title":"Monitor Amazon SQS with Atatus Go Agent","sidebarTitle":"Amazon SQS","href":"/application-monitoring/go-agent/installation/messaging-systems/amazon-sqs"},{"title":"Monitor Amazon SNS with Atatus Go Agent","sidebarTitle":"Amazon SNS","href":"/application-monitoring/go-agent/installation/messaging-systems/amazon-sns"}]}]},{"group":"Go Agent API","pages":[{"title":"Go Agent API - Application Performance Monitoring","sidebarTitle":"Overview","href":"/application-monitoring/go-agent/agent-api/overview"},{"title":"Capture Exceptions in Go with Atatus APM Agent API","sidebarTitle":"Capture exception","href":"/application-monitoring/go-agent/agent-api/go-capture-exception"},{"title":"Set transaction and span outcome in Go APM agent","sidebarTitle":"Set outcome","href":"/application-monitoring/go-agent/agent-api/go-set-outcome"}]},{"title":"Configure and Customize Atatus Go APM Agent","sidebarTitle":"Customizing Agent","href":"/application-monitoring/go-agent/customizing-agent"},{"title":"Go Log Correlation","sidebarTitle":"Log Correlation","href":"/application-monitoring/go-agent/log-correlation"},{"group":"Troubleshooting","pages":[{"title":"Go Troubleshooting","sidebarTitle":"Overview","href":"/application-monitoring/go-agent/troubleshooting/overview"},{"title":"Unable to see data in Go APM","href":"/application-monitoring/go-agent/troubleshooting/unable-to-see-data-in-go-apm"},{"title":"Routes or handlers not showing up as transactions","href":"/application-monitoring/go-agent/troubleshooting/routes-not-showing-as-transactions"}]},{"group":"FAQ","pages":[{"title":"Go FAQ","sidebarTitle":"Overview","href":"/application-monitoring/go-agent/faq/overview"},{"title":"How to enable analytics in the Atatus Go agent?","href":"/application-monitoring/go-agent/faq/how-to-enable-atatus-go-analytics"},{"title":"How to enable or disable distributed tracing in the Atatus Go agent?","href":"/application-monitoring/go-agent/faq/how-to-enable-distributed-tracing-in-go-agent"}]},{"title":"Uninstall the Go APM agent","sidebarTitle":"Uninstallation","href":"/application-monitoring/go-agent/uninstall-agent"},{"title":"Update the Go APM agent","sidebarTitle":"Update Agent","href":"/application-monitoring/go-agent/update-agent"}]},{"group":".NET","pages":[{"title":".NET APM Solution Overview","sidebarTitle":"Overview","href":"/application-monitoring/dotnet-agent/overview"},{"group":"Installation","pages":[{"title":".NET Agent Installation","sidebarTitle":"Overview","href":"/application-monitoring/dotnet-agent/installation/overview"},{"title":"Profiler Auto-Instrumentation","sidebarTitle":"Profiler Auto Instrumentation","href":"/application-monitoring/dotnet-agent/installation/profiler-auto-instrumentation"},{"title":".NET Core Agent Installation","sidebarTitle":".NET Core","href":"/application-monitoring/dotnet-agent/installation/net-core"},{"title":".NET Framework Agent Installation","sidebarTitle":".NET Framework","href":"/application-monitoring/dotnet-agent/installation/net-framework"},{"title":"IIS Agent Installation","sidebarTitle":"IIS","href":"/application-monitoring/dotnet-agent/installation/iis"}]},{"group":"Other Installations","pages":[{"title":".NET APM Agent Installations in various platforms","sidebarTitle":"Overview","href":"/application-monitoring/dotnet-agent/other-installations/overview"},{"title":"ASP .NET Core Agent Installation - Docker","sidebarTitle":"Docker","href":"/application-monitoring/dotnet-agent/other-installations/docker"}]},{"group":".NET Agent API","pages":[{"title":".NET Agent API - Application Performance Monitoring","sidebarTitle":"Overview","href":"/application-monitoring/dotnet-agent/agent-api/overview"},{"title":"Set transaction and span outcome in .NET APM agent","sidebarTitle":"Set outcome","href":"/application-monitoring/dotnet-agent/agent-api/dotnet-set-outcome"},{"title":"Start custom transaction in .NET APM agent","sidebarTitle":"Start transaction","href":"/application-monitoring/dotnet-agent/agent-api/dotnet-start-transaction"},{"title":"Start span in .NET APM agent","sidebarTitle":"Start span","href":"/application-monitoring/dotnet-agent/agent-api/dotnet-start-span"},{"title":"Capture .NET errors","sidebarTitle":"Capture errors","href":"/application-monitoring/dotnet-agent/agent-api/dotnet-capture-errors"},{"title":"Subscribe to diagnostic events in .NET APM agent","sidebarTitle":"Diagnostic subscriber","href":"/application-monitoring/dotnet-agent/agent-api/dotnet-diagnostic-subscriber"},{"title":"Set labels in .NET APM agent","sidebarTitle":"Set labels","href":"/application-monitoring/dotnet-agent/agent-api/dotnet-set-labels"},{"title":"Set custom data in .NET APM agent","sidebarTitle":"Set custom data","href":"/application-monitoring/dotnet-agent/agent-api/dotnet-set-custom-data"},{"title":"Set user in .NET APM agent","sidebarTitle":"Set user","href":"/application-monitoring/dotnet-agent/agent-api/dotnet-set-user"}]},{"group":"Assemblies","pages":[{"title":"HttpClient Instrumentation with .NET APM Agent","sidebarTitle":"HttpClient","href":"/application-monitoring/dotnet-agent/assemblies/http-client"},{"title":"SqlClient Instrumentation with .NET APM Agent","sidebarTitle":"SqlClient","href":"/application-monitoring/dotnet-agent/assemblies/sql-client"},{"title":"Entity Framework Core Instrumentation with .NET APM Agent","sidebarTitle":"Entity Framework Core","href":"/application-monitoring/dotnet-agent/assemblies/entity-framework-core"},{"title":"MongoDB Instrumentation with .NET APM Agent","sidebarTitle":"MongoDB","href":"/application-monitoring/dotnet-agent/assemblies/mongodb"},{"title":"Redis Instrumentation with .NET APM Agent","sidebarTitle":"Redis","href":"/application-monitoring/dotnet-agent/assemblies/redis"},{"title":"Elasticsearch Instrumentation with .NET APM Agent","sidebarTitle":"Elasticsearch","href":"/application-monitoring/dotnet-agent/assemblies/elasticsearch"},{"title":"gRPC Client Instrumentation with .NET APM Agent","sidebarTitle":"gRPC Client","href":"/application-monitoring/dotnet-agent/assemblies/grpc-client"},{"title":"Azure Service Bus Instrumentation with .NET APM Agent","sidebarTitle":"Azure Service bus","href":"/application-monitoring/dotnet-agent/assemblies/service-bus"},{"title":"Azure Cosmos DB Instrumentation with .NET APM Agent","sidebarTitle":"Azure Cosmos DB","href":"/application-monitoring/dotnet-agent/assemblies/cosmos-db"},{"title":"Azure Storage Instrumentation with .NET APM Agent","sidebarTitle":"Azure Storage","href":"/application-monitoring/dotnet-agent/assemblies/storage"}]},{"title":"Customizing .NET APM Agent","sidebarTitle":"Customizing Agent","href":"/application-monitoring/dotnet-agent/customizing-agent"},{"title":".NET Log Correlation","sidebarTitle":"Log Correlation","href":"/application-monitoring/dotnet-agent/log-correlation"},{"group":"Troubleshooting","pages":[{"title":".NET Troubleshooting","sidebarTitle":"Overview","href":"/application-monitoring/dotnet-agent/troubleshooting/overview"},{"title":".NET Application Data Not Visible in Atatus","href":"/application-monitoring/dotnet-agent/troubleshooting/dotnet-application-data-not-visible"},{"title":"IIS hosted applications data not visible in Atatus","href":"/application-monitoring/dotnet-agent/troubleshooting/iis-hosted-application-data-not-visible"},{"title":"IIS Duplicate Environment Variable Error","href":"/application-monitoring/dotnet-agent/troubleshooting/iis-duplicate-environment-variable-error"}]},{"title":"Uninstall the .NET agent","sidebarTitle":"Uninstallation","href":"/application-monitoring/dotnet-agent/uninstallation/uninstall-agent"}]},{"group":"Guide","pages":[{"title":"Application Performance Monitoring Guide Overview","sidebarTitle":"Overview","href":"/application-monitoring/guide/overview"},{"title":"APM Dashboard","sidebarTitle":"Application Monitoring Dashboard","href":"/application-monitoring/guide/application-dashboard"},{"title":"Exceptions Page - Error Monitoring","sidebarTitle":"Exceptions Page","href":"/application-monitoring/guide/application-exceptions"},{"title":"HTTP Failures Page in APM","sidebarTitle":"HTTP Failures Page","href":"/application-monitoring/guide/application-http-failures"},{"title":"Distributed Tracing Headers - APM","sidebarTitle":"Distributed Tracing Headers","href":"/application-monitoring/guide/distributed-tracing-headers"},{"title":"Session Traces Page - APM","sidebarTitle":"Session Traces Page","href":"/application-monitoring/guide/application-session-traces"},{"title":"Transaction Metrics - APM","sidebarTitle":"Transactions Page","href":"/application-monitoring/guide/application-transactions"},{"title":"Database Monitoring","sidebarTitle":"Databases Page","href":"/application-monitoring/guide/application-databases"},{"title":"External Network Calls - APM","sidebarTitle":"External Requests Page","href":"/application-monitoring/guide/application-network-calls"},{"title":"Belongs to which App Version","sidebarTitle":"App Versions Page","href":"/application-monitoring/guide/application-appversions"},{"title":"Host Tracking - Network Monitoring","sidebarTitle":"Host Tracking Page","href":"/application-monitoring/guide/application-host-tracking"},{"title":"Compare across time ranges - APM","sidebarTitle":"Compares Page","href":"/application-monitoring/guide/application-time-ranges"},{"title":"Deployments Tracking in APM","sidebarTitle":"Deployments Page","href":"/application-monitoring/guide/application-deployments"},{"title":"SLA Reports - APM","sidebarTitle":"Reports Page","href":"/application-monitoring/guide/application-reports"}]}]},{"group":"Serverless Monitoring","pages":[{"title":"Serverless Monitoring Overview","sidebarTitle":"Overview","href":"/serverless-monitoring/overview"},{"group":"AWS Lambda","pages":[{"title":"AWS Lambda Monitoring Overview","sidebarTitle":"Overview","href":"/serverless-monitoring/aws-lambda/overview"},{"title":"Node.js AWS Lambda Serverless Monitoring","sidebarTitle":"Node.js","href":"/serverless-monitoring/aws-lambda/nodejs"},{"title":"Python AWS Lambda Serverless Monitoring","sidebarTitle":"Python","href":"/serverless-monitoring/aws-lambda/python"},{"title":"AWS Lambda Monitoring with Atatus Extension","sidebarTitle":"Lambda Extension","href":"/serverless-monitoring/aws-lambda/lambda-extension"}]},{"group":"Azure App Service","pages":[{"title":"Azure App Service Monitoring Overview","sidebarTitle":"Overview","href":"/serverless-monitoring/azure-app-service/overview"},{"title":"Azure App Service - Linux","sidebarTitle":"Linux","href":"/serverless-monitoring/azure-app-service/linux-code"}]},{"group":"Azure Functions","pages":[{"title":"Monitor Azure Functions with Atatus .NET APM","sidebarTitle":".Net","href":"/serverless-monitoring/azure-functions/dotnet"}]}]},{"group":"Browser Monitoring","pages":[{"title":"Browser Monitoring Overview | Real User Monitoring","sidebarTitle":"Overview","href":"/browser-monitoring/overview"},{"title":"Agent Installation Setup for Browser Monitoring","sidebarTitle":"Installation","href":"/browser-monitoring/browser-installation-setup"},{"group":"Other Installations","pages":[{"title":"Other Installation Overview - Real User Monitoring","sidebarTitle":"Overview","href":"/browser-monitoring/other-installations/overview"},{"title":"Install Atatus RUM Agent in Next.js for Real-Time Monitoring","sidebarTitle":"Next.js","href":"/browser-monitoring/other-installations/nextjs"},{"title":"Install Atatus RUM Agent in Nuxt.js for Real-Time Monitoring","sidebarTitle":"Nuxt.js","href":"/browser-monitoring/other-installations/nuxtjs"},{"title":"Install Atatus RUM Agent via Segment for Web Monitoring","sidebarTitle":"Segment","href":"/browser-monitoring/other-installations/segment"},{"title":"Install Atatus RUM Agent in WordPress for Real-Time Monitoring","sidebarTitle":"Wordpress","href":"/browser-monitoring/other-installations/wordpress"},{"title":"Install Atatus RUM Agent in Magento for Real-Time Monitoring","sidebarTitle":"Magento","href":"/browser-monitoring/other-installations/magento"},{"title":"Install Atatus RUM Agent in Drupal for Real-Time Monitoring","sidebarTitle":"Drupal","href":"/browser-monitoring/other-installations/drupal"}]},{"group":"Supported Frameworks","pages":[{"title":"Platforms | Real User Monitoring","sidebarTitle":"Overview","href":"/browser-monitoring/platforms/overview"},{"title":"Install Atatus JavaScript Agent for Browser Monitoring","sidebarTitle":"Javascript","href":"/browser-monitoring/platforms/javascript"},{"title":"AngularJS Integration - Real User Monitoring","sidebarTitle":"AngularJS","href":"/browser-monitoring/platforms/angularjs"},{"title":"Angular Integration - Real User Monitoring","sidebarTitle":"Angular","href":"/browser-monitoring/platforms/angular"},{"title":"Backbone Integration - Real User Monitoring","sidebarTitle":"Backbone","href":"/browser-monitoring/platforms/backbone"},{"title":"Ember Integration - Real User Monitoring","sidebarTitle":"Ember","href":"/browser-monitoring/platforms/ember"},{"title":"Ionic 2+ Integration - Real User Monitoring","sidebarTitle":"Ionic2+","href":"/browser-monitoring/platforms/ionic2"},{"title":"Ionic Integration - Real User Monitoring","sidebarTitle":"Ionic","href":"/browser-monitoring/platforms/ionic"},{"title":"Meteor Integration - Real User Monitoring","sidebarTitle":"Meteor","href":"/browser-monitoring/platforms/meteor"},{"title":"React/Redux Integration - Real User Monitoring","sidebarTitle":"React","href":"/browser-monitoring/platforms/react"},{"title":"Vue Integration - Real User Monitoring","sidebarTitle":"Vue","href":"/browser-monitoring/platforms/vue"}]},{"title":"Customizing JS Agent in Real User Monitoring","sidebarTitle":"Customizing Agent","href":"/browser-monitoring/customize-agent"},{"group":"Browser Agent API","pages":[{"title":"Browser Agent API Overview","sidebarTitle":"Overview","href":"/browser-monitoring/browser-agent-api/overview"},{"title":"Adding custom breadcrumbs in Real User Monitoring","sidebarTitle":"Adding custom breadcrumbs","href":"/browser-monitoring/browser-agent-api/adding-custom-breadcrumbs"},{"title":"Console options - End User Monitoring","sidebarTitle":"Console options","href":"/browser-monitoring/browser-agent-api/console-options"},{"title":"Custom transactions - End User Monitoring","sidebarTitle":"Custom transactions","href":"/browser-monitoring/browser-agent-api/custom-transactions"},{"title":"Disable Atatus","sidebarTitle":"Disable atatus","href":"/browser-monitoring/browser-agent-api/disable-atatus"},{"title":"Disable Ajax(XHR) Monitoring","sidebarTitle":"Disable ajax monitoring","href":"/browser-monitoring/browser-agent-api/disable-ajax-monitoring"},{"title":"Disable Error Monitoring","sidebarTitle":"Disable error monitoring","href":"/browser-monitoring/browser-agent-api/disable-error-monitoring"},{"title":"Disable Error Timeline (Breadcrumbs)","sidebarTitle":"Disable error timeline","href":"/browser-monitoring/browser-agent-api/disable-breadcrumbs"},{"title":"Disable RUM Session","sidebarTitle":"Disable sessions","href":"/browser-monitoring/browser-agent-api/disable-session"},{"title":"Disable SPA (Single Page Application) Monitoring","sidebarTitle":"Disable SPA","href":"/browser-monitoring/browser-agent-api/disable-spa"},{"title":"Disable unhandled promise rejection errors","sidebarTitle":"Disable unhandled rejection errors","href":"/browser-monitoring/browser-agent-api/disble-unhandled-rejections"},{"title":"Hash Routes - Real User Monitoring","sidebarTitle":"Hash routes","href":"/browser-monitoring/browser-agent-api/hash-route"},{"title":"Ignore Spans for Routes in Real User Monitoring","sidebarTitle":"Ignore spans in routes","href":"/browser-monitoring/browser-agent-api/ignore-spans-in-routes"},{"title":"Ignore Urls - Real User Monitoring","sidebarTitle":"Ignore urls","href":"/browser-monitoring/browser-agent-api/ignore-urls"},{"title":"Notify custom exceptions","href":"/browser-monitoring/browser-agent-api/notify-custom-exceptions"},{"title":"Offline saving - End User Monitoring","sidebarTitle":"Offline saving","href":"/browser-monitoring/browser-agent-api/offline-saving"},{"title":"On before error send - Real User Monitoring","sidebarTitle":"On before error send","href":"/browser-monitoring/browser-agent-api/on-before-error-send"},{"title":"On before send - Real User Monitoring","sidebarTitle":"On before send","href":"/browser-monitoring/browser-agent-api/on-before-send"},{"title":"Set route group url - Real User Monitoring","sidebarTitle":"Set route group url","href":"/browser-monitoring/browser-agent-api/set-route-group-url"},{"title":"Set error grouping key - Real User Monitoring","sidebarTitle":"Set error grouping key","href":"/browser-monitoring/browser-agent-api/set-grouping-key-callback"},{"title":"Setting custom data in Real User Monitoring","sidebarTitle":"Set custom data","href":"/browser-monitoring/browser-agent-api/setting-custom-data"},{"title":"Setting tags - Real User Monitoring","sidebarTitle":"Set tags","href":"/browser-monitoring/browser-agent-api/setting-tags"},{"title":"Setting application version - Real User Monitoring","sidebarTitle":"Set version","href":"/browser-monitoring/browser-agent-api/application-version"},{"title":"User tracking - Real User Monitoring","sidebarTitle":"User tracking","href":"/browser-monitoring/browser-agent-api/user-tracking"},{"title":"Whitelist Urls in Real User Monitoring","sidebarTitle":"Whitelist urls","href":"/browser-monitoring/browser-agent-api/whitelist-urls"}]},{"group":"FAQ","pages":[{"title":"FAQ Overview","sidebarTitle":"Overview","href":"/browser-monitoring/faq/overview"},{"title":"How to load Atatus async?","href":"/browser-monitoring/faq/how-to-load-atatus-async"},{"title":"Can Atatus JS be used with CSP?","href":"/browser-monitoring/faq/can-atatus-js-be-used-with-csp"},{"title":"Is there support for Meteor?","href":"/browser-monitoring/faq/is-there-support-for-meteor"},{"title":"How to notify jQuery Ajax errors?","href":"/browser-monitoring/faq/how-to-notify-jquery-ajax-errors"},{"title":"Create JIRA Issues from Errors in Browser Monitoring","sidebarTitle":"How can issues in JIRA be created from my Atatus errors?","href":"/browser-monitoring/faq/how-can-issues-in-jira-be-created-from-my-atatus-errors"},{"title":"Keyboard Shortcuts for Navigating Error Events in Atatus RUM","sidebarTitle":"Are there keyboard shortcuts to navigate error events?","href":"/browser-monitoring/faq/are-there-keyboard-shortcuts-to-navigate-error-events"},{"title":"De-minify JavaScript Errors in Atatus with Source Maps","sidebarTitle":"How to deminify my JavaScript error coming out of a minified file?","href":"/browser-monitoring/faq/how-to-deminify-my-javascript-error-coming-out-of-a-minified-file"},{"title":"What is network and front-end time in page load performance?","href":"/browser-monitoring/faq/what-is-network-and-frontend-time-in-page-load-performance"},{"title":"Send Performance and Error Data from Specific Domains","sidebarTitle":"How to send performance and error data particularly from specific domains?","href":"/browser-monitoring/faq/how-to-send-performance-and-error-data-particularly-from-specific-domains"},{"title":"Is there a way to identify a user in Atatus?","href":"/browser-monitoring/faq/is-there-a-way-to-identify-a-user-in-atatus"},{"title":"How to enable session tracking?","href":"/browser-monitoring/faq/how-to-enable-session-tracking"},{"title":"Is there a way to see hash routing in pages?","href":"/browser-monitoring/faq/is-there-a-way-to-see-hash-routing-in-pages"},{"title":"Is there a way to see hash routing in SPA?","href":"/browser-monitoring/faq/is-there-a-way-to-see-hash-routing-in-spa"},{"title":"How to configure Navigo in Atatus SPA monitoring?","sidebarTitle":"How to configure navigo in Atatus SPA monitoring?","href":"/browser-monitoring/faq/how-to-configure-navigo-in-atatus-spa-monitoring"},{"title":"How to ignore certain user agents?","href":"/browser-monitoring/faq/how-to-ignore-certain-user-agents"},{"title":"Is there a way to add sampling in Atatus Browser Monitoring?","href":"/browser-monitoring/faq/is-there-a-way-to-add-sampling-in-atatus-browser-monitoring"}]},{"group":"Troubleshooting","pages":[{"title":"Browser Troubleshooting","sidebarTitle":"Overview","href":"/browser-monitoring/troubleshooting/overview"},{"title":"Automatic source map is not working","href":"/browser-monitoring/troubleshooting/automatic-source-map-is-not-working"},{"title":"No exceptions found in AngularJS","href":"/browser-monitoring/troubleshooting/no-exceptions-found-in-angularJS"},{"title":"Troubleshoot Missing JS Files in Stack Trace with Source Maps","sidebarTitle":"Unable to see original JS file in stack trace with source map","href":"/browser-monitoring/troubleshooting/unable-to-see-original-JS-file-in-stack-trace-with-source-map"},{"title":"Fix Missing Error File and Line Info in Console","sidebarTitle":"Unable to see original file and line of the error in console.","href":"/browser-monitoring/troubleshooting/unable-to-see-original-file-and-line-of-the-error-in-console"}]}]},{"group":"Real User Monitoring","pages":[{"title":"Real User Monitoring Overview","sidebarTitle":"Overview","href":"/rum-monitoring/overview"},{"group":"Browser","pages":[{"title":"Browser Monitoring Overview","sidebarTitle":"Overview","href":"/rum-monitoring/browser/overview"},{"title":"Browser Agent Installation","sidebarTitle":"Installation","href":"/rum-monitoring/browser/installation"},{"title":"Browser Agent Configuration","sidebarTitle":"Configuration Options","href":"/rum-monitoring/browser/configuration"},{"title":"Browser Session Replay","sidebarTitle":"Session Replay","href":"/rum-monitoring/browser/session-replay"},{"title":"Browser Error Tracking","sidebarTitle":"Error Tracking","href":"/rum-monitoring/browser/error-tracking"},{"title":"Browser Feature Flags","sidebarTitle":"Feature Flags","href":"/rum-monitoring/browser/feature-flags"},{"title":"Browser Log Collection","sidebarTitle":"Log Collection","href":"/rum-monitoring/browser/logs"},{"title":"Browser Framework Integrations","sidebarTitle":"Framework Integrations","href":"/rum-monitoring/browser/frameworks"},{"title":"Browser Agent API Reference","sidebarTitle":"API Reference","href":"/rum-monitoring/browser/api-reference"}]},{"group":"Mobile","pages":[{"title":"Mobile Monitoring Overview | Real User Monitoring","sidebarTitle":"Overview","href":"/rum-monitoring/mobile/overview"},{"group":"Android","pages":[{"title":"Android Monitoring Setup","sidebarTitle":"Setup","href":"/rum-monitoring/mobile/android/android"},{"title":"Android Configuration Options","sidebarTitle":"Configuration Options","href":"/rum-monitoring/mobile/android/android-configuration"},{"title":"Android Error Tracking","sidebarTitle":"Error Tracking","href":"/rum-monitoring/mobile/android/android-error-tracking"},{"title":"Android WebView Tracking","sidebarTitle":"WebView Tracking","href":"/rum-monitoring/mobile/android/android-webview-tracking"},{"title":"Android Log Collection","sidebarTitle":"Log Collection","href":"/rum-monitoring/mobile/android/android-logs"},{"title":"Android Trace Collection","sidebarTitle":"Trace Collection","href":"/rum-monitoring/mobile/android/android-traces"},{"title":"Android SDK Performance Impact","sidebarTitle":"SDK Performance Impact","href":"/rum-monitoring/mobile/android/android-performance"}]},{"group":"iOS","pages":[{"title":"iOS Monitoring Setup","sidebarTitle":"Setup","href":"/rum-monitoring/mobile/ios/ios"},{"title":"iOS Configuration Options","sidebarTitle":"Configuration Options","href":"/rum-monitoring/mobile/ios/ios-configuration"},{"title":"iOS Network Tracking","sidebarTitle":"Network Tracking","href":"/rum-monitoring/mobile/ios/ios-network-tracking"},{"title":"iOS Trace Collection","sidebarTitle":"Trace Collection","href":"/rum-monitoring/mobile/ios/ios-traces"},{"title":"iOS Error Tracking","sidebarTitle":"Error Tracking","href":"/rum-monitoring/mobile/ios/ios-error-tracking"},{"title":"iOS Mobile Vitals","sidebarTitle":"Mobile Vitals","href":"/rum-monitoring/mobile/ios/ios-vitals"},{"title":"iOS Session Replay","sidebarTitle":"Session Replay","href":"/rum-monitoring/mobile/ios/ios-session-replay"},{"title":"iOS WebView Tracking","sidebarTitle":"WebView Tracking","href":"/rum-monitoring/mobile/ios/ios-webview-tracking"},{"title":"iOS Log Collection","sidebarTitle":"Log Collection","href":"/rum-monitoring/mobile/ios/ios-logs"}]},{"group":"Flutter","pages":[{"title":"Flutter Monitoring Setup","sidebarTitle":"Setup","href":"/rum-monitoring/mobile/flutter/flutter"},{"title":"Flutter Log Collection - Logs Monitoring","sidebarTitle":"Log Collection","href":"/rum-monitoring/mobile/flutter/flutter-logs"},{"title":"Flutter Agent Configuration Options - Real User Monitoring","sidebarTitle":"Configuration Options","href":"/rum-monitoring/mobile/flutter/flutter-agent-configuration"},{"title":"Flutter Network Tracking","sidebarTitle":"Network Tracking","href":"/rum-monitoring/mobile/flutter/flutter-network-tracking"},{"title":"Flutter Distributed Tracing","sidebarTitle":"Distributed Tracing","href":"/rum-monitoring/mobile/flutter/flutter-distributed-tracing"},{"title":"Flutter WebView Tracking","sidebarTitle":"WebView Tracking","href":"/rum-monitoring/mobile/flutter/flutter-webview-tracking"},{"title":"Flutter Session Replay","sidebarTitle":"Session Replay","href":"/rum-monitoring/mobile/flutter/flutter-session-replay"}]}]}]},{"group":"Infrastructure Monitoring","pages":[{"title":"Infrastructure Monitoring Overview","sidebarTitle":"Overview","href":"/infrastructure-monitoring/overview"},{"group":"Installation","pages":[{"title":"Infra Agent Installation Overview","sidebarTitle":"Overview","href":"/infrastructure-monitoring/installation/overview"},{"title":"Infrastructure Agent Installation - Ubuntu, Debian","sidebarTitle":"Debian","href":"/infrastructure-monitoring/installation/debian"},{"title":"Infrastructure Agent Installation - Redhat, Centos","sidebarTitle":"RedHat","href":"/infrastructure-monitoring/installation/redhat"},{"title":"Install Atatus Infra Agent on Alpine and Void Linux Systems","sidebarTitle":"Musl","href":"/infrastructure-monitoring/installation/musl"},{"title":"Infrastructure Agent Installation - Mac","sidebarTitle":"Mac","href":"/infrastructure-monitoring/installation/mac"},{"title":"Infrastructure Agent Installation - Windows","sidebarTitle":"Windows","href":"/infrastructure-monitoring/installation/windows"},{"title":"Infrastructure Agent Installation - Tar Archive","sidebarTitle":"Tar Archive","href":"/infrastructure-monitoring/installation/tar-archive"},{"title":"Install Atatus Infra Agent on ARM64 via Tar Archive","sidebarTitle":"Tar Archive for arm64","href":"/infrastructure-monitoring/installation/tar-archive-arm"}]},{"group":"Docker Monitoring","pages":[{"title":"Docker Monitoring","sidebarTitle":"Overview","href":"/infrastructure-monitoring/docker-monitoring/overview"},{"title":"Container Monitoring: Customizing Agent","sidebarTitle":"Customizing Agent","href":"/infrastructure-monitoring/docker-monitoring/customizing-agent"},{"title":"Install Atatus Agent as a Sidecar Container","sidebarTitle":"Docker","href":"/infrastructure-monitoring/docker-monitoring/docker"},{"title":"Docker Monitoring for Swarm","sidebarTitle":"Docker Swarm","href":"/infrastructure-monitoring/docker-monitoring/docker-swarm"},{"title":"Docker Monitoring for Compose file","sidebarTitle":"Docker Compose","href":"/infrastructure-monitoring/docker-monitoring/docker-compose"},{"title":"Docker Monitoring for Amazon ECS","sidebarTitle":"Amazon ECS","href":"/infrastructure-monitoring/docker-monitoring/amazon-ecs"},{"title":"Install Atatus Agent inside your docker image","sidebarTitle":"Docker Container","href":"/infrastructure-monitoring/docker-monitoring/docker-container"},{"title":"Docker without init.d (SysVInit or SystemD)","href":"/infrastructure-monitoring/docker-monitoring/docker-without-initd-services"}]},{"title":"Customizing Agent - Infrastructure Monitoring","sidebarTitle":"Customizing Agent","href":"/infrastructure-monitoring/customizing-agent"},{"group":"Plugins","pages":[{"title":"Infra Plgins Overview","sidebarTitle":"Overview","href":"/infrastructure-monitoring/plugins/overview"},{"title":"Apache Monitoring","sidebarTitle":"Apache","href":"/infrastructure-monitoring/plugins/apache"},{"title":"HAProxy Monitoring","sidebarTitle":"HAProxy","href":"/infrastructure-monitoring/plugins/haproxy"},{"title":"Memcached Monitoring","sidebarTitle":"Memcached","href":"/infrastructure-monitoring/plugins/memcached"},{"title":"MongoDB Monitoring","sidebarTitle":"MongoDB","href":"/infrastructure-monitoring/plugins/mongodb"},{"title":"MySQL Monitoring","sidebarTitle":"MySQL","href":"/infrastructure-monitoring/plugins/mysql"},{"title":"NGINX Monitoring","sidebarTitle":"NGINX","href":"/infrastructure-monitoring/plugins/nginx"},{"title":"PostgreSQL Monitoring","sidebarTitle":"PostgreSQL","href":"/infrastructure-monitoring/plugins/postgresql"},{"title":"Monitoring Processes with Atatus","sidebarTitle":"Process","href":"/infrastructure-monitoring/plugins/process"},{"title":"Redis Monitoring","sidebarTitle":"Redis","href":"/infrastructure-monitoring/plugins/redis"}]},{"title":"Health Checks - Infrastructure Monitoring","sidebarTitle":"Health Checks","href":"/infrastructure-monitoring/infra-checks"},{"group":"Troubleshooting","pages":[{"title":"Infrastructure Troubleshooting","sidebarTitle":"Overview","href":"/infrastructure-monitoring/troubleshooting/overview"},{"title":"Check License Key","href":"/infrastructure-monitoring/troubleshooting/check-license-key"},{"title":"Unable to see data in Infrastructure","href":"/infrastructure-monitoring/troubleshooting/unable-to-see-data-in-infra"},{"title":"Error GPG check FAILED in RHEL9","href":"/infrastructure-monitoring/troubleshooting/gpg-check-failed-in-rhel9"}]},{"group":"Uninstallation","pages":[{"title":"Infra Agent Uninstallation Overview","sidebarTitle":"Overview","href":"/infrastructure-monitoring/uninstallation/overview"},{"title":"Uninstall the Infrastructure agent - Ubuntu, Debian","sidebarTitle":"Debian","href":"/infrastructure-monitoring/uninstallation/uninstall-debian"},{"title":"Uninstall the Infrastructure agent - Redhat, Centos","sidebarTitle":"RedHat","href":"/infrastructure-monitoring/uninstallation/uninstall-redhat"},{"title":"Uninstall the Infrastructure agent - Alpine, Void Linux","sidebarTitle":"Musl","href":"/infrastructure-monitoring/uninstallation/uninstall-musl"},{"title":"Uninstall the Infrastructure agent - Mac","sidebarTitle":"Mac","href":"/infrastructure-monitoring/uninstallation/uninstall-mac"},{"title":"Uninstall the Infrastructure agent - Windows","sidebarTitle":"Windows","href":"/infrastructure-monitoring/uninstallation/uninstall-windows"},{"title":"Uninstall the Infrastructure agent - Tar Archive","sidebarTitle":"Tar Archive","href":"/infrastructure-monitoring/uninstallation/uninstall-tar-archive"}]},{"group":"FAQ","pages":[{"title":"Infrastructure FAQ","sidebarTitle":"Overview","href":"/infrastructure-monitoring/faq/overview"},{"title":"What is Checks?","href":"/infrastructure-monitoring/faq/what-is-checks"},{"title":"How to enable HTTP Checks?","href":"/infrastructure-monitoring/faq/how-to-enable-http-checks"},{"title":"How to enable TCP Checks?","href":"/infrastructure-monitoring/faq/how-to-enable-tcp-checks"},{"title":"How can I collect PM2 logs from Docker container?","href":"/infrastructure-monitoring/faq/how-can-i-collect-pm2-logs-from-docker-container"}]}]},{"group":"Database Monitoring","pages":[{"title":"Database Monitoring Overview","sidebarTitle":"Overview","href":"/database-monitoring/overview"},{"group":"MySQL","pages":[{"title":"Database Monitoring for MySQL","sidebarTitle":"Self Hosted","href":"/database-monitoring/mysql/self-hosted"},{"title":"Database Monitoring for AWS RDS MySQL","sidebarTitle":"AWS RDS","href":"/database-monitoring/mysql/aws-rds"},{"title":"Database Monitoring for AWS Aurora MySQL","sidebarTitle":"AWS Aurora","href":"/database-monitoring/mysql/aws-aurora"},{"title":"Database Monitoring for Google Cloud SQL for MySQL","sidebarTitle":"Google Cloud SQL","href":"/database-monitoring/mysql/google-cloud-sql"},{"title":"Database Monitoring for Azure Database for MySQL","sidebarTitle":"Azure Database for MySQL","href":"/database-monitoring/mysql/azure"}]},{"group":"PostgreSQL","pages":[{"title":"Database Monitoring for PostgreSQL","sidebarTitle":"Self Hosted","href":"/database-monitoring/postgresql/self-hosted"},{"title":"Database Monitoring for AWS RDS PostgreSQL","sidebarTitle":"AWS RDS","href":"/database-monitoring/postgresql/aws-rds"},{"title":"Database Monitoring for AWS Aurora PostgreSQL","sidebarTitle":"AWS Aurora","href":"/database-monitoring/postgresql/aws-aurora"},{"title":"Database Monitoring for Google Cloud SQL for PostgreSQL","sidebarTitle":"Google Cloud SQL","href":"/database-monitoring/postgresql/google-cloud-sql"},{"title":"Database Monitoring for Google Cloud AlloyDB for PostgreSQL","sidebarTitle":"Google Cloud AlloyDB","href":"/database-monitoring/postgresql/alloydb"},{"title":"Database Monitoring for Azure Database for PostgreSQL","sidebarTitle":"Azure Database for PostgreSQL","href":"/database-monitoring/postgresql/azure"},{"title":"Database Monitoring for Heroku Postgres","sidebarTitle":"Heroku Postgres","href":"/database-monitoring/postgresql/heroku"},{"title":"Database Monitoring for Supabase Postgres","sidebarTitle":"Supabase","href":"/database-monitoring/postgresql/supabase"},{"title":"Managed Authentication for AWS RDS and Aurora PostgreSQL","sidebarTitle":"Managed Authentication","href":"/database-monitoring/postgresql/managed-authentication"},{"group":"Integrations","pages":[{"title":"Deploying Atatus Infra Agent with PostgreSQL Integration in Kubernetes","sidebarTitle":"Kubernetes","href":"/database-monitoring/postgresql/kubernetes"}]}]},{"group":"Microsoft SQL Server","pages":[{"title":"Database Monitoring for self-hosted SQL Server","sidebarTitle":"Self Hosted","href":"/database-monitoring/microsoft-sql-server/self-hosted"},{"title":"Database Monitoring for SQL Server on Amazon RDS","sidebarTitle":"AWS RDS","href":"/database-monitoring/microsoft-sql-server/aws-rds"},{"group":"Azure","pages":[{"title":"Setting Up Database Monitoring for Azure SQL Server","sidebarTitle":"Overview","href":"/database-monitoring/microsoft-sql-server/overview"},{"title":"Database Monitoring for Azure SQL Database","sidebarTitle":"Azure SQL Database","href":"/database-monitoring/microsoft-sql-server/azure-sql-database"},{"title":"Database Monitoring for Azure SQL Managed Instance","sidebarTitle":"Azure SQL Managed Instance","href":"/database-monitoring/microsoft-sql-server/azure-sql-managed-instance"},{"title":"Database Monitoring for SQL Server on Azure VM","sidebarTitle":"Azure VM","href":"/database-monitoring/microsoft-sql-server/azure-vm"}]},{"title":"Database Monitoring for SQL Server on Google Cloud SQL","sidebarTitle":"Google Cloud SQL","href":"/database-monitoring/microsoft-sql-server/google-cloud-sql"}]},{"group":"Oracle","pages":[{"title":"Database Monitoring for Self-Hosted Oracle","sidebarTitle":"Self Hosted","href":"/database-monitoring/oracle/self-hosted"},{"title":"Database Monitoring for Amazon RDS Oracle","sidebarTitle":"AWS RDS","href":"/database-monitoring/oracle/aws-rds"}]},{"group":"MongoDB","pages":[{"title":"Database Monitoring for Self-Hosted MongoDB","sidebarTitle":"Self Hosted","href":"/database-monitoring/mongodb/self-hosted"},{"title":"Database Monitoring for MongoDB Atlas","sidebarTitle":"MongoDB Atlas","href":"/database-monitoring/mongodb/mongodb-atlas"}]},{"group":"ClickHouse","pages":[{"title":"Database Monitoring for Self-Hosted ClickHouse","sidebarTitle":"Self Hosted","href":"/database-monitoring/clickhouse/self-hosted"},{"title":"Database Monitoring for ClickHouse Cloud","sidebarTitle":"ClickHouse Cloud","href":"/database-monitoring/clickhouse/clickhouse-cloud"}]},{"title":"Database Monitoring for Amazon DocumentDB","sidebarTitle":"AWS DocumentDB","href":"/database-monitoring/aws-documentdb"},{"group":"Setup Agent with Terraform","pages":[{"title":"Set Up the Agent with Terraform for PostgreSQL","sidebarTitle":"PostgreSQL","href":"/database-monitoring/setup-agent-terraform/postgresql"},{"title":"Set Up the Agent with Terraform for DocumentDB","sidebarTitle":"DocumentDB","href":"/database-monitoring/setup-agent-terraform/documentdb"}]},{"group":"Troubleshooting","pages":[{"title":"Database Monitoring Troubleshooting","sidebarTitle":"Overview","href":"/database-monitoring/troubleshooting/overview"},{"title":"Configure MySQL Plugin for UNIX Socket","href":"/database-monitoring/troubleshooting/mysql-plugin-unix-socket-configuration"},{"title":"MySQL Monitoring for DigitalOcean Managed MySQL Databases","href":"/database-monitoring/troubleshooting/mysql-monitoring-digitalocean"},{"title":"Enable SQL Server TCP/IP Port 1433 for Atatus Integration","sidebarTitle":"Enable SQL Server TCP/IP Configuration for Windows","href":"/database-monitoring/troubleshooting/sqlserver-windows-tcp-configuration"}]}]},{"group":"Logs Monitoring","pages":[{"title":"Log Monitoring Overview","sidebarTitle":"Overview","href":"/logs-monitoring/overview"},{"title":"Log Search Syntax","sidebarTitle":"Search Syntax","href":"/logs-monitoring/search-syntax"},{"group":"Integrations","pages":[{"title":"Log Monitoring Modules Integration","sidebarTitle":"Overview","href":"/logs-monitoring/modules/overview"},{"title":"Custom Files - Log Monitoring","sidebarTitle":"Custom Files","href":"/logs-monitoring/modules/custom-files"},{"title":"Windows Event Logs","href":"/logs-monitoring/modules/windows-event-logs"},{"title":"Apache - Log Monitoring","sidebarTitle":"Apache","href":"/logs-monitoring/modules/apache"},{"title":"Docker - Log Monitoring","sidebarTitle":"Docker","href":"/logs-monitoring/modules/docker"},{"title":"Elasticsearch Logs Monitoring","sidebarTitle":"Elasticsearch","href":"/logs-monitoring/modules/elasticsearch"},{"title":"HAProxy Logs Monitoring","sidebarTitle":"HAProxy","href":"/logs-monitoring/modules/haproxy"},{"title":"MongoDB Logs Monitoring","sidebarTitle":"MongoDB","href":"/logs-monitoring/modules/mongodb"},{"title":"MySQL Logs Monitoring","sidebarTitle":"MySQL","href":"/logs-monitoring/modules/mysql"},{"title":"NGINX Logs Monitoring","sidebarTitle":"NGINX","href":"/logs-monitoring/modules/nginx"},{"title":"PostgreSQL Logs Monitoring","sidebarTitle":"PostgreSQL","href":"/logs-monitoring/modules/postgresql"},{"title":"Redis Logs Monitoring","sidebarTitle":"Redis","href":"/logs-monitoring/modules/redis"},{"title":"Application Logging in AWS Elastic Beanstalk","sidebarTitle":"AWS Elastic Beanstalk","href":"/logs-monitoring/modules/elastic-beanstack"},{"group":"AWS ECS","pages":[{"title":"AWS ECS Logs Integration Overview","sidebarTitle":"Overview","href":"/logs-monitoring/modules/aws-ecs/overview"},{"title":"AWS ECS Logging Setup with Atatus (Fargate + Fluent Bit)","sidebarTitle":"Atatus Logs Only","href":"/logs-monitoring/modules/aws-ecs/atatus-logs-only"},{"title":"AWS ECS Logging Setup with Atatus and Cloudwatch (Fargate + Fluent Bit)","sidebarTitle":"CloudWatch + Atatus Logs","href":"/logs-monitoring/modules/aws-ecs/cloudwatch-and-atatus-logs"},{"title":"AWS ECS Logging Setup with Atatus and Loki (Fargate + Fluent Bit)","sidebarTitle":"Atatus + Loki Logs","href":"/logs-monitoring/modules/aws-ecs/atatus-and-loki-logs"},{"title":"AWS ECS Logging Setup with Atatus + Loki + CloudWatch (Fargate + Fluent Bit)","sidebarTitle":"Loki + CloudWatch + Atatus Logs","href":"/logs-monitoring/modules/aws-ecs/loki-cloudwatch-and-atatus-logs"}]},{"title":"Heroku Logs","sidebarTitle":"Heroku","href":"/logs-monitoring/modules/heroku-logs"},{"title":"Collect Node.js Logs using Atatus Winston Logger","sidebarTitle":"Node.js Logging","href":"/logs-monitoring/modules/nodejs-logging"},{"title":"Logs Ingest API","sidebarTitle":"Log Ingest API","href":"/logs-monitoring/modules/log-ingest-api"}]},{"group":"Configurations","pages":[{"title":"Log Configuration","sidebarTitle":"Overview","href":"/logs-monitoring/configuration/overview"},{"title":"Log Grouping","href":"/logs-monitoring/configuration/log-grouping"},{"group":"Log Pipeline","pages":[{"title":"Log Pipeline","sidebarTitle":"Pipelines","href":"/logs-monitoring/configuration/log-pipeline/pipelines"},{"title":"Processor","href":"/logs-monitoring/configuration/log-pipeline/processor"},{"title":"Log Remapper","href":"/logs-monitoring/configuration/log-pipeline/log-remapper"}]}]},{"group":"Archives","pages":[{"title":"Amazon S3 Log Archiving","sidebarTitle":"Automatic S3 archive export","href":"/logs-monitoring/archives/archive-s3"}]},{"group":"Troubleshooting","pages":[{"title":"Log Monitoring Troubleshooting","sidebarTitle":"Overview","href":"/logs-monitoring/troubleshooting/overview"},{"title":"Unable to see data in logs","sidebarTitle":"Unable to see data in Logs","href":"/logs-monitoring/troubleshooting/unable-to-see-data-in-logs"},{"title":"Laravel error log parsing rule","href":"/logs-monitoring/troubleshooting/laravel-error-log-parsing"}]}]},{"group":"Kubernetes Monitoring","pages":[{"title":"Kubernetes Monitoring Overview","sidebarTitle":"Overview","href":"/kubernetes-monitoring/overview"},{"group":"Installation","pages":[{"title":"Install Atatus Agent on Kubernetes Using Helm Chart","sidebarTitle":"Helm","href":"/kubernetes-monitoring/installation/helm-chart"}]},{"title":"Customizing Agent - Kubernetes Monitoring","sidebarTitle":"Customizing Agent","href":"/kubernetes-monitoring/customizing-agent"},{"group":"Uninstallation","pages":[{"title":"Uninstall Atatus Agent on Kubernetes Using Helm Chart","sidebarTitle":"Helm","href":"/kubernetes-monitoring/uninstallation/helm-chart"}]}]},{"group":"Synthetic Monitoring","pages":[{"title":"Synthetic(Uptime) Monitoring Overview","sidebarTitle":"Overview","href":"/synthetic-monitoring/overview"},{"group":"API Checks","pages":[{"title":"API checks - Uptime Monitoring","sidebarTitle":"Overview","href":"/synthetic-monitoring/api-checks"},{"title":"HTTP (Website) Checks - Synthetic(Uptime) Monitoring","sidebarTitle":"HTTP Check","href":"/synthetic-monitoring/http-check"},{"title":"SSL Expiration Checks - Synthetic(Uptime) Monitoring","sidebarTitle":"SSL Check","href":"/synthetic-monitoring/ssl-check"},{"title":"DNS Performance Check - Synthetic(Uptime) Monitoring","sidebarTitle":"DNS Check","href":"/synthetic-monitoring/dns-check"},{"title":"TCP Checks - Synthetic(Uptime) Monitoring","sidebarTitle":"TCP Check","href":"/synthetic-monitoring/tcp-check"},{"title":"ICMP checks - Synthetic(Uptime) Monitoring","sidebarTitle":"ICMP Check","href":"/synthetic-monitoring/icmp-check"}]},{"title":"Multistep API Checks - Synthetic Monitoring","sidebarTitle":"Multistep API Checks","href":"/synthetic-monitoring/multistep-api-check"},{"title":"Whitelisting IPs for Synthetic Monitoring","sidebarTitle":"Whitelist IPs","href":"/synthetic-monitoring/whitelist-ips"}]},{"group":"Network Monitoring","pages":[{"title":"Network Monitoring Overview","sidebarTitle":"Overview","href":"/network-monitoring/overview"},{"group":"Network Device Monitoring","pages":[{"group":"Setup","pages":[{"title":"Supported Devices","href":"/network-monitoring/networkdevice-monitoring/supported_devices"},{"title":"SNMP Metrics","href":"/network-monitoring/networkdevice-monitoring/snmp_metrics"},{"title":"SNMP Traps","href":"/network-monitoring/networkdevice-monitoring/snmp_traps"},{"title":"Ping Monitoring","href":"/network-monitoring/networkdevice-monitoring/ping_monitoring"},{"title":"VPN Monitoring","href":"/network-monitoring/networkdevice-monitoring/vpn_monitoring"}]}]},{"group":"NetFlow Monitoring","pages":[{"title":"NetFlow Monitoring","sidebarTitle":"Setup","href":"/network-monitoring/netflow-monitoring/setup"}]},{"group":"Network Path Monitoring","pages":[{"title":"Network Path Monitoring","sidebarTitle":"Setup","href":"/network-monitoring/networkpath-monitoring/setup"}]}]},{"group":"Profiling","pages":[{"title":"Profiling","sidebarTitle":"Overview","href":"/profiling/overview"},{"title":"Profiling Types","href":"/profiling/profiling-types"},{"group":"Enable Profiling","pages":[{"title":"Go Profiling Agent","sidebarTitle":"Go","href":"/profiling/go"},{"title":"Java Profiling Agent","sidebarTitle":"Java","href":"/profiling/java"},{"title":"Node.js Profiling","sidebarTitle":"Node.js","href":"/profiling/nodejs"}]}]},{"group":"API Analytics","pages":[{"title":"API Analytics","sidebarTitle":"Overview","href":"/api-analytics/overview"},{"group":"Integrations","pages":[{"title":"API Analytics Integrations","sidebarTitle":"Overview","href":"/api-analytics/integrations/overview"},{"title":"Kong Gateway API Analytics","sidebarTitle":"Kong Gateway","href":"/api-analytics/integrations/kong-gateway-api-analytics"},{"title":"Atatus Plugin for NGINX","sidebarTitle":"OpenResty","href":"/api-analytics/integrations/openresty"}]}]},{"group":"LLM Monitoring","pages":[{"title":"LLM Monitoring Overview","sidebarTitle":"Overview","href":"/llm-monitoring/overview"},{"title":"Getting Started with LLM Monitoring","sidebarTitle":"Getting Started","href":"/llm-monitoring/getting-started"},{"group":"APM Agents","pages":[{"title":"Node.js LLM Monitoring","sidebarTitle":"Node.js","href":"/llm-monitoring/apm-agents/nodejs"},{"title":"Python LLM Monitoring","sidebarTitle":"Python","href":"/llm-monitoring/apm-agents/python"},{"title":"LLM Monitoring Troubleshooting","sidebarTitle":"Troubleshooting","href":"/llm-monitoring/apm-agents/troubleshooting"}]},{"group":"Coding Agents","pages":[{"title":"Coding Agent Monitoring","sidebarTitle":"Overview","href":"/llm-monitoring/coding-agents/overview"},{"title":"Install Coding Agent Tracing","sidebarTitle":"Installation","href":"/llm-monitoring/coding-agents/installation"},{"title":"Antigravity Tracing","sidebarTitle":"Antigravity","href":"/llm-monitoring/coding-agents/antigravity"},{"title":"Claude Code Tracing","sidebarTitle":"Claude Code","href":"/llm-monitoring/coding-agents/claude-code"},{"title":"Codex CLI Tracing","sidebarTitle":"Codex CLI","href":"/llm-monitoring/coding-agents/codex"},{"title":"Cursor Tracing","sidebarTitle":"Cursor","href":"/llm-monitoring/coding-agents/cursor"},{"title":"Devin CLI Tracing","sidebarTitle":"Devin","href":"/llm-monitoring/coding-agents/devin"},{"title":"Gemini CLI Tracing","sidebarTitle":"Gemini CLI","href":"/llm-monitoring/coding-agents/gemini-cli"},{"title":"GitHub Copilot Tracing","sidebarTitle":"GitHub Copilot","href":"/llm-monitoring/coding-agents/copilot"},{"title":"Kiro CLI Tracing","sidebarTitle":"Kiro CLI","href":"/llm-monitoring/coding-agents/kiro"},{"title":"opencode Tracing","sidebarTitle":"opencode","href":"/llm-monitoring/coding-agents/opencode"},{"title":"omp Tracing","sidebarTitle":"omp","href":"/llm-monitoring/coding-agents/omp"},{"title":"Coding Agent Configuration","sidebarTitle":"Configuration","href":"/llm-monitoring/coding-agents/configuration"},{"title":"Coding Agent Privacy and Data Capture","sidebarTitle":"Privacy and Data Capture","href":"/llm-monitoring/coding-agents/privacy"},{"title":"Uninstall Coding Agent Tracing","sidebarTitle":"Uninstall","href":"/llm-monitoring/coding-agents/uninstall"}]},{"group":"Evaluators","pages":[{"title":"Evaluators Overview","sidebarTitle":"Overview","href":"/llm-monitoring/evaluators/overview"},{"title":"Create Your First Evaluator","href":"/llm-monitoring/evaluators/getting-started"},{"title":"Evaluator Templates","sidebarTitle":"Templates","href":"/llm-monitoring/evaluators/templates"},{"title":"Reading Verdicts","href":"/llm-monitoring/evaluators/verdicts"},{"title":"Sampling and Backfill","href":"/llm-monitoring/evaluators/backfill"},{"title":"Evaluator Troubleshooting","sidebarTitle":"Troubleshooting","href":"/llm-monitoring/evaluators/troubleshooting"}]},{"group":"Reference","pages":[{"title":"LLM Span Kinds","sidebarTitle":"Span Kinds","href":"/llm-monitoring/reference/span-kinds"},{"title":"LLM Cost and Tokens","sidebarTitle":"Cost and Tokens","href":"/llm-monitoring/reference/cost-and-tokens"}]}]},{"group":"OpenTelemetry","pages":[{"title":"Instrument Your Application using OpenTelemetry","sidebarTitle":"Overview","href":"/opentelemetry/overview"},{"group":"Python","pages":[{"title":"Pyhton Application Instrumentation Using OTEL Overview","sidebarTitle":"Overview","href":"/opentelemetry/python/overview"},{"title":"Django OpenTelemetry Instrumentation","sidebarTitle":"Django","href":"/opentelemetry/python/opentelemetry-django"},{"title":"Flask OpenTelemetry Instrumentation","sidebarTitle":"Flask","href":"/opentelemetry/python/opentelemetry-flask"}]},{"group":"Java","pages":[{"title":"Java Application Instrumentation Using OTEL Overview","sidebarTitle":"Overview","href":"/opentelemetry/java/overview"},{"title":"Spring Boot OpenTelemetry Instrumentation","sidebarTitle":"Spring Boot","href":"/opentelemetry/java/opentelemetry-springboot"},{"title":"Apache Tomcat OpenTelemetry Instrumentation","sidebarTitle":"Apache Tomcat","href":"/opentelemetry/java/opentelemetry-tomcat"},{"title":"JBoss OpenTelemetry Instrumentation","sidebarTitle":"JBoss","href":"/opentelemetry/java/opentelemetry-jboss"}]},{"group":"Ruby","pages":[{"title":"Ruby Application Instrumentation Using OTEL Overview","sidebarTitle":"Overview","href":"/opentelemetry/ruby/overview"},{"title":"Ruby on Rails OpenTelemetry Instrumentation","sidebarTitle":"Ruby on Rails","href":"/opentelemetry/ruby/opentelemetry-ruby-on-rails"}]},{"group":"Java Script","pages":[{"title":"JavaScript Application Instrumentation Using OTEL Overview","sidebarTitle":"Overview","href":"/opentelemetry/javascript/overview"},{"title":"Express.js OpenTelemetry Instrumentation","sidebarTitle":"Express","href":"/opentelemetry/javascript/opentelemetry-express"},{"title":"Nest.js OpenTelemetry Instrumentation","sidebarTitle":"NestJS","href":"/opentelemetry/javascript/opentelemetry-nestjs"},{"title":"Next.js OpenTelemetry Instrumentation","sidebarTitle":"NextJs","href":"/opentelemetry/javascript/opentelemetry-nextjs"},{"title":"Angular OpenTelemetry Instrumentation","sidebarTitle":"Angular","href":"/opentelemetry/javascript/opentelemetry-angular"}]},{"title":"PHP OpenTelemetry Instrumentation","sidebarTitle":"PHP","href":"/opentelemetry/php/opentelemetry-php"},{"title":".NET OpenTelemetry Instrumentation","sidebarTitle":".NET","href":"/opentelemetry/dotnet/opentelemetry-dotnet"},{"group":"Integrations","pages":[{"title":"Nginx OpenTelemetry Instrumentation","sidebarTitle":"Nginx","href":"/opentelemetry/integrations/nginx/opentelemetry-nginx"}]},{"group":"OTel Collector","pages":[{"title":"OpenTelemetry Collector Configuration","sidebarTitle":"Configuration","href":"/opentelemetry/collector/configuration"}]},{"group":"Serverless","pages":[{"title":"Serverless Monitoring Using OTEL Overview","sidebarTitle":"Overview","href":"/opentelemetry/serverless/overview"},{"group":"AWS Lambda","pages":[{"title":"AWS Lambda Monitoring OTEL Overview","sidebarTitle":"Overview","href":"/opentelemetry/serverless/aws-lambda/overview"},{"title":"AWS Lambda Serverless Monitoring in Node.js","sidebarTitle":"Node.js","href":"/opentelemetry/serverless/aws-lambda/nodejs"},{"title":"AWS Lambda Serverless Monitoring in Python","sidebarTitle":"Python","href":"/opentelemetry/serverless/aws-lambda/python"},{"title":"AWS Lambda Serverless Monitoring in Java","sidebarTitle":"Java","href":"/opentelemetry/serverless/aws-lambda/java"}]},{"group":"GCP Cloud Function","pages":[{"title":"GCP Cloud Function Monitoring Overview","sidebarTitle":"Overview","href":"/opentelemetry/serverless/cloud-function/overview"},{"title":"GCP Cloud Function Serverless Monitoring in Go","sidebarTitle":"Go","href":"/opentelemetry/serverless/cloud-function/go"},{"title":"GCP Cloud Function Serverless Monitoring in Node.js","sidebarTitle":"Node.js","href":"/opentelemetry/serverless/cloud-function/nodejs"}]}]}]},{"group":"MCP Server","pages":[{"title":"MCP Server Overview","sidebarTitle":"Overview","href":"/mcp-server/overview"},{"title":"Installation","href":"/mcp-server/installation"},{"title":"Tool Reference","href":"/mcp-server/tools-reference"},{"title":"Troubleshooting \u0026 FAQ","href":"/mcp-server/troubleshooting"}]},{"group":"Integration","pages":[{"title":"Integrations","sidebarTitle":"Overview","href":"/integration/overview"},{"title":"Prometheus Integration","sidebarTitle":"Prometheus","href":"/integration/prometheus"},{"title":"StatsD Integration","sidebarTitle":"StatsD","href":"/integration/statsd"},{"title":"CockroachDB Integration","sidebarTitle":"CockroachDB","href":"/integration/cockroachdb"},{"title":"Lighthouse Integration","sidebarTitle":"LightHouse","href":"/integration/lighthouse"},{"title":"Ping Integration","sidebarTitle":"Ping","href":"/integration/ping"},{"title":"Cassandra Integration","sidebarTitle":"Cassandra","href":"/integration/cassandra"},{"title":"RabbitMQ Integration","sidebarTitle":"RabbitMQ","href":"/integration/rabbitmq"},{"title":"Apache Integration","sidebarTitle":"Apache","href":"/integration/apache"},{"title":"NGINX Integration","sidebarTitle":"NGINX","href":"/integration/nginx"},{"title":"Redis Integration","sidebarTitle":"Redis","href":"/integration/redis"}]},{"group":"Cloud Integrations","pages":[{"title":"AWS Integration","sidebarTitle":"AWS","href":"/cloud-integration/aws"},{"group":"Azure","pages":[{"title":"Azure Integration","sidebarTitle":"Overview","href":"/cloud-integration/azure"},{"title":"Move the Azure log forwarder to Kubernetes","sidebarTitle":"Move Log Forwarder to Kubernetes","href":"/cloud-integration/azure-log-forwarder-move-to-kubernetes"}]}]},{"group":"Security","pages":[{"title":"Security Overview","sidebarTitle":"Overview","href":"/security/overview"},{"group":"Cloud SIEM","pages":[{"title":"Audit Log Monitoring","sidebarTitle":"Linux Audit Log","href":"/security/linux-audit-logs/setup"},{"title":"Kubernetes Audit Log Monitoring","sidebarTitle":"Kubernetes Audit Log (Self Hosted)","href":"/security/kubernetes-audit-logs/setup"},{"title":"Linux Syslog","href":"/security/linux-syslog/setup"},{"title":"AWS CloudTrail","sidebarTitle":"AWS CloudTrail (S3)","href":"/security/aws-cloudtrail/setup"},{"title":"AWS VPC Flow Logs","sidebarTitle":"AWS VPC Flow Logs (S3)","href":"/security/aws-vpc-flow/setup"},{"title":"Reading an S3 bucket in another AWS account","sidebarTitle":"AWS cross-account role","href":"/security/aws-s3-role/setup"},{"group":"Integrations","pages":[{"title":"Cloud SIEM Integrations","sidebarTitle":"Overview","href":"/security/integrations/overview"},{"group":"Identity","pages":[{"title":"Okta","href":"/security/integrations/okta"},{"title":"OneLogin","href":"/security/integrations/onelogin"},{"title":"Auth0","href":"/security/integrations/auth0"},{"title":"Azure Active Directory","href":"/security/integrations/azure-ad"},{"title":"Google Workspace","href":"/security/integrations/google-workspace"}]},{"group":"DevOps","pages":[{"title":"GitHub","href":"/security/integrations/github"},{"title":"GitLab","href":"/security/integrations/gitlab"},{"title":"Bitbucket","href":"/security/integrations/bitbucket"},{"title":"CircleCI","href":"/security/integrations/circleci"},{"title":"Jenkins","href":"/security/integrations/jenkins"},{"title":"PagerDuty","href":"/security/integrations/pagerduty"}]},{"group":"AWS","pages":[{"title":"AWS CloudTrail","href":"/security/integrations/aws-cloudtrail"},{"title":"AWS CloudWatch Logs","href":"/security/integrations/aws-cloudwatch"},{"title":"AWS GuardDuty","href":"/security/integrations/aws-guardduty"},{"title":"AWS VPC Flow Logs","href":"/security/integrations/aws-vpc-flow-logs"},{"title":"AWS WAF","href":"/security/integrations/aws-waf"},{"title":"AWS EKS","href":"/security/integrations/aws-eks"}]},{"group":"Azure","pages":[{"title":"Azure Event Hub","href":"/security/integrations/azure-eventhub"},{"title":"Azure Firewall","href":"/security/integrations/azure-firewall"},{"title":"Azure Sentinel","href":"/security/integrations/azure-sentinel"},{"title":"Azure Kubernetes Service (AKS)","href":"/security/integrations/azure-aks"}]},{"group":"GCP","pages":[{"title":"Google Cloud Platform","href":"/security/integrations/google-cloud-platform"},{"title":"GCP Security Command Center","href":"/security/integrations/gcp-scc"},{"title":"GCP Kubernetes Engine (GKE)","href":"/security/integrations/gke"}]},{"group":"Productivity","pages":[{"title":"Office 365","href":"/security/integrations/office365"},{"title":"Slack","href":"/security/integrations/slack"},{"title":"Zoom","href":"/security/integrations/zoom"}]},{"group":"Security and Network","pages":[{"title":"CrowdStrike","href":"/security/integrations/crowdstrike"},{"title":"Palo Alto Networks","href":"/security/integrations/palo-alto"},{"title":"SentinelOne","href":"/security/integrations/sentinelone"},{"title":"Carbon Black","href":"/security/integrations/carbon-black"},{"title":"Akamai","href":"/security/integrations/akamai"},{"title":"Cloudflare","href":"/security/integrations/cloudflare"},{"title":"Fortinet","href":"/security/integrations/fortinet"},{"title":"Cisco","href":"/security/integrations/cisco"},{"title":"Juniper","href":"/security/integrations/juniper"},{"title":"F5","href":"/security/integrations/f5"}]}]}]},{"group":"Detection Rules \u0026 Signals","pages":[{"title":"Detection Rules and Signals Overview","sidebarTitle":"Overview","href":"/security/detection-rules/overview"},{"title":"Creating Custom Detection Rules","sidebarTitle":"Creating Custom Rules","href":"/security/detection-rules/custom-rules"},{"title":"Filter Query Syntax","href":"/security/detection-rules/filter-syntax"},{"title":"Investigating Signals","href":"/security/detection-rules/signals"}]},{"group":"Sensitive Data Classifier","pages":[{"title":"Sensitive Data Classifier Overview","sidebarTitle":"Overview","href":"/security/sensitive-data-classifier/overview"},{"title":"Set Up the Sensitive Data Classifier","sidebarTitle":"Setup","href":"/security/sensitive-data-classifier/setup"},{"title":"Scanning Groups","href":"/security/sensitive-data-classifier/scanning-groups"},{"title":"Scanning Rules","href":"/security/sensitive-data-classifier/scanning-rules"},{"title":"Library Rules","href":"/security/sensitive-data-classifier/library-rules"},{"title":"Custom Rules","href":"/security/sensitive-data-classifier/custom-rules"},{"title":"Investigate Sensitive Data","href":"/security/sensitive-data-classifier/investigate-findings"}]},{"group":"File Integrity Monitoring","pages":[{"title":"File Integrity Monitoring","sidebarTitle":"Setup","href":"/security/file-integrity-monitoring/setup"}]}]},{"group":"Alerting","pages":[{"title":"Alerts Overview","sidebarTitle":"Overview","href":"/alerting/alert-overview"},{"title":"Alert Policies","href":"/alerting/alert-policies"},{"title":"Alert Rule","sidebarTitle":"Rules","href":"/alerting/alert-rules"},{"title":"Alert Incidents","sidebarTitle":"Incidents","href":"/alerting/alert-incidents"},{"title":"Alert Issues","sidebarTitle":"Issues","href":"/alerting/alert-issues"},{"title":"Alert Events","sidebarTitle":"Events","href":"/alerting/alert-events"},{"title":"Alert Threshold","sidebarTitle":"Thresholds","href":"/alerting/set-thresholds"},{"title":"Alert Notification Channels","sidebarTitle":"Notification Channels","href":"/alerting/alert-notification-channels"},{"title":"Browser alerts","sidebarTitle":"Browser Alerts","href":"/alerting/browser-alerts"},{"title":"APM alerts","sidebarTitle":"APM Alerts","href":"/alerting/apm-alerts"},{"title":"Infrastructure Alerts","href":"/alerting/infra-alerts"},{"title":"Kubernetes alerts","sidebarTitle":"Kubernetes Alerts","href":"/alerting/kubernetes-alerts"},{"title":"Logs Alerts","href":"/alerting/logs-alerts"},{"title":"Analytics Alerts","href":"/alerting/analytics-alerts"},{"title":"Baseline Alerts","href":"/alerting/baseline-alerts"},{"title":"Maintenance windows","sidebarTitle":"Maintenance Windows","href":"/alerting/maintenance-windows"},{"title":"SLO alerts","sidebarTitle":"SLO Alerts","href":"/alerting/slo-alerts"},{"title":"Alerting best practices","sidebarTitle":"Best Practices","href":"/alerting/best-practices"}]},{"group":"Flow View","pages":[{"title":"Flow View Overview","sidebarTitle":"Overview","href":"/flowview-guide/overview"},{"title":"Navigating the Graph","href":"/flowview-guide/navigating-the-graph"},{"title":"Service Dependency View","sidebarTitle":"Service Dependency","href":"/flowview-guide/service-dependency"},{"title":"Kubernetes Overview","href":"/flowview-guide/kubernetes-overview"},{"title":"Infrastructure Overview","href":"/flowview-guide/infrastructure-overview"},{"title":"Problems View","href":"/flowview-guide/problems"}]},{"group":"Problems Guide","pages":[{"title":"Problems Overview","href":"/problems-guide/problems-overview"},{"title":"Viewing \u0026 Filtering Problems","href":"/problems-guide/problems-viewing"},{"title":"Problem Details","href":"/problems-guide/problem-details"},{"title":"AI Root Cause Analysis","href":"/problems-guide/problems-ai-analysis"}]},{"group":"Product Guide","pages":[{"title":"Product Guide Overview","sidebarTitle":"Overview","href":"/product-guide/overview"},{"title":"Apdex","href":"/product-guide/apdex"},{"title":"Whitelist URLs","href":"/product-guide/whitelist-urls"},{"title":"Inbound Filters","href":"/product-guide/inbound-filter"},{"title":"Source Maps","href":"/product-guide/source-maps"},{"group":"Deployment Tracking","pages":[{"title":"Deployment Tracking Overview","sidebarTitle":"Overview","href":"/product-guide/deployment-tracking/overview"},{"title":"Bash - Deployment Tracking","sidebarTitle":"Bash","href":"/product-guide/deployment-tracking/bash"},{"title":"Travis CI","href":"/product-guide/deployment-tracking/travis-ci"},{"title":"Heroku","href":"/product-guide/deployment-tracking/heroku"},{"title":"Engine Yard","href":"/product-guide/deployment-tracking/engine-yard"},{"title":"Fabric","href":"/product-guide/deployment-tracking/fabric"}]},{"group":"Account Management","pages":[{"title":"Account Management Overview","sidebarTitle":"Overview","href":"/product-guide/accounting/overview"},{"title":"Roles and Users","sidebarTitle":"Roles \u0026 Users","href":"/product-guide/accounting/roles-users"},{"title":"Sub-Accounts","href":"/product-guide/accounting/sub-accounts"},{"title":"Billing and Invoice","sidebarTitle":"Billing \u0026 Invoices","href":"/product-guide/accounting/billing-and-invoices"}]},{"group":"Tool Integrations","pages":[{"title":"Tool Integrations Overview","sidebarTitle":"Overview","href":"/product-guide/tool-integrations/overview"},{"group":"Issue Tracking","pages":[{"title":"Asana","icon":"/images/integrations/asana.png","href":"/product-guide/tool-integrations/asana"},{"title":"Azure DevOps","icon":"/images/integrations/azuredevops.png","href":"/product-guide/tool-integrations/azuredevops"},{"title":"BigPanda","icon":"/images/integrations/bigpanda.png","href":"/product-guide/tool-integrations/bigpanda"},{"title":"BugHerd","icon":"/images/integrations/bugherd.png","href":"/product-guide/tool-integrations/bugherd"},{"title":"Codeship","icon":"/images/integrations/codeship.png","href":"/product-guide/tool-integrations/codeship"},{"title":"ClickUp","icon":"/images/integrations/clickup.png","href":"/product-guide/tool-integrations/clickup"},{"title":"Flowdock","icon":"/images/integrations/flowdock.png","href":"/product-guide/tool-integrations/flowdock"},{"title":"GitHub","icon":"/images/integrations/github.png","href":"/product-guide/tool-integrations/github"},{"title":"GitLab","icon":"/images/integrations/gitlab.svg","href":"/product-guide/tool-integrations/gitlab"},{"title":"JIRA Integration","sidebarTitle":"Jira","icon":"/images/integrations/jira.png","href":"/product-guide/tool-integrations/jira"},{"title":"Linear","icon":"/images/integrations/linear.png","href":"/product-guide/tool-integrations/linear"},{"title":"Lighthouse","icon":"/images/integrations/lighthouse.png","href":"/product-guide/tool-integrations/lighthouse"},{"title":"PivotalTracker","sidebarTitle":"Pivotal Tracker","icon":"/images/integrations/pivotaltracker.png","href":"/product-guide/tool-integrations/pivotaltracker"},{"title":"ServiceNow","icon":"/images/integrations/servicenow.png","href":"/product-guide/tool-integrations/servicenow"},{"title":"YouTrack","icon":"/images/integrations/youtrack.png","href":"/product-guide/tool-integrations/youtrack"}]},{"group":"Notifications","pages":[{"title":"Campfire","icon":"/images/integrations/campfire.png","href":"/product-guide/tool-integrations/campfire"},{"title":"Google Chat","href":"/product-guide/tool-integrations/google-chat"},{"title":"HipChat","icon":"/images/integrations/hipchat.png","href":"/product-guide/tool-integrations/hipchat"},{"title":"Microsoft Teams","icon":"/images/integrations/teams.png","href":"/product-guide/tool-integrations/teams"},{"title":"OpsGenie","icon":"/images/integrations/opsgenie.png","href":"/product-guide/tool-integrations/opsgenie"},{"title":"PagerDuty","icon":"/images/integrations/pagerduty.png","href":"/product-guide/tool-integrations/pagerduty"},{"title":"Slack","icon":"/images/integrations/slack.png","href":"/product-guide/tool-integrations/slack"},{"title":"VictorOps","icon":"/images/integrations/victorops.png","href":"/product-guide/tool-integrations/victorops"},{"title":"Twilio (SMS)","icon":"/images/integrations/twilio.png","href":"/product-guide/tool-integrations/twilio"},{"title":"Webhook","icon":"/images/integrations/webhook.png","href":"/product-guide/tool-integrations/webhook"}]}]},{"title":"How Billing Works","href":"/product-guide/how-billing-works"},{"title":"Atatus Terminology","href":"/product-guide/atatus-terminology"}]},{"group":"Security \u0026 Privacy","pages":[{"title":"Security \u0026 Privacy Overview","sidebarTitle":"Overview","href":"/product-guide/security-privacy/overview"},{"title":"Personally Identifiable Information (PII) Handling \u0026 Data Privacy","sidebarTitle":"PII Handling and Data Privacy","href":"/product-guide/security-privacy/pii-handling-and-data-privacy"},{"title":"Data Retention","href":"/product-guide/security-privacy/data-retention"},{"title":"Two-Factor Authentication (2FA)","sidebarTitle":"Two Factor Authentication","href":"/product-guide/security-privacy/two-factor-authentication"},{"group":"Single sign-on","pages":[{"title":"Single Sign-On (SSO) Overview","sidebarTitle":"Overview","href":"/product-guide/security-privacy/single-sign-on/overview"},{"title":"Okta Single Sign-On (SSO)","description":"Configure SAML 2.0 Single Sign-On for Atatus using Okta as your Identity Provider.","sidebarTitle":"Okta","href":"/product-guide/security-privacy/single-sign-on/okta"},{"title":"Microsoft Entra ID (Azure AD) Single Sign-On","sidebarTitle":"Microsoft Entra ID","href":"/product-guide/security-privacy/single-sign-on/azure"},{"title":"AWS IAM Identity Center Single Sign-On","description":"Configure SAML 2.0 Single Sign-On for Atatus using AWS IAM Identity Center (formerly AWS SSO).","sidebarTitle":"AWS Identity Center","href":"/product-guide/security-privacy/single-sign-on/aws-identity-center"},{"title":"Google Workspace Single Sign-On","sidebarTitle":"Google Workspace","href":"/product-guide/security-privacy/single-sign-on/gsuite"},{"title":"OneLogin Single Sign-On","sidebarTitle":"OneLogin","href":"/product-guide/security-privacy/single-sign-on/one-login"},{"title":"Auth0 Single Sign-On","sidebarTitle":"Auth0","href":"/product-guide/security-privacy/single-sign-on/auth0"},{"title":"JumpCloud Single Sign-On","sidebarTitle":"JumpCloud","href":"/product-guide/security-privacy/single-sign-on/jumpcloud"},{"title":"Keycloak Single Sign-On","sidebarTitle":"Keycloak","href":"/product-guide/security-privacy/single-sign-on/keycloak"},{"title":"Custom SAML 2.0 Identity Provider Setup","sidebarTitle":"Custom SAML 2.0","href":"/product-guide/security-privacy/single-sign-on/generic-saml"},{"title":"SSO Troubleshooting Guide","sidebarTitle":"Troubleshooting","href":"/product-guide/security-privacy/single-sign-on/troubleshooting"},{"title":"Single Sign-On (SSO) FAQ","sidebarTitle":"FAQ","href":"/product-guide/security-privacy/single-sign-on/faq"}]},{"title":"Audit Log","href":"/product-guide/security-privacy/audit-log"}]},{"group":"On-premise","pages":[{"title":"On-Premise Setup for Atatus Agents","sidebarTitle":"Overview","href":"/on-premise/overview"}]}]}]},{"tab":"API reference","pages":[{"title":"API reference","href":"/api/overview"}]},{"tab":"Changelog","pages":[{"title":"Changelog","href":"/release-notes/overview"}]},{"tab":"FAQ","pages":[{"title":"FAQ","href":"/faq/overview"}]}]},"basePath":"","title":"Microsoft Entra ID (Azure AD) Single Sign-On - Atatus Docs","buildId":"3aef62315289","dynamics":["a74be98ba7"],"chunks":["zoom-image-lightbox-g5Lse6v9.js","lightbox-handle-r17bVUz3.js"]}