

What You Will Need
Before you begin, verify that you have:- An Atatus account with the Owner or Admin role.
- Administrative access to the AWS Management Console with IAM Identity Center enabled.
Step 1: Get Service Provider Values from Atatus
- Log in to your Atatus dashboard.
- Navigate to Settings » Account Settings » Single Sign-on.
- Keep this tab open. Copy and record the following parameters:
- Atatus SAML ACS URL:
https://app.atatus.com/login/saml/<ACCOUNT_ID>/acs - Atatus Account Id: Your unique 24-character alphanumeric identifier.
- Atatus SAML ACS URL:
Step 2: Add a Custom Application in AWS IAM Identity Center
- Sign in to the AWS Management Console and open IAM Identity Center.
- In the left navigation pane, select Applications.
- Select the Customer managed tab, then click Add application.
- Choose I have an application I want to set up.
- Under Application type, select SAML 2.0.
- Click Next.
Step 3: Configure Application Properties in AWS
- Under Configure application, enter a Display name (for example,
Atatus). - In the Application metadata section, select Manually type your metadata values:
- Application ACS URL: Paste your Atatus SAML ACS URL.
- Application SAML audience: Paste your Atatus Account Id.
- Click Submit.
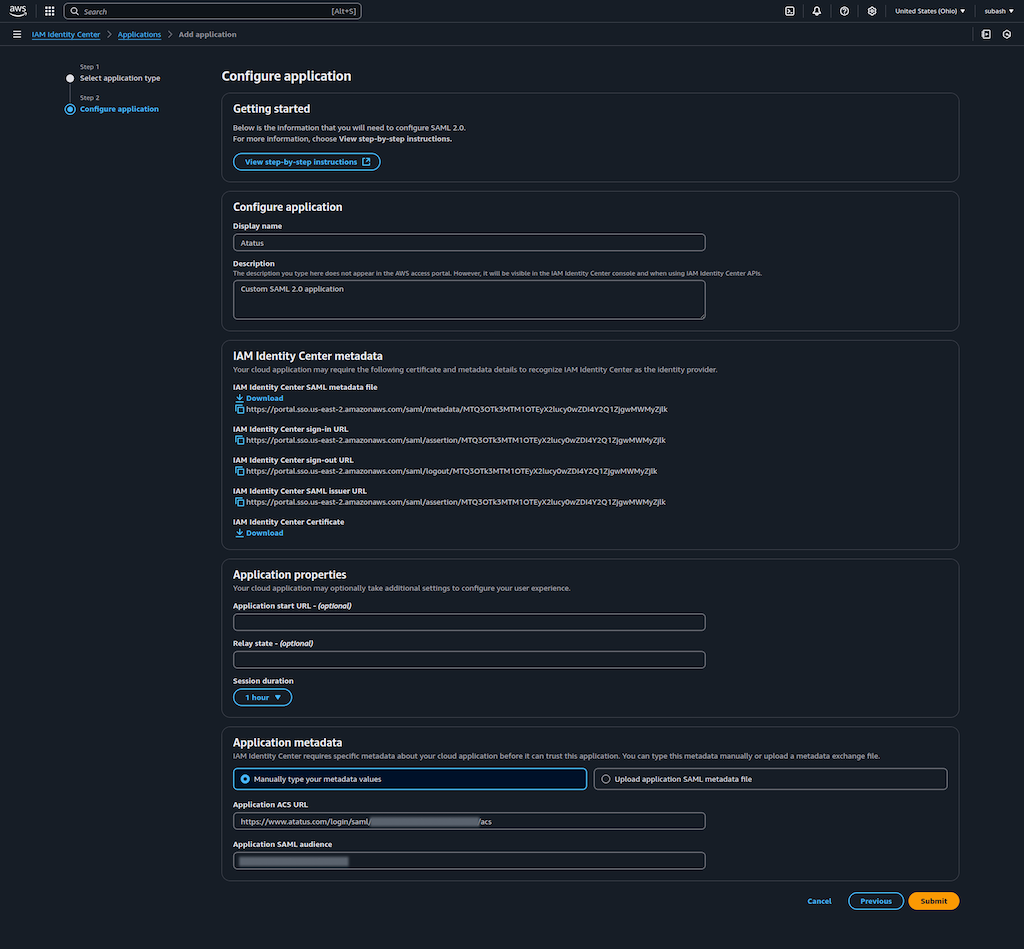
Step 4: Configure SAML Attribute Mapping
- On the application details page, select Actions » Edit attribute mappings.
- Configure the following user attributes and string mappings:
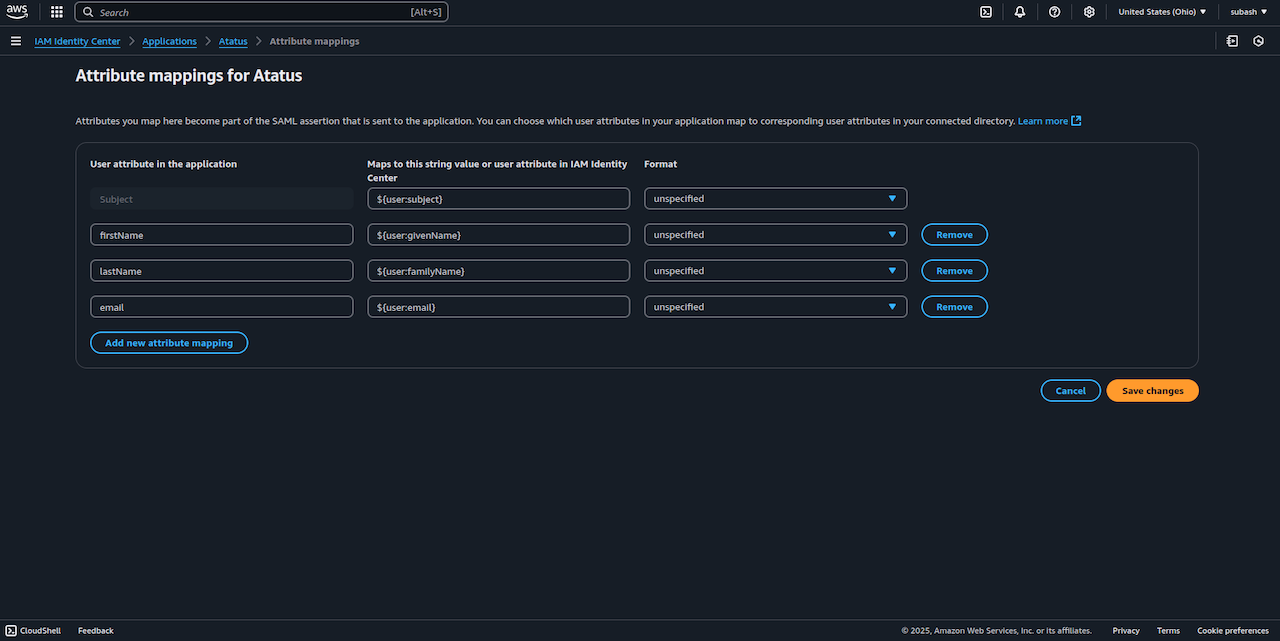
- Click Save changes.
Step 5: Assign Users and Groups in AWS
- On the Atatus application page in IAM Identity Center, select the Assigned users tab.
- Click Assign users.
- Select the individual users or groups who need access to Atatus.
- Click Next, review the assignments, and click Assign users.
Step 6: Download Metadata and Configure Atatus
- In IAM Identity Center, go to Actions » Edit configuration.
- In the IAM Identity Center metadata section, locate the IAM Identity Center SAML metadata file and click Download.
- Return to the Atatus dashboard under Settings » Account Settings » Single Sign-on.
- Under SAML Metadata from your SSO provider, select SAML Metadata XML.
- Click Choose File (or Browse) and upload the downloaded AWS IAM Identity Center metadata file.
- Click Save SSO.
- Confirm that the Enabled toggle switch displays active.
Step 7: Test the SSO Configuration
Always test your SSO integration using an incognito or private browsing window.Test SP-Initiated Login
- Open an incognito browser window.
- Navigate to your Atatus custom login URL:
https://app.atatus.com/login/saml/<ACCOUNT_ID_OR_ALIAS>. - Verify redirection to your AWS access portal login page.
- Sign in with an assigned AWS Identity Center user.
- Confirm successful authentication and entry into the Atatus dashboard.
Test IdP-Initiated Login
- Sign in to your AWS access portal (
https://<your-subdomain>.awsapps.com/start). - Click the Atatus application icon.
- Confirm that you are logged in to Atatus in a new tab.
Troubleshooting AWS Identity Center SSO
Error: “User Not Assigned” in AWS Portal
- Cause: The user has not been granted an assignment in IAM Identity Center.
- Solution: Open the Atatus application in IAM Identity Center, navigate to Assigned users, and assign the user or their group.
Error: “Invalid Audience” / SAML Validation Error
- Cause: The Application SAML audience in AWS does not match the 24-character Atatus Account ID.
- Solution: In AWS Identity Center, select Actions » Edit configuration and ensure the Application SAML audience exactly matches your Atatus Account Id.
Error: Syntax Error in Attribute Mappings
- Cause: Typo in the attribute mapping variable syntax (such as
${user.email}instead of${user:email}). - Solution: Verify that all user attribute mappings use colons (
${user:email},${user:givenName},${user:familyName}).