

What You Will Need
Before you begin, verify that you have:- An Atatus account with the Owner or Admin role.
- An Okta organization with administrative permissions (Super Admin or Application Administrator).
Step 1: Get Service Provider Values from Atatus
- Log in to your Atatus dashboard.
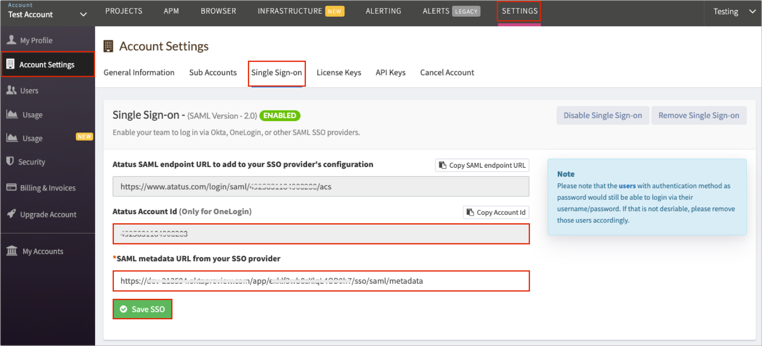
- Navigate to Settings » Account Settings » Single Sign-on.
- Keep this tab open. Copy and save the following values:
- Atatus SAML ACS URL:
https://app.atatus.com/login/saml/<ACCOUNT_ID>/acs - Atatus Account Id: Your unique 24-character alphanumeric identifier (for example,
5b271cc49b002019712c5100).
- Atatus SAML ACS URL:
Step 2: Add Atatus in Okta
- Sign in to your Okta Admin Console.
- In the navigation menu, select Applications » Applications.
- Click Browse App Catalog.
- In the search bar, type Atatus and select the Atatus application from the results.
- Click Add Integration.
- On the General Settings screen, review the application label and click Done.
Step 3: Configure SAML in Okta
- In the Atatus application settings in Okta, select the Sign On tab.
- Locate the Settings section and click Edit.
- Scroll down to the Advanced Sign-on Settings section:
- In the Atatus Account Id field, paste the Atatus Account Id you copied in Step 1.
- Click Save.
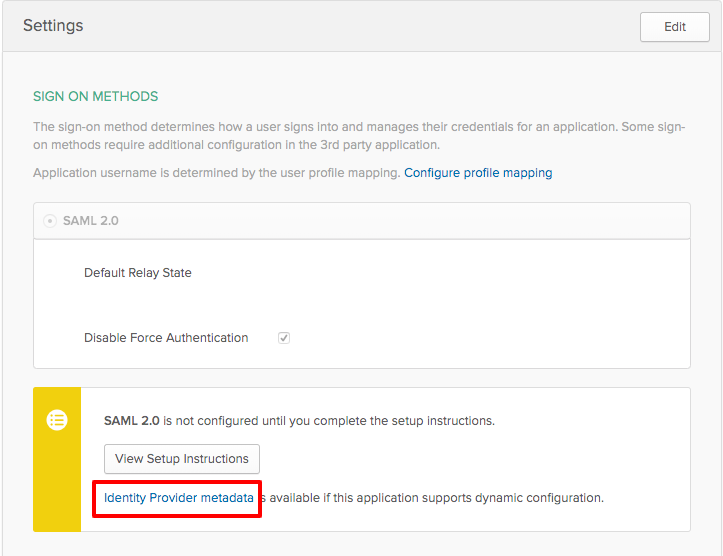
- Under the SAML 2.0 section on the Sign On tab, locate Metadata details.
- Right-click the Identity Provider metadata link and click Copy link address.
Step 4: Configure SAML Attribute Mapping
The pre-built Okta Atatus catalog integration automatically passes user attributes. If you create a custom SAML 2.0 app integration in Okta, configure the following attribute statements:Atatus matches attributes by exact key name. Missing first names default to the user’s email address, and missing last names default to
-.Step 5: Assign Users and Groups in Okta
Users cannot sign in via SSO until you assign them to the application in Okta:- In your Okta Atatus application view, select the Assignments tab.
- Click Assign, then select Assign to People or Assign to Groups.
- Locate the users or groups requiring access to Atatus and click Assign.
- Verify the user attributes and click Save and Go Back.
- Click Done.
Step 6: Add Okta Metadata in Atatus
- Return to the Atatus dashboard under Settings » Account Settings » Single Sign-on.
- Under SAML Metadata from your SSO provider, select the SAML Metadata URL radio option.
- Paste the Okta Identity Provider metadata link copied in Step 3 into the text field.
- Click Save SSO.
- Confirm that the Enabled toggle switch at the top right of the card is turned ON.